Article

Pace by Nino Migliori: Examination, Analysis and Treatment of a Contemporary Color Photography Experimental Artwork

by
Maria Cristina D’Amico
*,
Melissa Gianferrari
and
Andrea Del Bianco
Scuola di Restauro, Accademia di Belle Arti di Bologna—Fine Arts Academy of Bologna, Via delle Belle Arti 54, 40126 Bologna, Italy
*
Author to whom correspondence should be addressed.
Heritage 2023, 6(1), 90-111; https://doi.org/10.3390/heritage6010005
Submission received: 9 November 2022 / Revised: 12 December 2022 / Accepted: 17 December 2022 / Published: 21 December 2022

Abstract

:
The present work intends to focus on the examination, analysis and treatment of Pace, a contemporary color photography experimental artwork created by Nino Migliori in 1973. Given the particular nature of the artifact, in which the photographic materials and the media of contemporary art coexist in a complex interaction, an in-depth study of its creation, structure and components was deemed necessary to plan and perform an adequate conservation treatment. The preliminary research was conducted in order to contextualize the artwork within the author’s production, to understand the creation process, to identify the photographic technique of the print and the stratigraphic sequencing, and to characterize the constituent materials of each layer through non-invasive and micro-invasive diagnostic analysis. The severe detachments and lifts of the print from the underlying aluminum panel and the subsequent planarity alterations of the photograph, strongly compromised the legibility of the artwork and put its future conservation at risk. Therefore, the elaboration of a minimally invasive intervention methodology was required. Approaching contemporary works of art, which are at the same time also photographic objects, can present some theoretical and practical challenges, and in the near future lots of professionals in the field of art conservation are probably going to face analogue conservation problems on similar objects. The results obtained through the preliminary study phase and the conservation treatment may offer a good starting point for further research on how to examine, analyze and treat this kind of photographic objects.

1. Introduction

Pace (
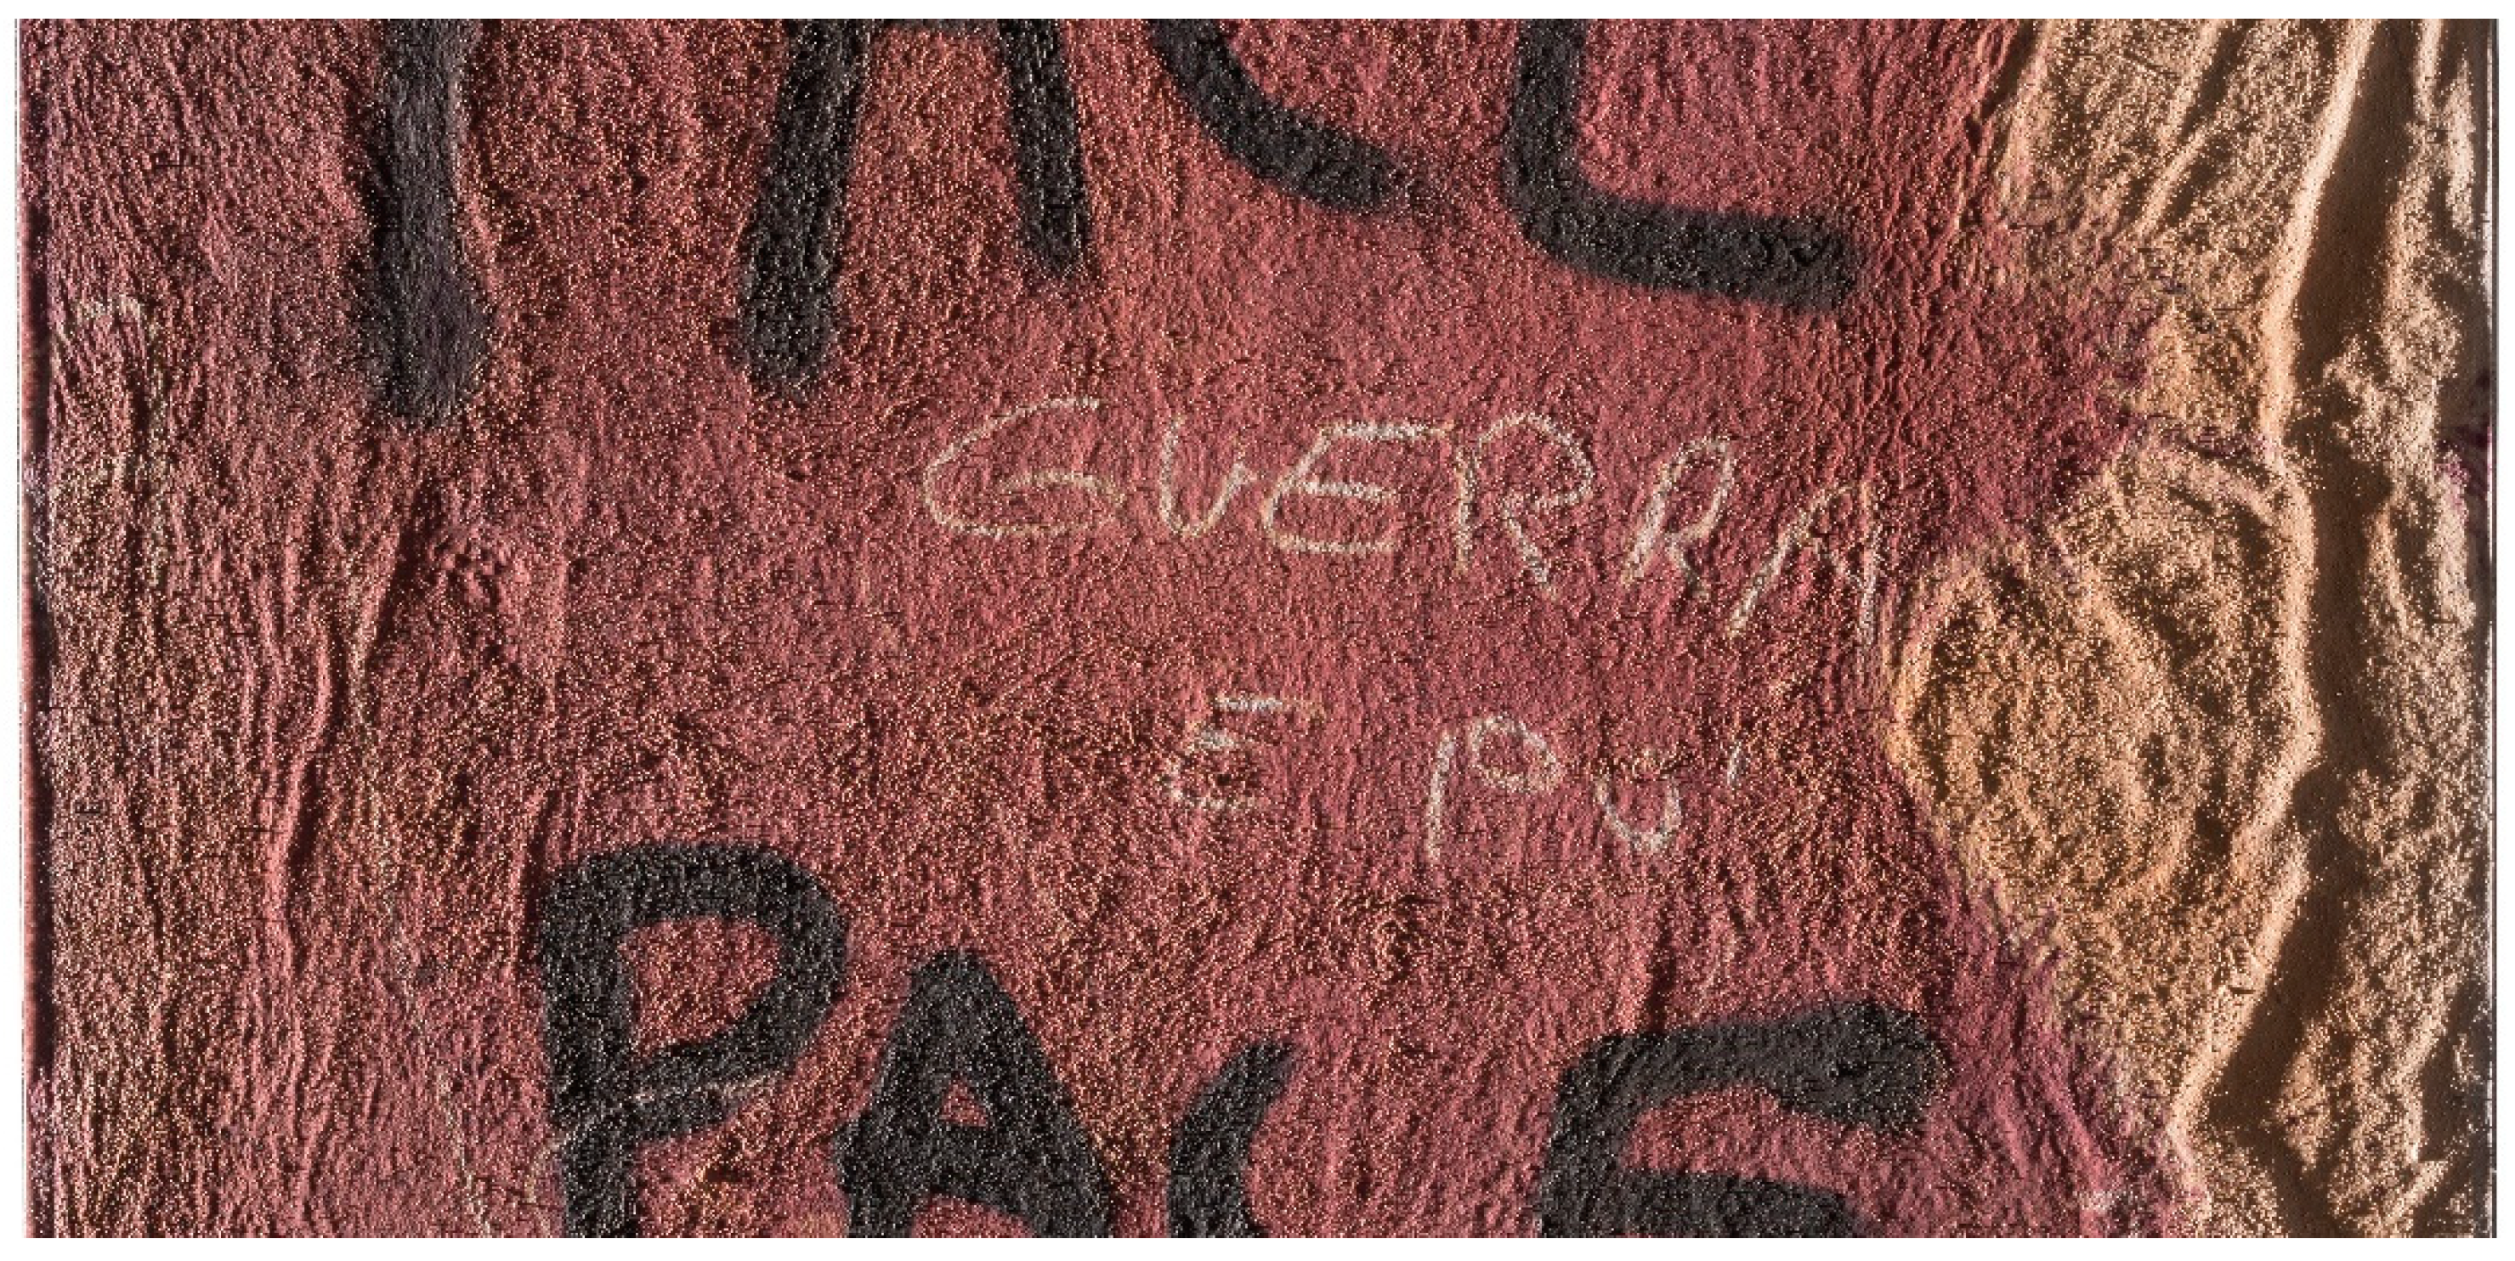
Figure 1) can be described as one of the most experimental artworks created by Nino Migliori. It is part of Walls, a very significant series of the author’s production, and, since 1975, it has been included in the permanent collection of MAMbo—Museum of Modern Art of Bologna [1]. What makes Pace so peculiar is the fact that it is a photo-based artifact, which means it has the characteristics and conservation necessities of both a contemporary artwork and an object of experimental color photography.
At the beginning of 2020, after a state of conservation assessment, Pace was evaluated as being in urgent need for conservation treatment and for this reason, in July of the same year, it was transported to the Conservation Laboratories of the Conservation Department at the Fine Arts Academy of Bologna. Due to the complex structure of the artifact and the uncommon materials used by the author, an extensive preliminary study phase was considered necessary before starting to plan the conservation treatment. Although it was conducted as a fundamental preliminary step in developing an intervention methodology to address Pace-specific conservation issues, it is believed that this approach could be a valid starting point for the analysis and treatment of other contemporary photographic objects with similar types of mountings. In addition, the same study and treatment methodologies could be applied to the issues encountered on the numerous artworks included in the Walls series examined throughout this study. The examined artifacts were created with similar techniques but, in most of the cases, they presented a simpler structure with fewer layers as a result of a less complex artistic experimentation process. Both the in-depth research and the conservation treatment were conducted in the context of a master’s degree thesis project and this paper intends to explain in detail how the examination, analysis and treatment of this experimental artwork of contemporary color photography were carried out.

2. The Preliminary Research on Pace: Introductory Remarks and Final Objectives

Pace consists of a large format c-print (100 × 100 cm) mounted on an aluminum panel by the author himself in a unique and complex making process. During the preliminary study phase, the focus has been mainly on the analysis of the structure of the artwork and the characterization of the materials used by the artist. 
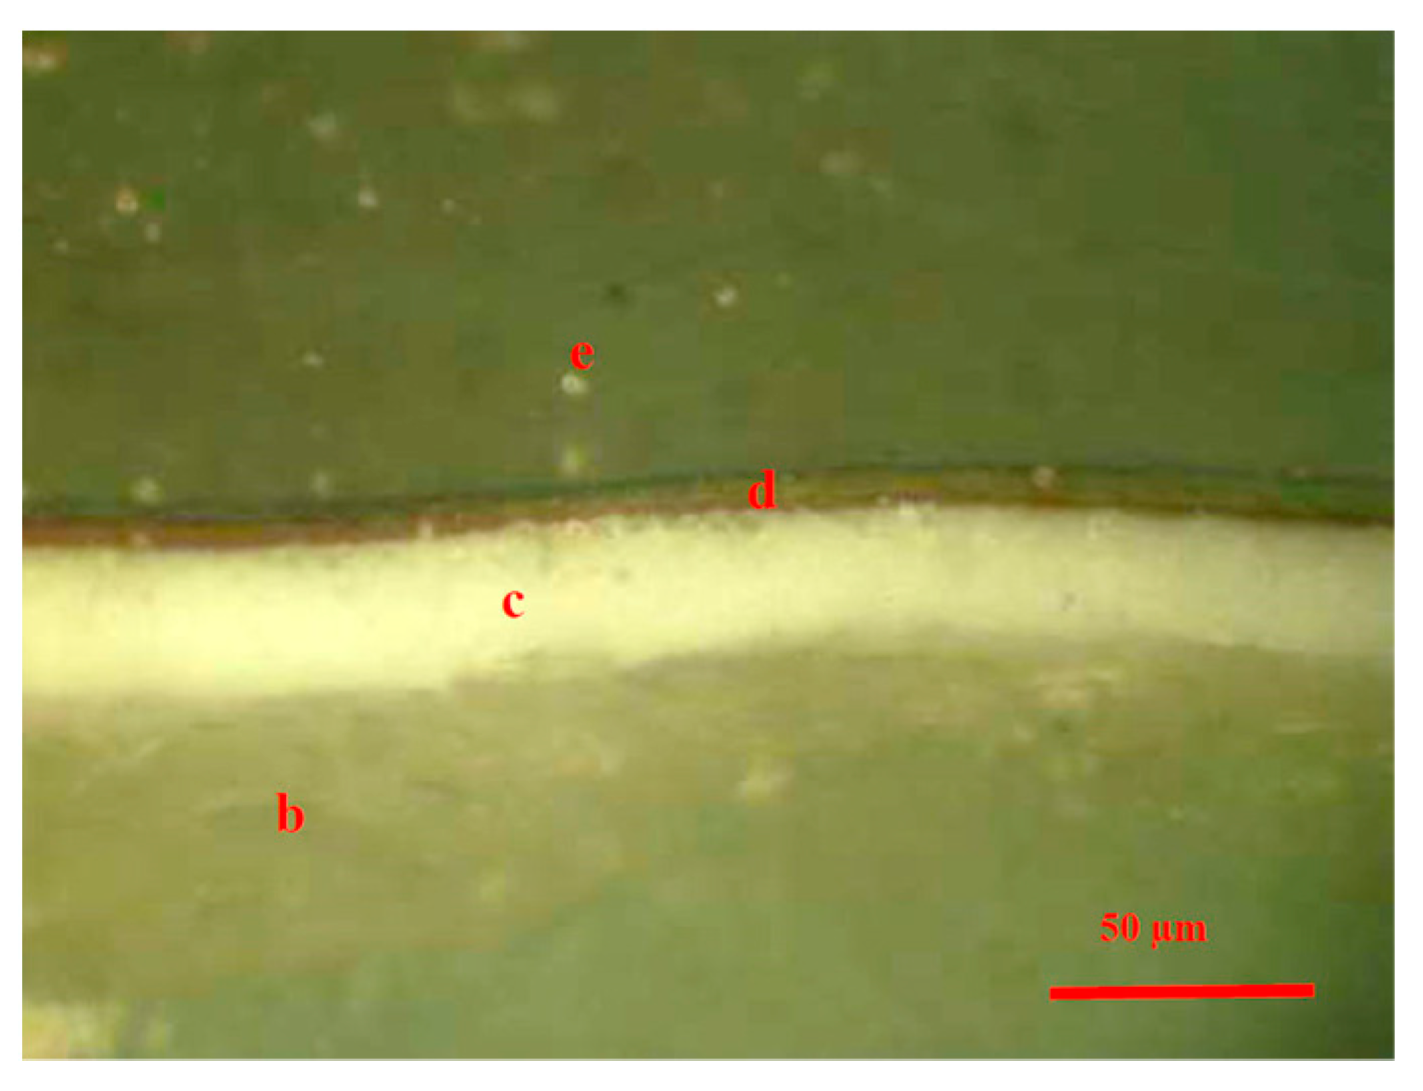
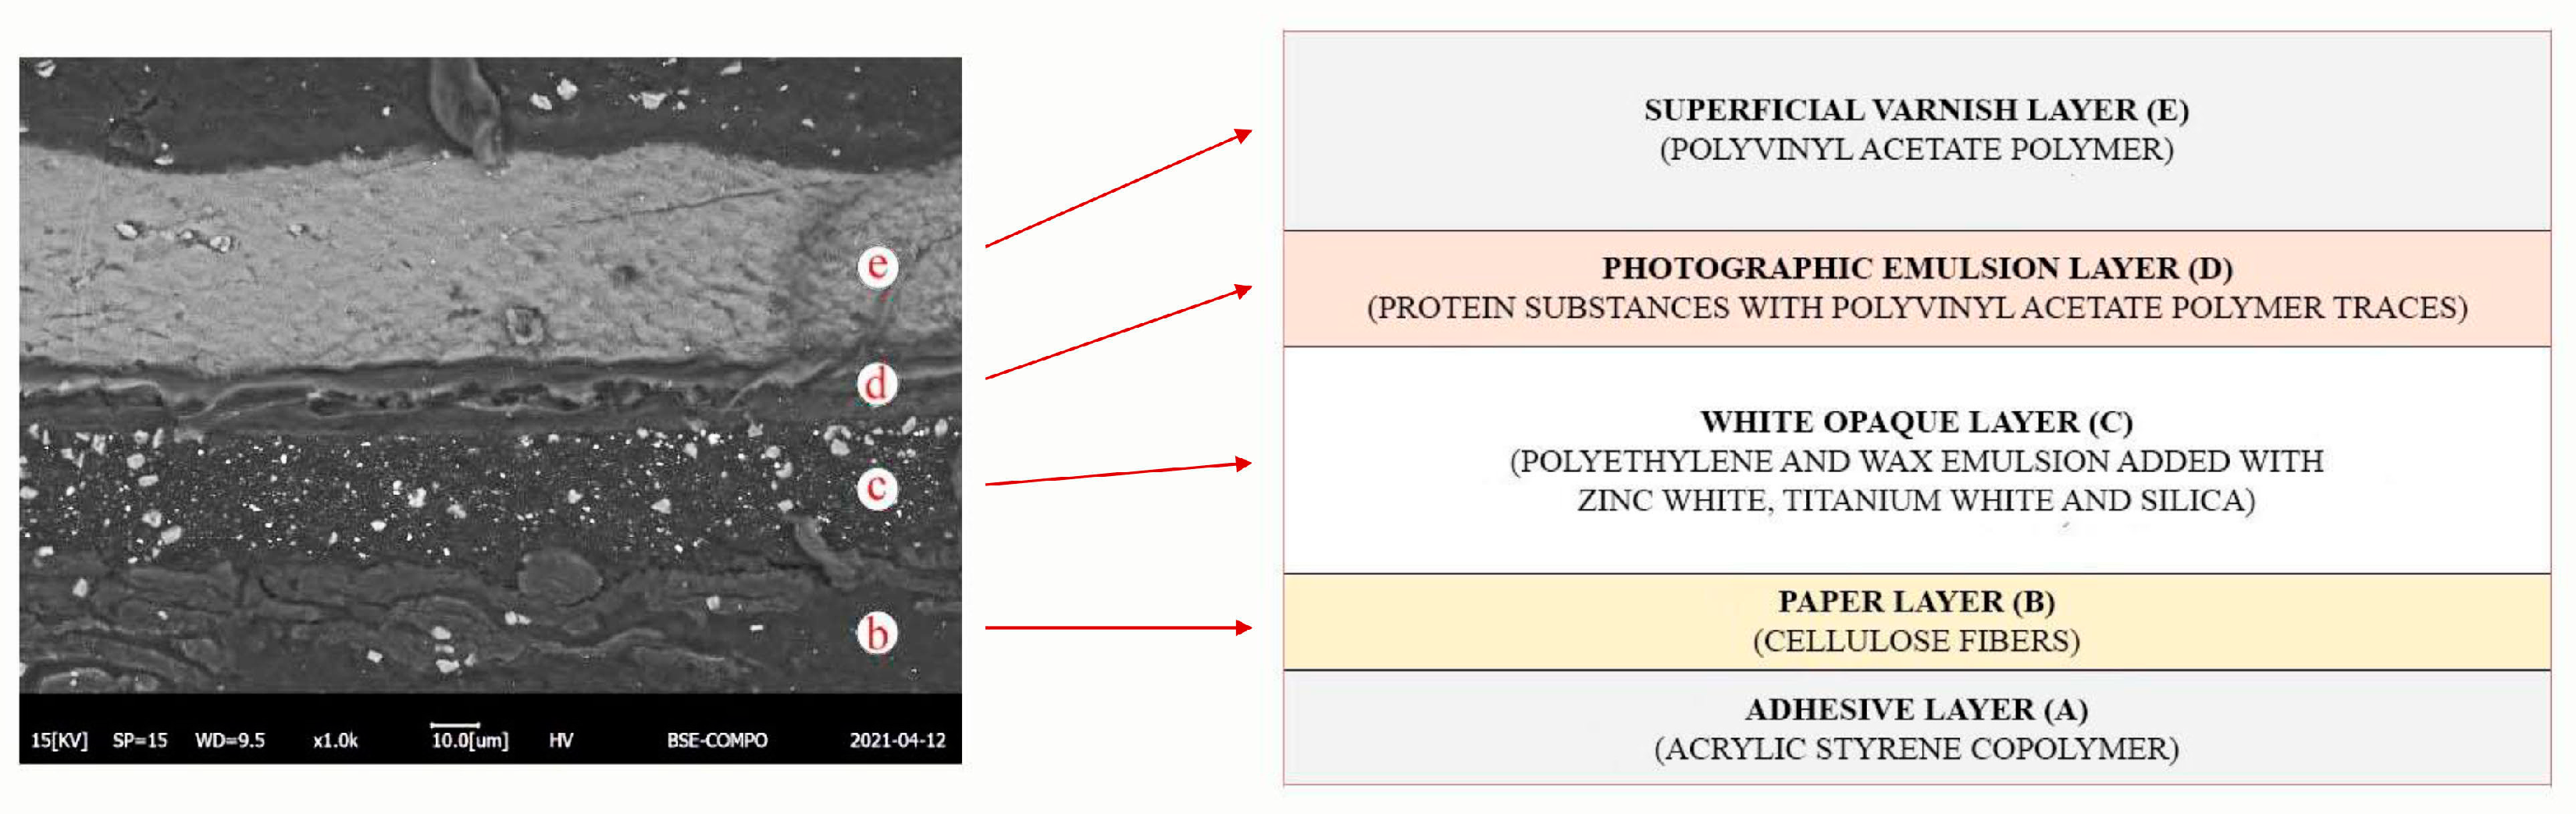
Pace, which was created out of a photographic print (hence, making it reproducible in theory), is actually an unicum, namely the sole existing exemplar of this specific kind of artifact. From the beginning, it became apparent that the understanding of the structure would not be easy since Pace showed a layered structure (Figure 2) in which the overlays appeared merged together.
The author Nino Migliori used this print as a starting point for his experimentation and he used different kinds of media and techniques to create a completely different and unique artwork. He intervened not only on the surface of the print, but also underneath it and on the mounting. The objective of this process was to recreate the appearance and the perception of the wall he shot and he succeeded in this effort in an extremely realistic way. In order to plan and perform an adequate treatment to solve the conservation issues encountered, such as detachments, planarity distortions and mechanical damages, which was indeed the ultimate purpose of this project, an in-depth research preliminary phase was deemed necessary. This research was conducted in three phases, each with the aim of analyzing a particular aspect of the artwork’s creation. The first phase entailed a thorough literature review on the series of Walls, with the purpose of understanding and contextualizing the artifact within the author’s production as far as possible. Subsequently, the second part of the research allowed one to precisely reconstruct the process behind the creation of Pace, providing fundamental insights for the study of the execution technique through direct examination of the artwork and data gathering through research and interviews. Eventually, in the third and last phase, the more technical aspects of the artwork’s creation were addressed, focusing on the materials’ characterization, the identification of the photographic technique and the definition of the component layers’ stratigraphic sequencing, using both non-invasive and micro-invasive diagnostic techniques.

3. Nino Migliori and the Walls Series

The photographer Nino Migliori was born in Bologna in 1926 and started shooting in the late 1940s. To this day, he is one of the most active experimenters in Italian photography and his production is one of the most varied and interesting in European image culture [2]. His heterogeneous production is made up of both canonical photographs in documentary style and incredible experiments, such as the Walls series. Throughout his career, the contact with contemporary art and artists has been fundamental to his experiments in photography; in fact, while they cannot be traced back to a specific period of his production, experimentation can be considered more a method or a line of research that he has never abandoned to this day. Walls can be considered one of the founding series of his production and during the thirty years of shooting mural surfaces, from 1949 to the late 1970s, Migliori has investigated the walls in an original way and from different points of view [3]. The author himself stated that he always approached the walls he shot without much interest in planning ahead, but in retrospect it is perhaps possible to divide his production into three periods. Initially he was driven by curiosity about marks on walls, then by interest in stains and molds, and toward the end by the concept of writing on walls. This was a time when the author considered the wall a real medium for writing, for communication and also for gestures [4]. Pace was created during the last period and this first part of the research made clear that, among the artworks of the same years, it is definitely one of the most experimental.

4. Reconstruction of the Creation Process through Direct Examination and Interviews

The second phase of the research focused on the reconstruction of the artifact creation process and on the identification of the print photographic process. The initial step to reconstruct the creation process was the direct examination of some other artworks from the Walls series, mostly housed at the Nino Migliori Foundation in Bologna [5] (IT), at the Museum of Contemporary Photography (MUFOCO) [6] in Cinisello Balsamo (IT), and at the Study Centre and Communication Archive (CSAC) [7] of the University of Parma (IT). After careful examination of the artworks, it became clear that the execution technique of Pace was very peculiar; among the examined objects, Pace was the only one showing that type of material application, made of sand and mixed media, above and under the print layer. The following step was to interview people connected to Pace and its creation, such as Paolo Barbaro, Nino Migliori and Marina Nella Truant. Paolo Barbaro from CSAC has collaborated for years with the author Nino Migliori and the Studio Villani, a renowned photographic studio in Bologna, where Nino Migliori used to print his color photographs [8,9]. He provided important information on the materials and techniques generally used by the printers of the Studio Villani, allowing one to formulate an initial hypothesis on the print photographic technique. All the information he delivered was confirmed and enforced during a later interview with the author himself (
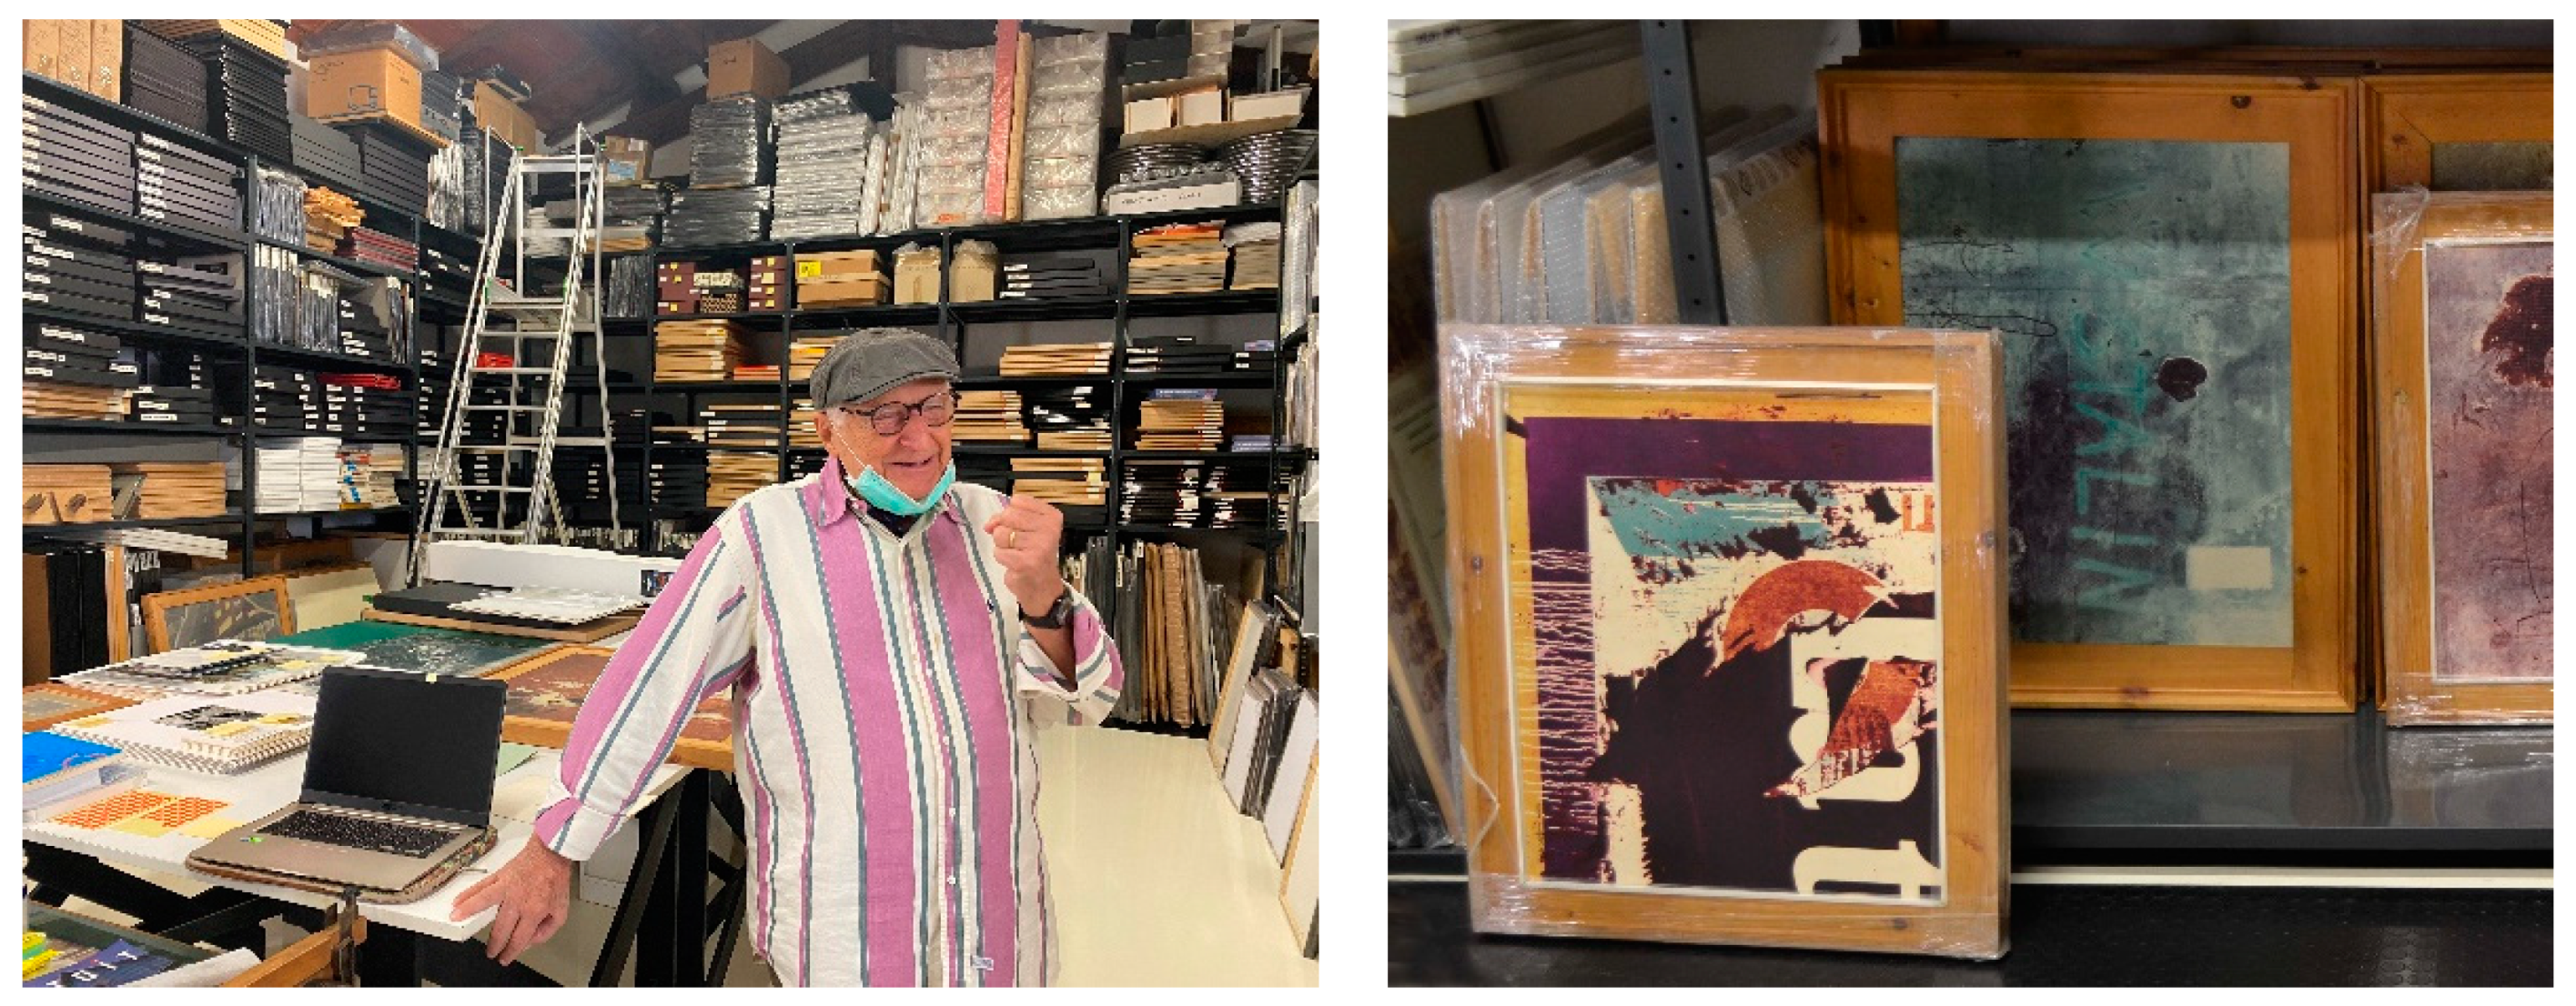
Figure 3) and with the Director of the Nino Migliori Foundation, Marina Nella Truant. They both provided fundamental insights on the artistic and social context in which Nino Migliori conducted his experimentation. On this occasion, it was made clear that the print was not only mounted on an aluminum secondary support, using a vinylic-based adhesive applied with a brush, but that it was also manipulated by the photographer, who experimented on the artifact by applying sea sand of different grain sizes above and below the print. Nino Migliori also made use of other media, such as chalk, varnishes, and synthetic paints, with the aim of emphasizing some graphic elements of the photograph so as to give it a realistic appearance, resembling the wall surface.
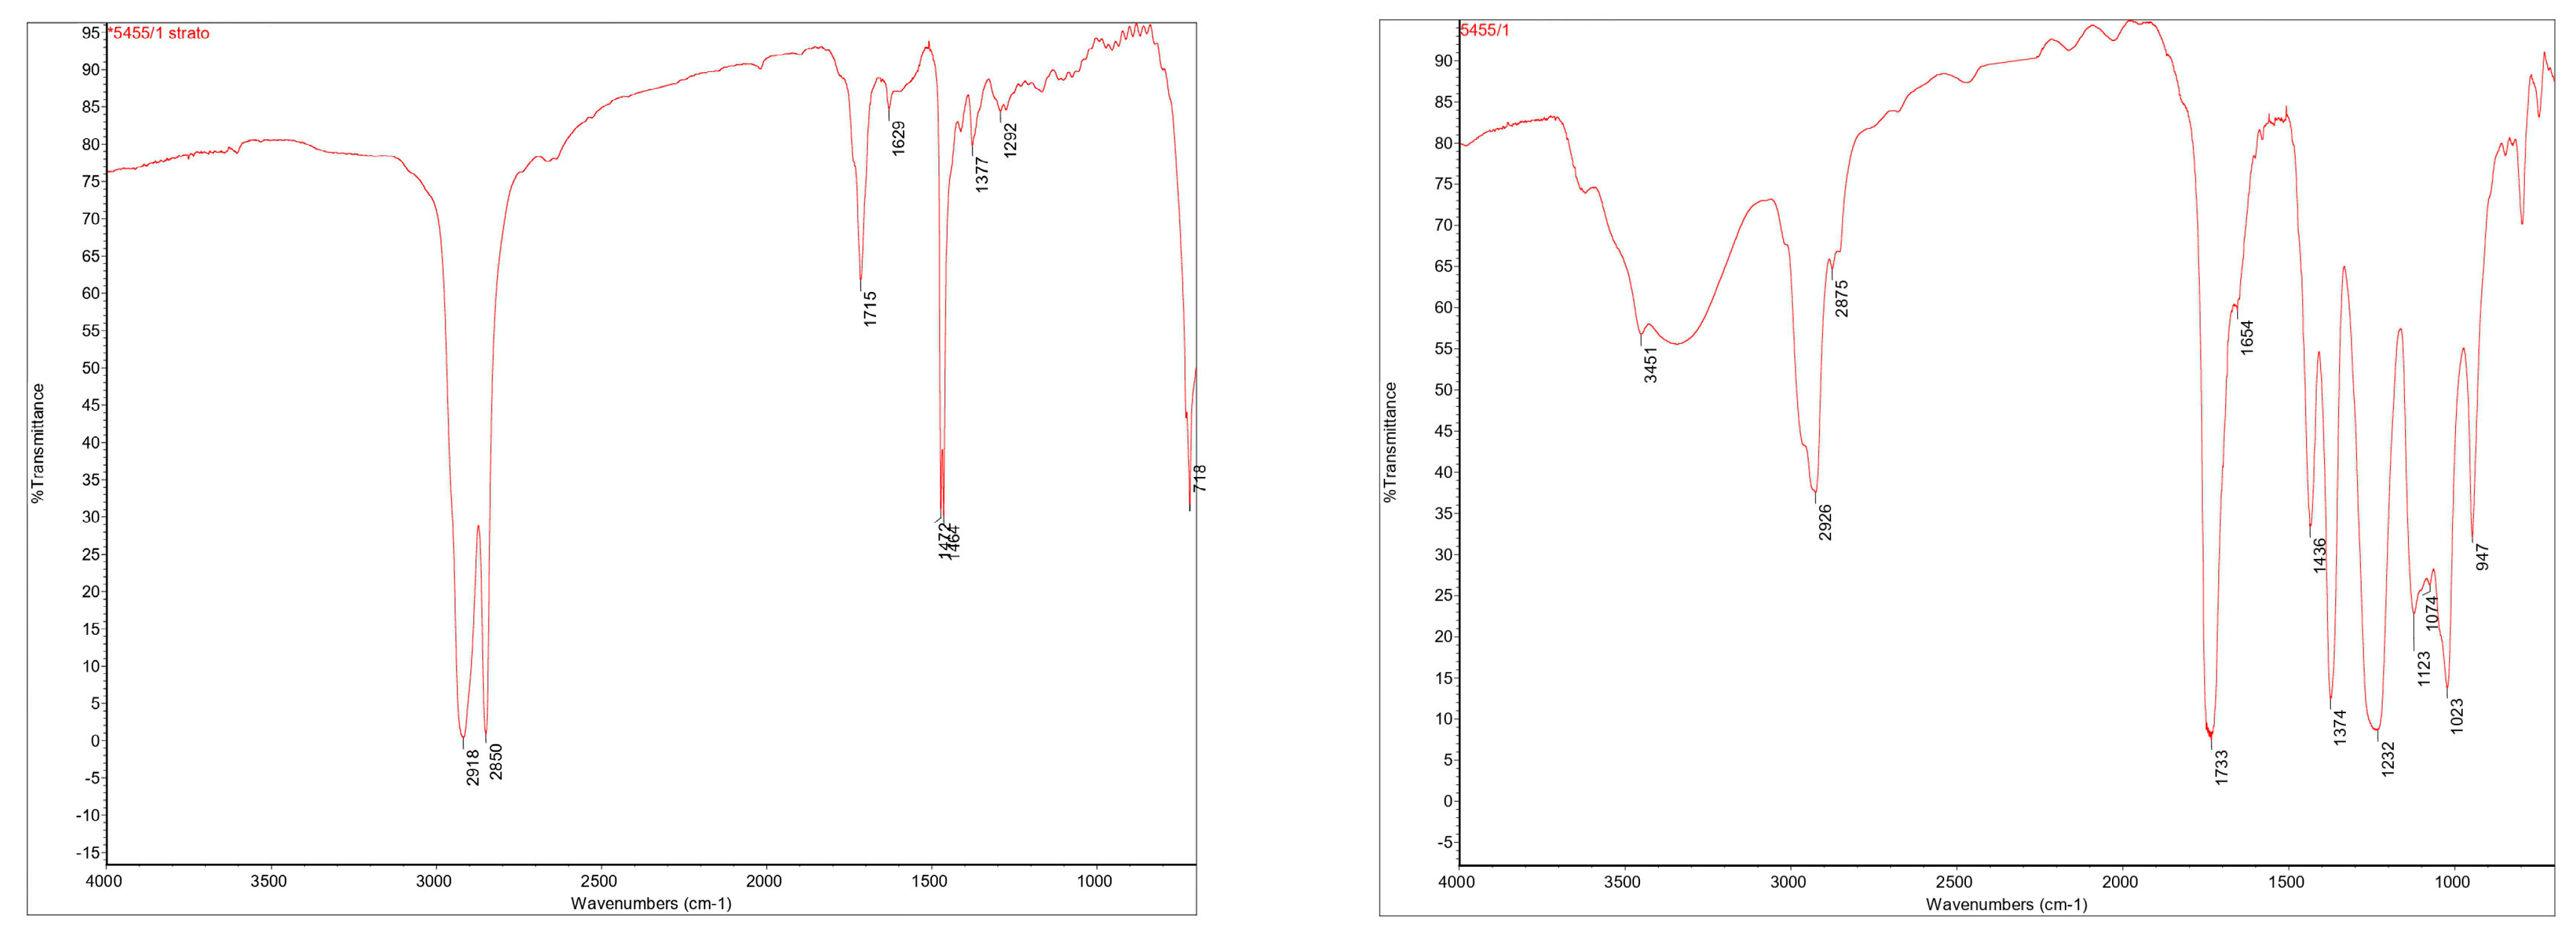
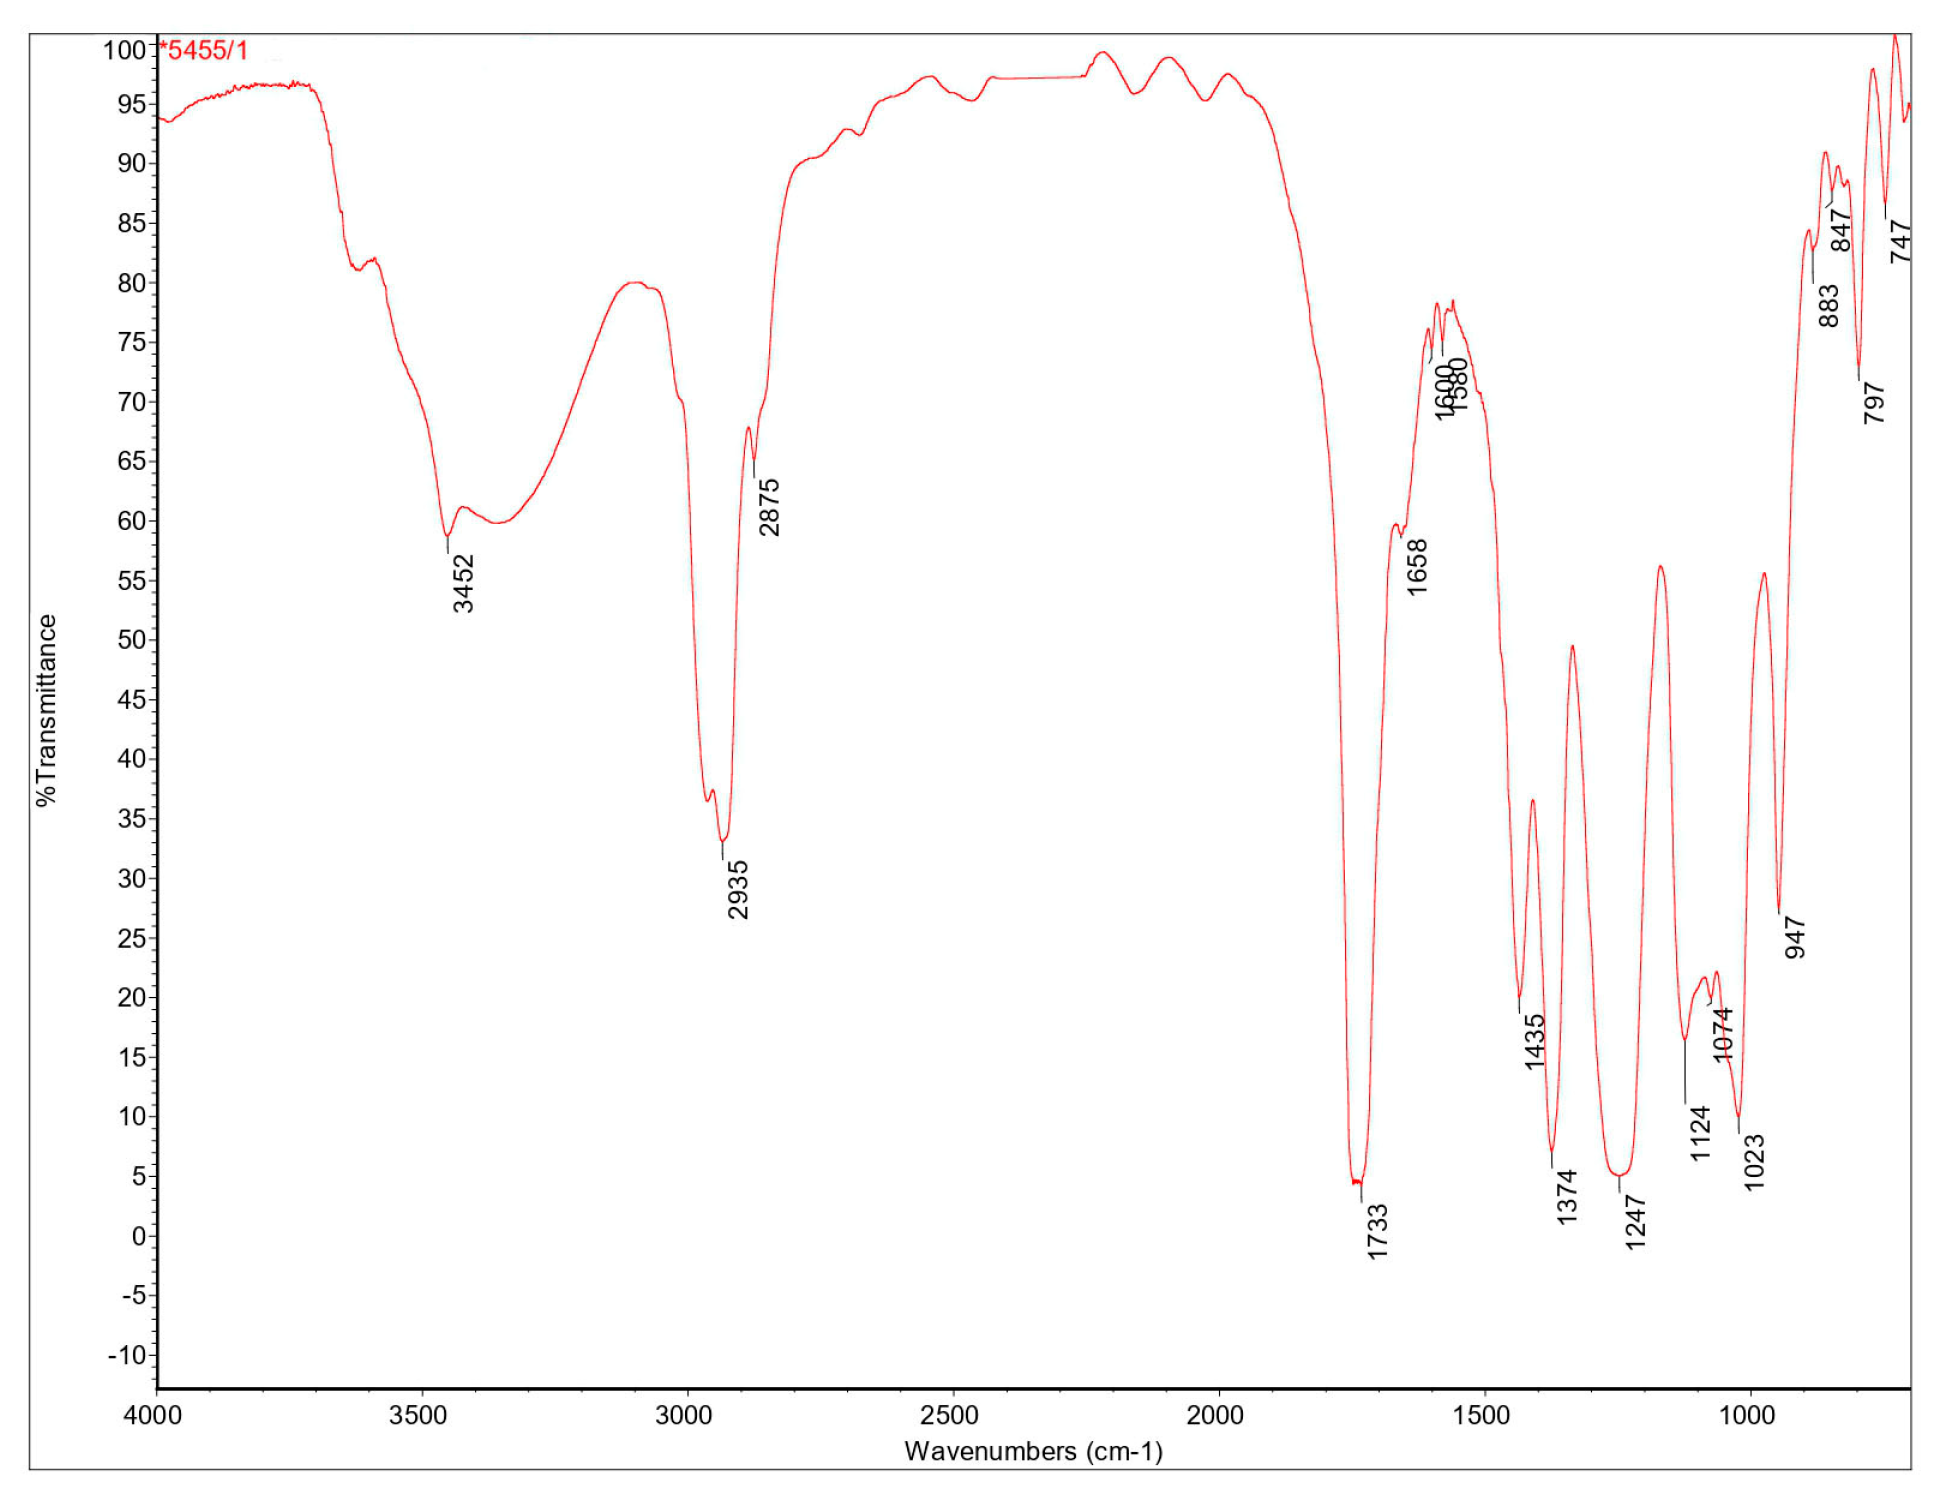
As regards the identification of the photographic technique, there were certain factors which complicated the visual examination of the print. First of all, the whole surface of the photograph appeared covered by a thick layer of mixed media which included chalk, pigmented paint and sea sand; therefore, the image layer of the print could be observed only through the cracks and losses of the mixed media superficial layer. After careful examination of the image layer in those points, it became clear that the surface was too compromised by the author’s intervention and the observation was deemed inconclusive. Then, the back of the photograph was completely cloaked by the aluminum secondary support; therefore, it was not possible to observe the back of the print nor to identify any back printing related to manufacturers and type of photographic paper. The only indication that could lead to the identification of the photographic technique was the examination of the signs of deterioration, which, in most cases, refer to specific photographic processes. Starting from this consideration, a literature search about typical alterations of color photographic materials was carried out in order to compare the conservation issues found on this print with what could be found in the literature [10,11,12,13,14]. This part of the research revealed a paucity of information in the literature on deterioration of photo-based contemporary objects. This factor, along with the substantial lack of presented case-studies and intervention methodologies for the treatment of similar artworks, has brought crucial attention to some challenges and difficulties for the conservators. At this point of the research, the most relevant information were the data gathered through the interviews, especially regarding the materials and photographic processes commonly used at Studio Villani, along with the direct examination of the photographic alterations which could be observed on Pace. This led to the assumption that this contemporary artwork was made out of a chromogenic print or c-print, a common color photographic process used from 1942 to the present [14]. Confirmation of this hypothesis was sought through an analytical approach for the identification of the photographic process.

5. Diagnostic Investigations: An Analytical Approach for the Identification of the Photographic Process, the Characterization of the Constituent Materials and the Condition Assessment of the Artifact

In order to deepen the knowledge of the artifact structure and the nature of its constituent materials, it was necessary to resort to an analytical approach, which involved the study of the artwork through both non-invasive and micro-invasive diagnostic investigations.

5.1. Non-Invasive

The non-invasive investigations were performed not only to document the artwork during each phase of the conservation treatment, but also to gather fundamental information about the artifact and its surface, ahead of the conservation treatment.

5.1.1. Digital Photography Documentation in Diffuse and Raking Visible Light

Digital photography documentation was taken in diffuse and raking visible light [15] to meticulously document the artifact before, during and after the conservation treatment. A Nikon D800 digital SLR camera with a Nikkor 50 mm f/1.8 G prime lens and lamps with neutral white halogen light bulbs (3300–3500 K) were used (UNI EN 12464-1).

5.1.2. Ultraviolet Fluorescence Digital Photography Documentation

UV fluorescence photographs were taken with a Nikon D800 digital SLR camera with a Nikkor 50 mm f/1.8 G prime lens and blacklight Wood’s lamps (365 nm). The artwork was documented before and after the surface cleaning, and no changes in fluorescence were observed.

5.1.3. Digital Microphotography Documentation

Before, during and after the conservation treatment, micrographs were taken with a Dino-lite AM4113T digital microscope. Binocular digital microscope with 1.3 MP (1280 × 1024) resolution and 20–220× optical magnification.

5.1.4. Contact Angle (α) Measurement

The contact angle (α) measurement was performed by placing a drop of distilled water on different areas of the surface of the artwork in order to determine its hydrophilic or hydrophobic properties.

5.1.5. pH Measurement

The pH measurement was carried out using a LAQUAtwin pH-11 Horiba pHmeter. Multiple Agarose gel samples were analyzed after being placed in contact with the surface of the artifact for pre-set time intervals. The measurements were conducted in several points of the surface both before and after cleaning in order to detect any pH variation resulting from the superficial dirt removal. The initial pH value of the Agarose gel samples used for carrying out the test was 7.8 pH.

5.1.6. Ionic Conductivity Measurement

The ionic conductivity measurement was performed using a LAQUAtwin EC-11 Horiba compact meter. Multiple Agarose gel samples were analyzed after being placed in contact with the surface of the artifact for pre-set time intervals. The measurements were conducted in several points of the surface both before and after cleaning in order to detect any ionic conductivity variation resulting from the superficial dirt removal. The initial conductivity of the Agarose gel samples used for the execution of the test was 84 µS/cm.

5.2. Micro-Invasive Investigations

After collecting few micro samples, micro-invasive investigations were carried out with the aim of precisely identifying the stratigraphic succession of the print and the superficial layer, and characterizing the constituent materials of each identified layer.

5.2.1. Sample Preparation

The identification of the stratigraphic succession of the chromogenic print and the superficial mixed media layer [16] was conducted through the observation of micro samples. Two sample preparation involved the manufacturing of polished cross-sections. The samples were embedded in epoxy resin Cristal 150 and, after drying, they were cut with a precision saw Remet Micromet. The sections were polished with a LS 2 Remet polishing machine. For the preparation of one of the two samples, before the embedding in epoxy resin, a scalpel was used to separate the layers as much as possible, in an effort to get a clearer view of each one. The collected samples were observed under the optical microscope with polarized light, the scanning electron microscope (SEM-EDS) and Micro FTIR. The other samples analyzed with Fourier-Transform Infrared Spectroscopy (FTIR) did not require any specific preparation.

5.2.2. Optical Microscopy

The optical microscopy was conducted using an Olympus BX51 microscope with 4×–40× magnification lenses and polarized light. The samples were placed over a microscope slide, covered with a cover slip and photographed.

5.2.3. Scanning Electron Microscopy and Energy Dispersive X-ray Spectroscopy (SEM-EDS)

The SEM-EDS analysis was performed using Philips 515 SEM equipped with EDAX EDS DX4 system (15 kV and 2000× magnification). The analysis was performed to get a clearer image of the stratigraphic sequencing and to gather some fundamental data for the constituent materials’ characterization.

5.2.4. Fourier-Transform Infrared Spectroscopy (FTIR)

The FTIR [17] analyses were recorded in transmittance for the stratigraphic sequencing characterization in the mid-IR (range 4000–1000 cm−1), in ATR mode at room temperature, using a Micro-FTIR Jasco. This analysis was performed on a cross-section sample. Further FTIR investigations were recorded in absorbance for the study of the superficial layer in the mid-IR (range 4000–400 cm−1), in ATR mode at room temperature, using a spectrophotometer Bruker Alpha. The three samples were analyzed without the need of sample pretreatment.

6. Results

6.1. Non-Invasive Investigations

The non-invasive investigations allowed us to collect essential data about the artwork’s superficial characteristics, which guided the choice of cleaning materials and methods. The information obtained through these analyses allowed us to conduct an effective yet gentle removal of surface dirt, while respecting the chemical and physical characteristics of the artifact’s surface.

6.1.1. Digital Photography Documentation in Diffuse and Raking Visible Light

The digital photography documentation in diffuse visible light allowed to us accurately document the artwork at each stage of the conservation treatment, as well as its execution technique and alterations as a consequence of any present deterioration phenomenon. The images obtained through digital photography documentation in raking visible light (Figure 4) further emphasized the surface morphological characteristics of the artifact. Some alterations, such as deformations and detachments of the print from the underlying aluminum panel, were highlighted, as well as some peculiarities of the execution technique (i.e., superficial roughness).

6.1.2. Ultraviolet Fluorescence Digital Photography Documentation

The results of UV fluorescence digital photography documentation on the artwork Pace revealed a yellow-green UV fluorescence and a generalized UV fluorescence (Figure 5). The yellow-green UV fluorescence was observed in correspondence with some sand accumulations, probably due to the presence of oil-based pollutants in the sand used by the artist which, due to ageing, may present this type of fluorescence. The generalized fluorescence was instead ascribed to the aging of paints and varnishes. The fluorescence was absent along the edges of the photograph, where the frame protected the surface from environmental aging-accelerating agents, which could have had a role in materials’ deterioration on the rest of the surface. This investigation also allowed us to evaluate any fluorescence emission variation before and after the cleaning operations. By comparing UV fluorescence images, no significant variations were detected.

6.1.3. Digital Microphotography Documentation

The micrographs taken before, during and after the conservation made it possible to observe the execution technique and the constituent materials of the artwork in detail: some degradation phenomena affecting the surface layer, such as cracks and losses, as well as the unevenness in sand grain-size, and its distribution on the surface (Figure 6).

6.1.4. Contact Angle (α) Measurement

The contact angle (α) measured on Pace was α < 90°, indicating the hydrophilic nature of the surface components (Figure 7). This test directed the choice of cleaning materials and methods towards high water-retention systems, such as viscoelastic hydrogels. This type of cleaning systems made it possible to convey a low amount of water on the surface in a controlled manner, allowing the removal of surface dirt without affecting the chemical and physical stability of the artwork materials.

6.1.5. pH Measurement

The pH values detected on the surface (Table 1) are consistent with the ones generally detected on polyvinyl acetate (PVAc) paint or varnish films, since this synthetic resin tends to assume acidic values of pH with aging.
After cleaning, the pH values resulted in the neutral range in all the sampling points. Based on these results, it can be stated that the cleaning allowed us to remove the surface dirt and the most of the components resulting from the deterioration processes, which were probably responsible for the acidity of the surface.

6.1.6. Ionic Conductivity Measurement

The results showed low values of ionic conductivity (Table 2), probably due to a low concentration of ionizable substances. No substantial changes were detected before and after cleaning operations. The surface layer of the artwork was not sensitive to the action of aqueous solutions and, as no values referable to serious deterioration alterations were identified, it was deemed appropriate to proceed with the dry-cleaning operations and with the dirt removal, using high water-retention viscoelastic hydrogels.

6.2. Micro-Invasive Investigations

After a first set of non-invasive analyses, it was deemed necessary to carry out some further investigations by employing micro-invasive techniques. The analyses were conducted after micro sampling the superficial layer and the print, with the aim of acquiring in-depth knowledge of the artifact’s structure. The information gathered through this second set of analyses was essential to plan the conservation treatment.

6.2.1. Optical Microscopy

Through the observation of the samples with the optical microscope, it was possible to get a first insight about the structure of the layers and the stratigraphic sequencing (Figure 8). The photographic print was manipulated by the artist and its surface was completely covered by a layer of mixed media, such as paints and varnishes, which most likely permeated the underlying layers. For this reason, it was not possible to get a clear image of the structure or to determine an exact stratigraphic sequencing through the optical microscope, but only to make initial assumptions (Figure 9).

6.2.2. Scanning Electron Microscopy and Energy Dispersive X-ray Spectroscopy (SEM-EDS)

The micrographs obtained from the SEM analysis on the micro sample allowed us to observe the layers in more detail and to confirm the first hypotheses about the layers and their sequencing (Figure 10).
The SEM coupled with the EDS allowed us to gather some valuable information for the characterization of the identified layers. The following (Figure 11) are the spectra from the EDS analysis on one of the analyzed sites:

6.2.3. Fourier-Transform Infrared Spectroscopy (FTIR)

FITR spectroscopy was used for the stratigraphic sequencing characterization and for the study of the superficial layer study in more detail.
The FTIR analysis results for the stratigraphic sequencing characterization are the following (Figure 12, Figure 13 and Figure 14):
- layer a: synthetic acrylic resin (2958; 2931; 2873; 2860; 1775; 1733; 1456; 1375; 1236; 1166; 1120; 872; 829 cm−1) with traces of polystyrene (1027; 771 cm−1);
- layer b: cellulose (3344; 2918; 1736; 1648; 1431; 1371; 1336; 1317; 1281; 1236; 162; 1112; 1058; 898 cm−1);
- layer c: microcrystalline wax (2919; 2850 cm−1) and polyethylene (1714; 1464; 719 cm−1);
- layer d: polyvinyl acetate (3451; 2968; 2926; 2875; 2851; 1733; 1436; 1374; 1232; 1123; 1074; 1023; 974; 796 cm−1) and protein substances (1654 cm−1);
- layer e: polyvinyl acetate (3452; 2970; 2927; 2875; 1733; 1654; 1436; 1374; 1247; 1123; 1023; 947; 796 cm−1).
At this point, further FTIR investigations on the surface layer were performed (Figure 15 and Figure 16), since there was a loss of the superficial layer at the first sampling point; hence, it was not possible to analyze it. Three micro samples were collected from the superficial layer.
Sample 1: vinyl (2927; 1729; 1432; 1370; 1227; 1018; 944; 793; 604 cm−1).
Sample 2: vinyl (1730; 1433; 1370; 1226; 1018; 945 cm−1) and oil-based substance (2920; 2851 cm−1).
Sample 1’s spectrum showed a vinylic composition, comparable to the polyvinyl acetate (PVAc), while PVAc and an oil-based substance were detected in Sample 2. In this case, the micro sampling point corresponded to an area with an accumulation of sea sand. This result is compatible with oil-based pollutants that may be present in the sea sand used by the artist.
Sample 3: Acryl (1165; 1069; 839; cm−1), Styrene (742; 690 cm−1), Vinyl (2959; 2933; 2874; 1730; 1433; 1372; 1233; 1120; 1021; 945; 839; 795; 634; 605 cm−1).
Sample 3’s spectrum confirmed the use of a PVAc-based varnish or transparent adhesive, but the presence of an acrylic-styrene resin was also detected. Considering that the micro sampling point was in correspondence with an area where a light-colored paint was applied, it was possible to hypothesize that the artist used an acrylic-styrene resin-based paint in that area.
This analytical approach played a fundamental role in the study of the artwork’s execution technique. The micro-invasive diagnostic investigations made it possible to identify the stratigraphic succession of the artifact and to characterize the chemical composition of the constituent materials of the artwork.
The results of the investigations can be summarized as in the following scheme (Figure 17):
In conclusion, through the identification of the stratigraphic succession of the artifact, and the detailed study of the constituent materials and their degradation processes, it was possible to identify the photographic process, confirming that the photograph was a chromogenic print, as previously hypothesized. Moreover, the detailed knowledge acquired through this research phase guided the choice of materials and methods to be used in the conservation treatment toward those most suitable for the characteristics of the artifact.

7. The Treatment of Detachments and Lifts of the c-Print from the Secondary Support

To perform a safe and effective conservation treatment, the elaboration of a new intervention methodology was necessary to address the severe alterations observed on the artwork, bearing in mind its peculiarities as a photographic object and a contemporary work of art.
Before starting to treat the detachments of the print from the aluminum panel, it was necessary to conduct some cleaning operations to remove potentially harmful surface dirt and to improve the chemical and physical stability of the superficial layer. The artwork framing did not include a protective glass; in fact, its surface was in direct contact with the frame and therefore exposed to any kind of environmental factor, such as dust and dirt. Although the artifact had been kept in a museum environment approximately since its creation, a light layer of dust and particulate air pollution had nevertheless deposited on the surface. It was therefore considered essential to proceed with cleaning as the first step of the conservation treatment, choosing materials and methods compatible with the chemical and physical characteristics of the artwork surface. The choice of cleaning materials was oriented towards the ones suitable for photographic objects’ cleaning, while being soft and adaptable to the superficial layer morphology. The artist applied sea sand on the artwork surface and the superficial layer presented some cracks and losses; thus, it was fundamental to perform the cleaning operation in a gentle yet effective manner in order to avoid altering this fragile surface.
The cleaning was performed in two phases: dry-cleaning and hydrogel cleaning.
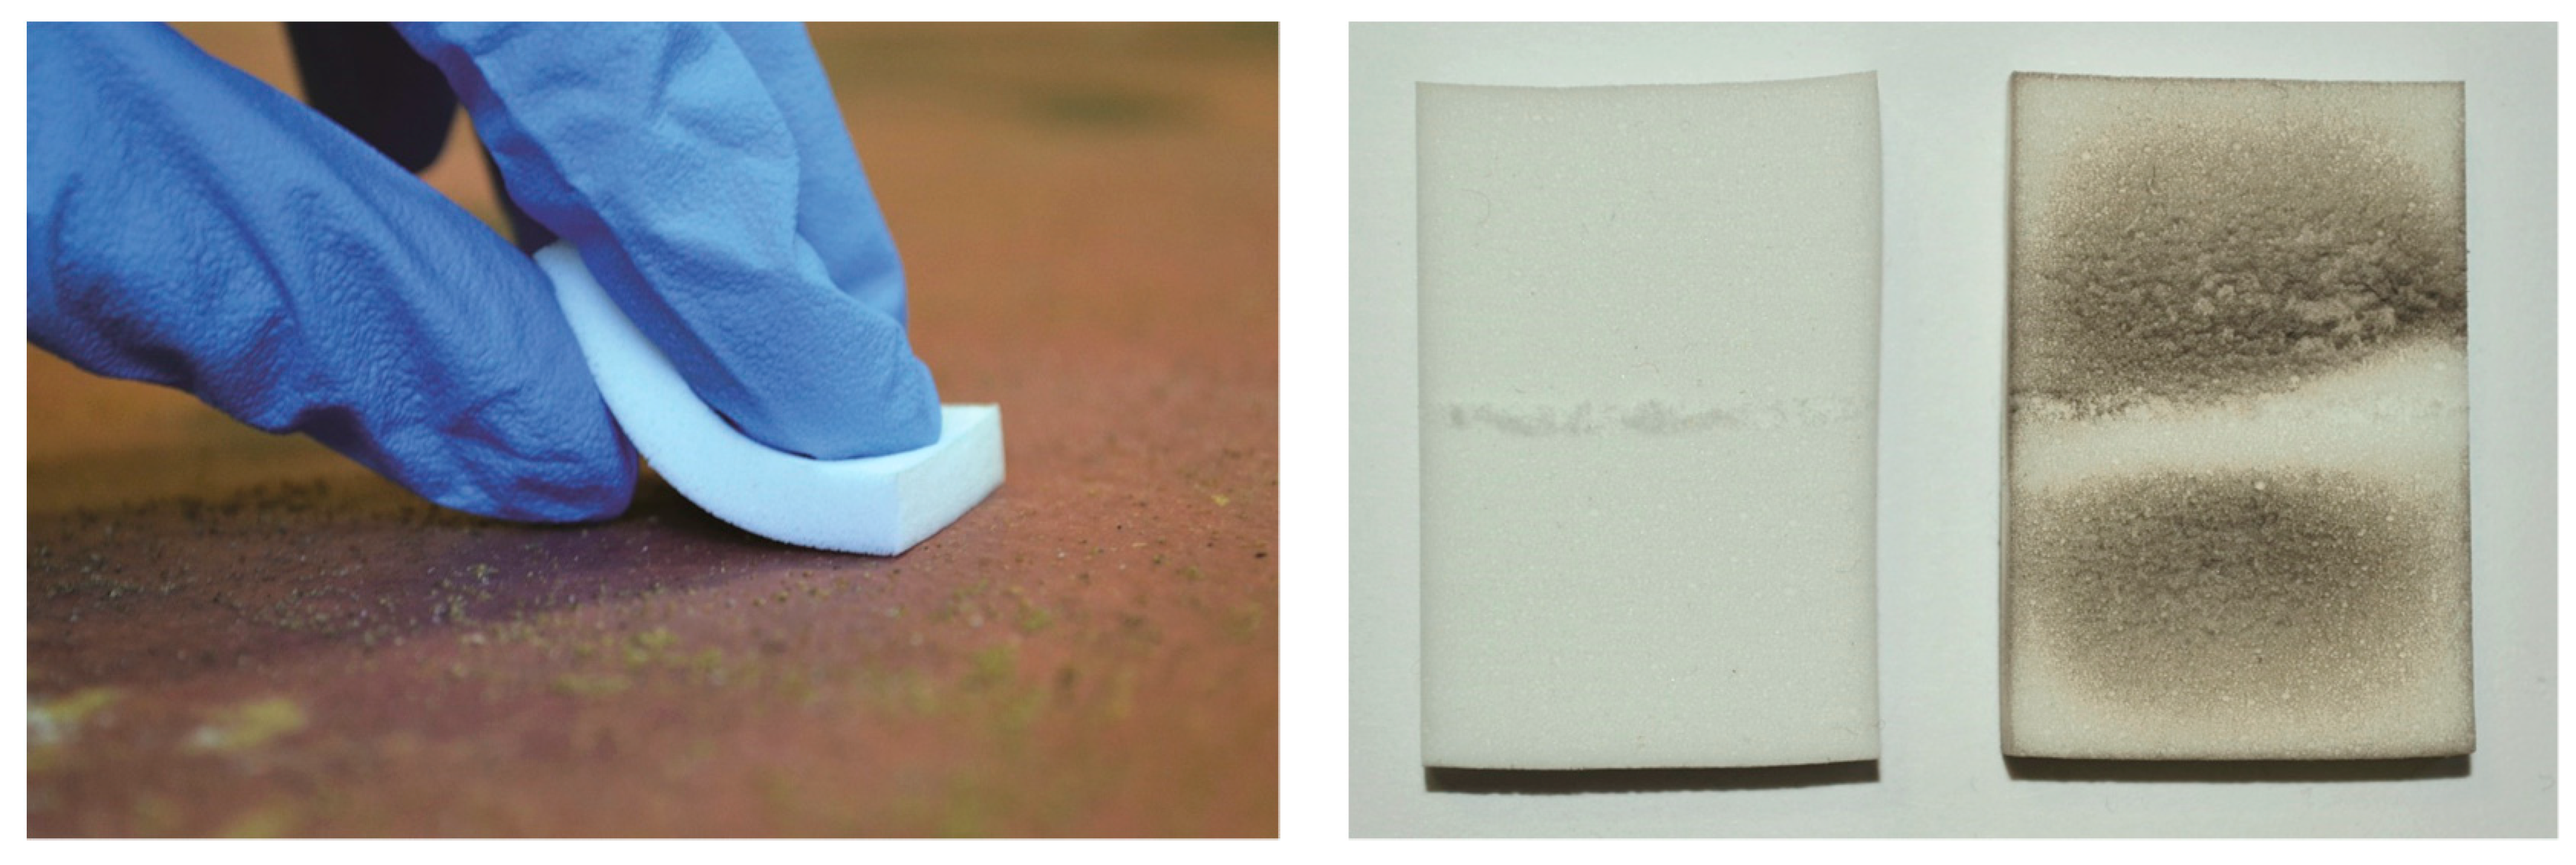
The dry-cleaning [18] operation was carried out using a polyurethane sponge specifically designed for conservation, which was used to clean the surface with light and gentle strokes (Figure 18). Its characteristics, such as flexibility and softness, made it possible to carry out an effective cleaning while simultaneously respecting the complex surface morphology of the superficial layer. The compact micro-porous structure of the PU sponge was proven to be particularly suitable for removing the finest dirt residues.
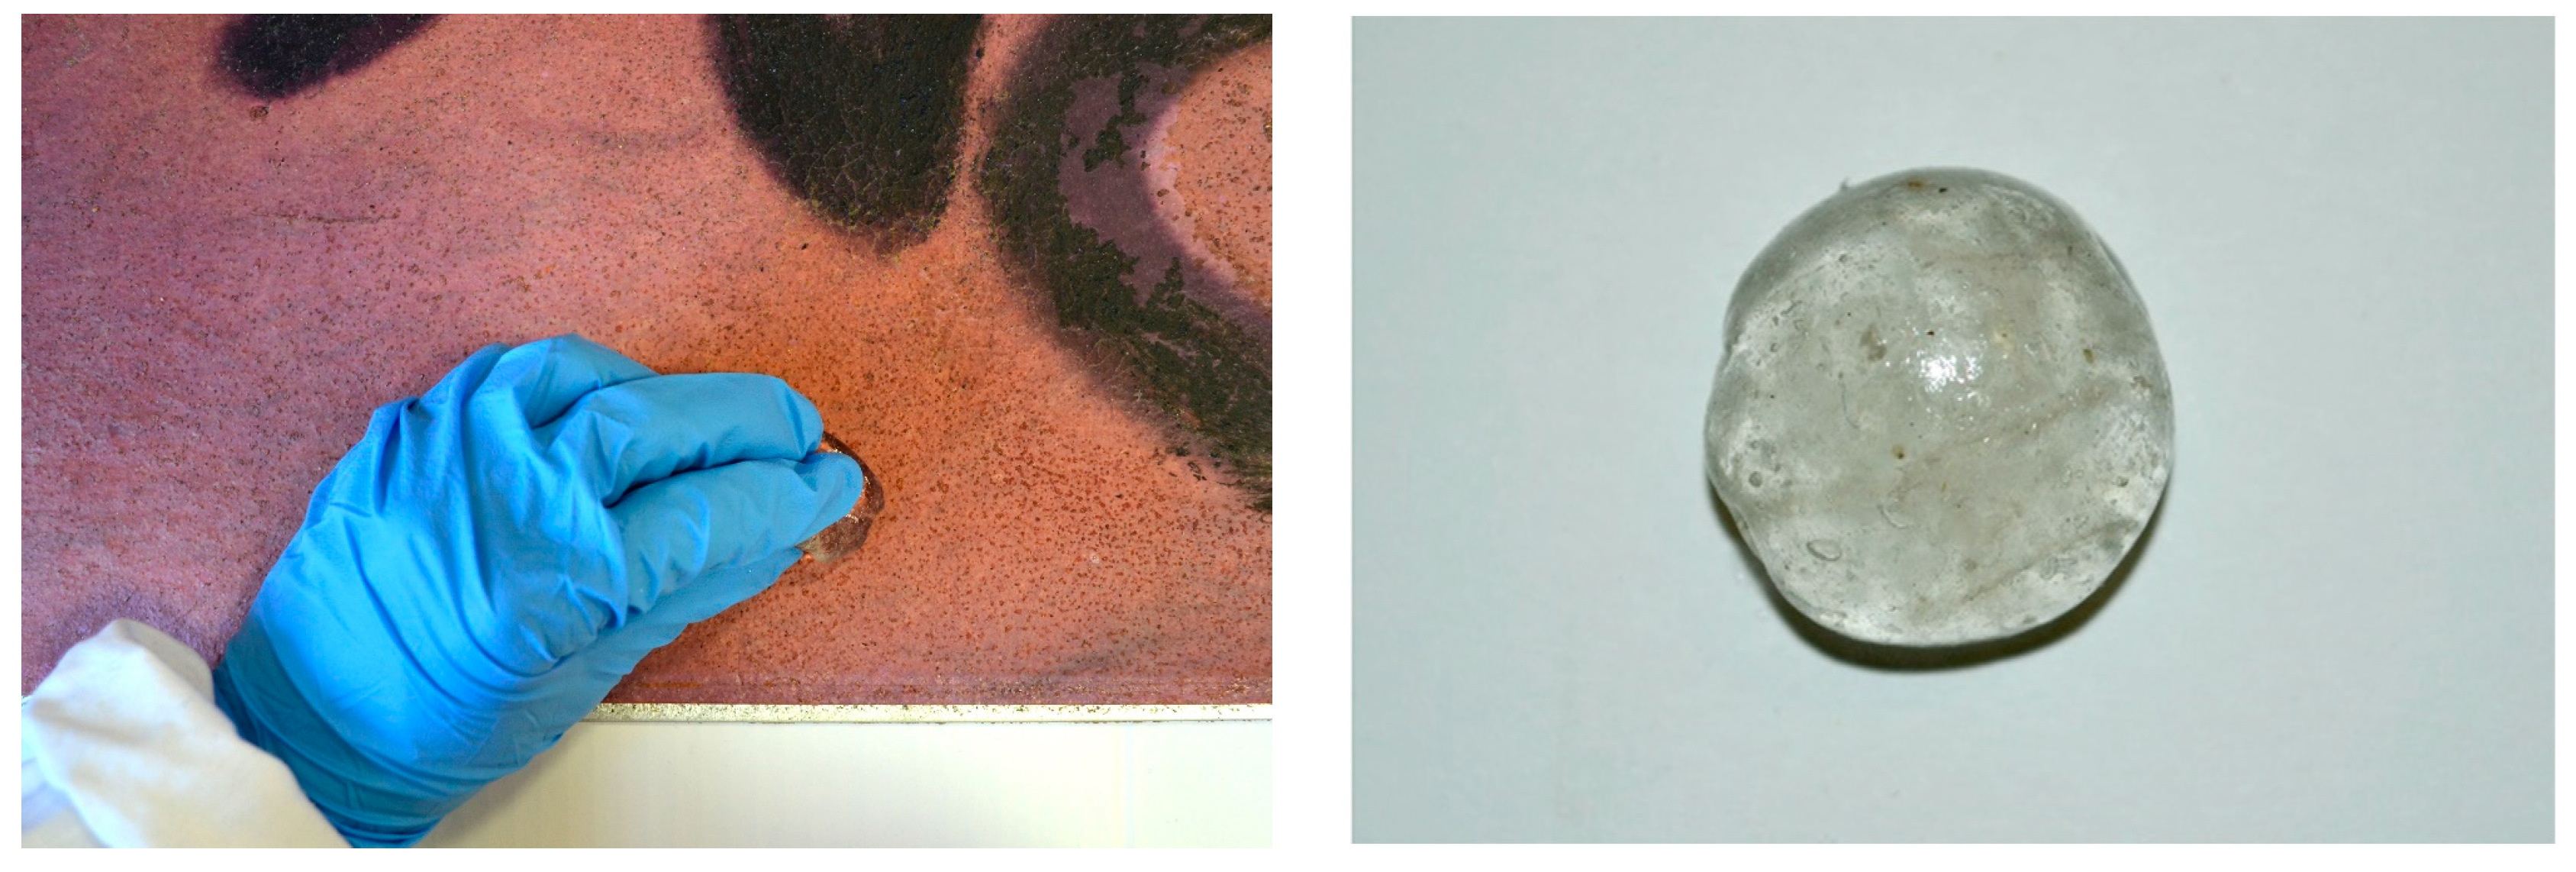
The hydrogel cleaning was performed using high water-retention viscoelastic PVA-borax hydrogel at 8% [19]. This is a transparent and non-adhesive gel that can adapt to surface irregularities under very light pressure, thanks to its particular malleability and specific viscoelastic properties. This type of hydrogel has a high water retention and therefore a reduced wettability, which allowed us to perform a safe and effective cleaning of the surface (Figure 19).
The treatment of detachments was addressed after these preliminary cleaning operations. Before the conservation treatment, the c-print was unevenly detached from the underlying aluminum panel and addressing this problem was the main focus of the treatment. At first, the possibility of completely detaching the photograph from the underlying aluminum panel by using solvents was considered, but this procedure would have compromised the original adhesive and sand layer, leading to the displacement and loss of most of those materials. For this reason, the methodology elaborated still comprehended the use of the solvent but it was not used to remove the print from the secondary support in this case. The application methods described below made it possible to use solvent to reactivate the original adhesive, allowing one to preserve the glue and sand layer while working on the re-adhesion of the print. The methodology elaborated to address this conservation problem consisted of two phases: the first, concerning the solvent reactivation of the original adhesive with ethyl acetate, [
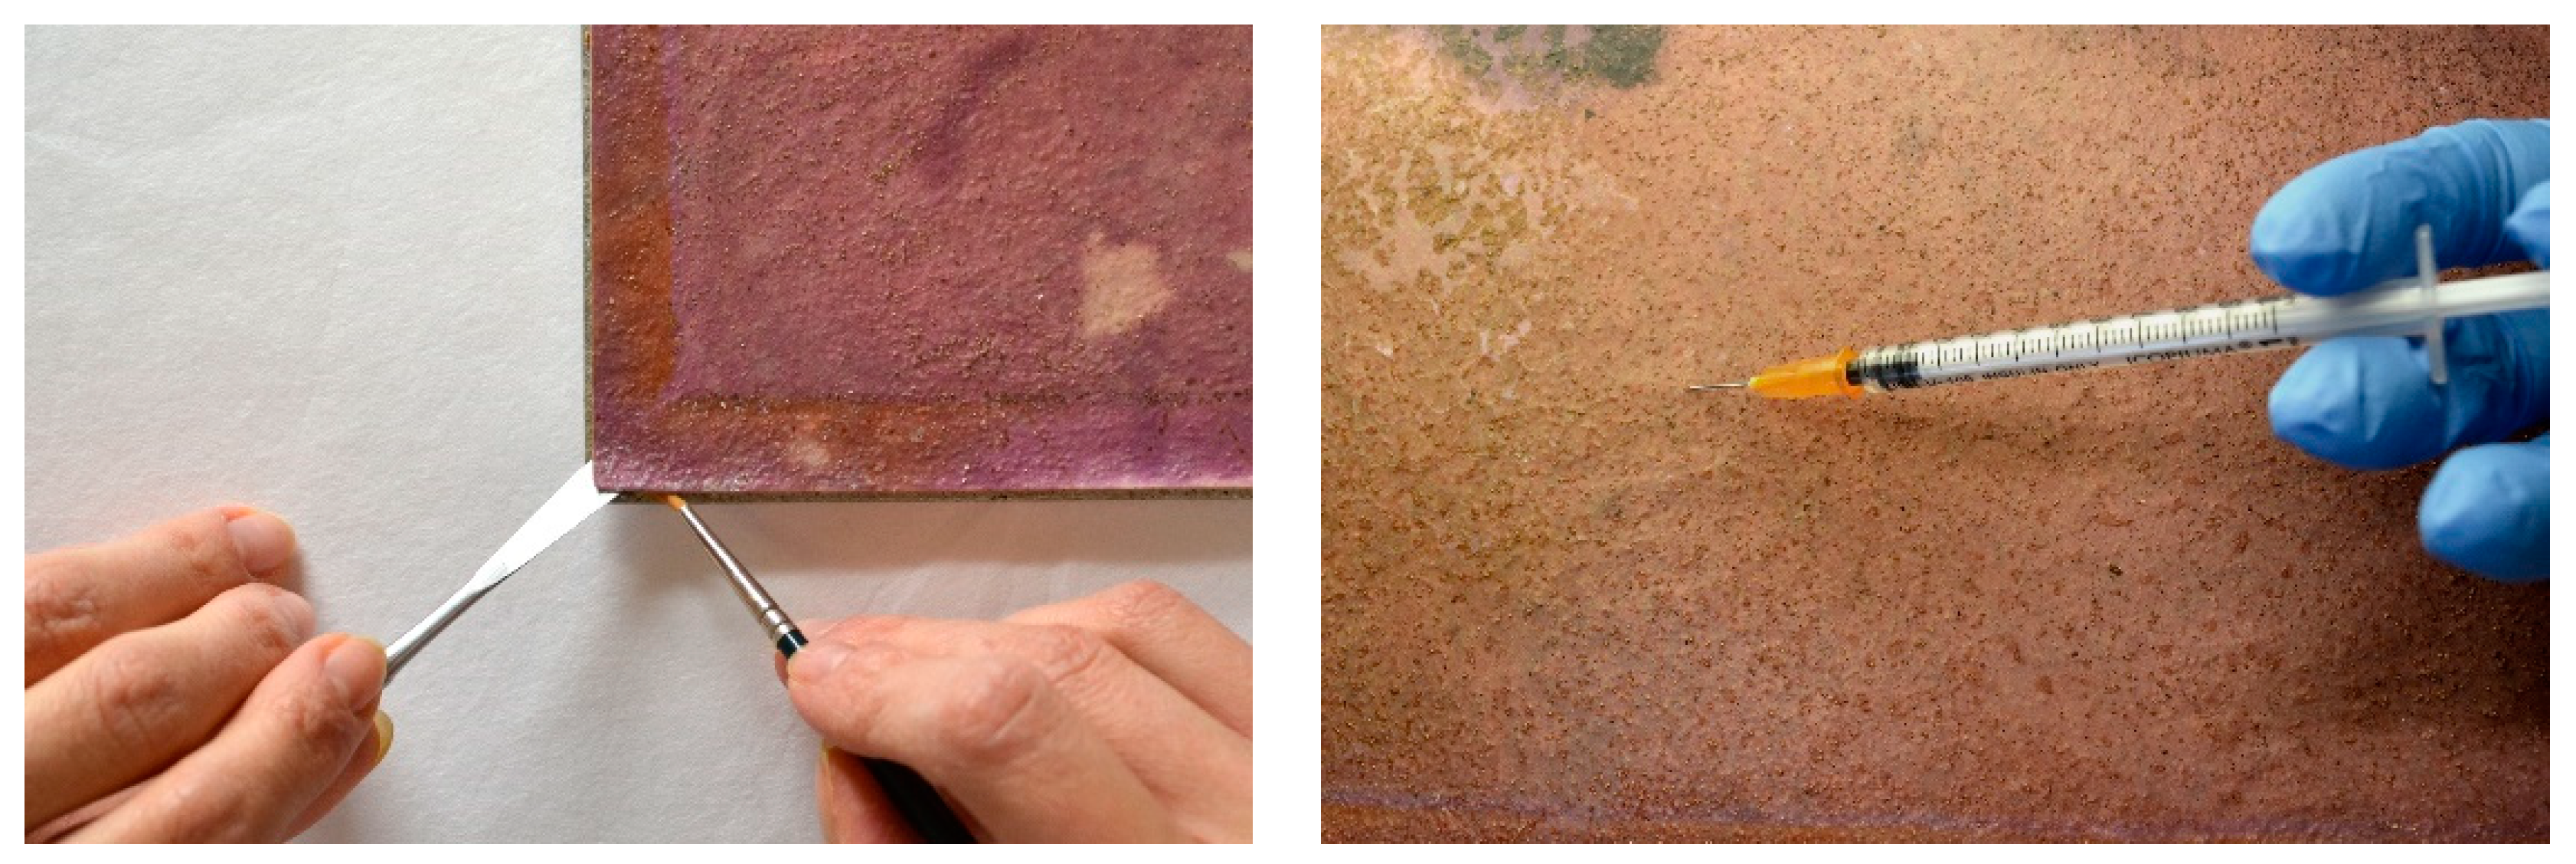
20] and the second, involving the addition of small amounts of Plextol B500 adhesive in demineralized water (1:1 ratio) to the areas of the artifact where the reactivation of the original adhesive alone was insufficient. Initially, the re-adhesion of areas with minor detachments was addressed, starting from the most internal areas on the left of the artwork and gradually moving closer to the edges, in order to limit the retention of solvent in the internal areas and facilitate its evaporation. In the most inaccessible areas, ethyl acetate was applied through injections of calibrated amounts in proportion to the extent of the detached area, while the application was done by brush at the edges (Figure 20).
The amount of solvent to inject was calibrated through some empirical tests, in which the 0.1 mL of ethyl acetate was spread on a flat glass surface. The diffusion of the solvent was measured in centimeters in order to approximately assess the spreading of ethyl acetate when injected onto a flat surface (Figure 21). Whether the measurement of the diffusion on the glass did not take into consideration the swelling of the original adhesive and the presence of sand, it was still possible to use the results of this empirical test as a guide to calibrate the amount of solvent to inject in each area. The same test was carried out to measure the spreading of the Plextol B500 solution in order to calibrate the adhesive injections as well.
After this operation, the areas were placed under weight until complete evaporation of the solvent, which, despite its particular volatility, took several days in most cases. The weights were applied to the surface of the artwork initially by interposing Melinex monosiliconate sheets in order to prevent direct contact between the photographic print and the weights used (Figure 22). Once the setting time of the reactivated original adhesive had passed, the artwork was placed again under weight, this time interposing some non-woven fabric sheets and felts to facilitate the evaporation of the solvent through more permeable layers.
The cushioning effect of the felt layer allowed one to exert an effective yet gentle pressure on the surface while preserving the morphology of the artifact superficial roughness (Figure 23). This operation was carried out over the entire surface of the artwork affected by the detachments; once the solvent had completely evaporated, it was noticed that the reactivation of the original adhesive alone was insufficient in some areas.
Those areas were mainly located on the right side of the artwork, characterized by the most severe detachments and alterations in flatness, as well as at the edges of the work of art, where the original adhesive was almost absent due to the fact that it was unevenly applied by the author using a brush. The remaining detachments were treated with the application of a conservation adhesive which consists of an acrylic dispersion in water. In this case, it was decided to apply Plextol® B 500 adhesive with a brush at the edges and through injection in the internal areas after diluting it with demineralized water (1:1) to facilitate the injection. Throughout this operation, any micro excesses of adhesive that had leaked from the edges or injection holes were carefully removed with a damp cotton swab to avoid causing any kind of alteration on the artwork surface. The selection of an aqueous, solvent-free dispersion adhesive, used to treat the areas where the organic solvent was found to be ineffective, was made to ensure a confined treatment to the detached areas, as the injection of a solvent-based adhesive could have caused the occurrence of further detachments in areas previously unaffected. This is for two reasons: first, the solvent diffusion through the original adhesive layer would have not been easy to control, due to the affinity of the adhesive with organic solvents; and second, the characteristic high viscosity of solvent-based polymeric solutions would have been an obstacle in the injection phase, leading to the use of more diluted solutions and therefore the injection of larger amounts of solvent, increasing the risk of creating new detachments [21]. During the drying of the adhesive, the same precautions were taken as in the previous solvent evaporation phase. It may be important to point out that the operations described were carried out extremely gradually, over several weeks, during which the time required for complete drying and total evaporation of the solvent was given to the materials. The time frames needed for the drying of the original and the new adhesives were evaluated taking into consideration the ethyl acetate and water volatility and by carrying out empirical tests of solvent evaporation through layered materials similar to the one of the artwork in the same environmental conditions. The strict compliance of the necessary time frames was decisive for the effectiveness of the intervention, while respecting the constituent materials of the artifact, which, at the end of the operation, appeared unaltered in their physical and aesthetic consistency (Figure 24).
In addition, the artwork was monitored during every stage of the treatment through the observation of the surface in raking light, which made it possible to intervene safely, with a high degree of awareness and control of the immediate effects of the products used and their application methods. At the end of the intervention, it was possible to notice how the combined action of the two methods described above made it possible to achieve an optimal result in the re-adhesion of the photographic print to the aluminum panel, and how the controlled drying underweight allowed it to regain the flatness of the print (Figure 25).

8. Conservation Treatment Results

The treatment performed on Pace allowed us to address the existing conservation issues and to restore the legibility of the artwork while respecting the nature of the materials. The approach followed in the planning and execution of the conservation treatment made it possible to develop a minimally invasive intervention methodology that involved localized and extremely controlled operations, using techniques and materials suitable for this purpose. The choice of appropriate products and methods was the result of an extensive preliminary study phase. Pace is a very peculiar artifact, in which the photographic materials and the media of contemporary art coexist in a complex interaction. Planning a conservation treatment on this kind of object usually requires a multi-disciplinary approach; in this specific case, this type of strategy was essential to understand how the artwork was made and how all the interactions and connections existing between the overlays and materials worked. Given the knowledge acquired during the initial phase of study, it was decided to intervene very gradually, over the course of several weeks, allowing the solvents used to evaporate completely and enabling the materials to recover their original setting, without affecting their physical and aesthetic consistency to any extent. In conclusion, it may be affirmed that the methodology adopted for the treatment of the detachments and for the re-adhesion of the c-print to the aluminum panel was effective, and that the use of the selected solvents and adhesives allowed the successful regaining of the print’s flatness and the optimal restoration of the adhesion between the constituent elements of the artwork.

9. Discussion

The present work can be included into the broader panorama of researches on conservation of photographic objects, a rather recent field of study and not always rich in previous experiences and tested methodologies to refer to. The project, focused on the examination, analysis and treatment of Pace, may be considered a starting point for further research on the elaboration and experimentations of new methodologies to be used for the treatment of critical issues in similar artworks of contemporary photography. Another aspect that may be worth emphasizing is the importance of collaboration between conservators and contemporary photographers or artists, as they could represent a valuable source of knowledge throughout the study phase. In this case, the collaboration with Nino Migliori and the ones who worked with him in the 1970s provided a valuable support to the research and it is very likely that most of the conservation projects would benefit from the artists’ theoretical contribution.

Author Contributions

Conceptualization, M.C.D., M.G. and A.D.B.; methodology, M.C.D.; writing—original draft preparation, M.C.D.; writing—review and editing, M.G. and A.D.B.; supervision, M.G. and A.D.B. All authors have read and agreed to the published version of the manuscript.

Funding

This research received no external funding.

Data Availability Statement

Not applicable.

Acknowledgments

For this research, we received significant support from the photographer Nino Migliori, Marina Nella Truant (Director of Nino Migliori Foundation), Paolo Barbaro (CSAC Research Center - University of Parma). We thank Michele Di Foggia (Academy of Fine Arts of Bologna), who carried out FTIR analyses, and Mirella Baldan (Academy of Fine Arts of Bologna), who performed SEM-EDS, Optical Microscopy and additional FTIR investigations, for their assistance with the interpretation of the scientific analyses results. We would also like to thank Barbara Secci (MAMbo – Museum of Modern Art of Bologna) and Laura Gasparini (Academy of Fine Arts of Bologna) for comments that improved this research.

Conflicts of Interest

The authors declare no conflict of interest.

References

  1. MAMbo Collezione Permanente—MAMbo Permanent Collection. Available online: www.mambo-bologna.org/collezione/ (accessed on 4 November 2022).
  2. Mauro, A.; Curti, D.; Smargiassi, M. La Materia dei Sogni—The Matter of Dreams, 1st ed.; Contrasto: Roma, Italy, 2012; p. 12. [Google Scholar]
  3. Riccomini, E.; Pasquali, M.; Marelli, F.E. Muri. Tempo, Gesto, Segno—Walls. Time, Gesture, Sign, 1st ed.; Damiani Editore: Bologna, Italy, 2004; pp. 9–15. [Google Scholar]
  4. Barbaro, P.; Cavatorta, C.; Migliori, N. Luci e Tracce—Lights and Traces, 1st ed.; Assessorato alla Cultura di Cavezzo: Cavezzo, Italy, 1997; p. 9. [Google Scholar]
  5. Opere della Fondazione Nino Migliori—Artworks at Nino Migliori Foundation. Available online: www.fondazioneninomigliori.org/it/nino-migliori/opere (accessed on 4 November 2022).
  6. MUFOCO Museum of Contemporary Photography. Available online: www.mufoco.org/info/museo/ (accessed on 4 November 2022).
  7. CSAC. Available online: www.csacparma.it/ (accessed on 4 November 2022).
  8. Studio Villani in Bologna: The Most Important Italian Photographic Atelier of the 20th Century Between Industry, Art and History (2014–2015). Available online: www.museibologna.it/patrimonioindustriale/articoli/52869/offset/6/id/78230 (accessed on 4 November 2022).
  9. Barbaro, P. Studio Villani. Il Lavoro Della Fotografia—Studio Villani. The Work of Photography, 1st ed.; CSAC—University of Parma: Parma, Italy, 1979. [Google Scholar]
  10. Wilhelm, H.; Brower, C. The Permanence and Care of Color Photographs: Traditional and Digital Color Prints, Color Negatives, Slides, and Motion Pictures, 1st ed.; Preservation Publishing Co.: Grinnell, IA, USA, 1993. [Google Scholar]
  11. Reilly, J.M. Storage Guide for Color Photographic Materials: Caring for Color Slides, Prints, Negatives, and Movie Films, 1st ed.; Image Permanence Institute, University of the State of New York, New York State Education Dept., New York State Library, New York State Program for the Conservation and Preservation of Library Research Materials: New York, NY, USA, 1998; pp. 24–26. [Google Scholar]
  12. Lavedrine, B. Photographs of the Past—Process and Preservation, 1st ed; The Getty Conservation Institute: Los Angeles, CA, USA, 2009; pp. 202–203. [Google Scholar]
  13. Berselli, S.; Gasparini, L. L’archivio Fotografico. Manuale per la Conservazione e la Gestione Della Fotografia Antica e Moderna—The Photographic Archive. Handbook for the Preservation and Management of Ancient and Modern Photography, 1st ed.; Zanichelli, Ed.: Bologna, Italy, 2010; pp. 58–59. [Google Scholar]
  14. Pénichon, S. Twentieth century color photographs—The Complete Guide to Processes, Identification & Preservation, 1st ed.; Thames & Hudson: Los Angeles, CA, USA, 2013; pp. 17–19, 160–182, 192–203. [Google Scholar]
  15. Aldrovandi, A.; Picollo, M. Metodi di Documentazione e Indagini Non Invasive sui Dipinti—Methods of Documentation and Non-invasive Investigation of Paintings, 1st ed.; Il Prato: Saonara, Italy, 1999; pp. 73–78. [Google Scholar]
  16. Giannini, C. Dizionario del Restauro. Tecniche, Diagnostica, Conservazione—Dictionary of Restoration. Techniques, Diagnostics, Conservation, 1st ed.; Nardini Editore: Firenze, Italy, 2010; p. 197. [Google Scholar]
  17. Paolillo, L.; Guidicianni, I. La Diagnostica Nei Beni Culturali. Moderni Metodi D’indagine—Diagnostics in Cultural Heritage. Modern Methods of Investigation, 1st ed.; Loghìa Editore: Napoli, Italy, 2010; pp. 17–40. [Google Scholar]
  18. Selva Bonino, V.E.; Saccani, I.; Riedo, C.; Cimino, D.; Chiantore, O.; Croveri, P.; Lottici, P.P.; Predieri, G.; Casoli, A. Dry cleaning methods for conservative treatment of contemporary surfaces: The Italian project of characterization and application. In Proceedings of the VII Convegno Internazionale Colore e Conservazione Cesmar7, Dall’olio All’acrilico, Dall’impressionismo All’arte Contemporanea, Milano, Italy, 13–14 November 2015. [Google Scholar]
  19. Giuffredi, A.; Del Bianco, A.; Di Foggia, M. La rimozione dei depositi superficiali del gesso mediante idrogel viscoelastici di alcol polivinilico e borace—The removal of surface deposits on plaster using viscoelastic hydrogels of polyvinyl alcohol and borax. In Proceedings of the Lo Stato dell’Arte XVII Congresso Nazionale IGIIC—Chiesa di Cristo Flagellato dell’ex Ospedale San Rocco, Matera, Italy, 10–12 October 2019. [Google Scholar]
  20. Cremonesi, P. L’uso Dei Solventi Organici Nella Pulitura Di Opere Policrome—The Use of Organic Solvents in the Cleaning of Polychrome Artworks, 1st ed.; Il Prato: Saonara, Italy, 2004. [Google Scholar]
  21. Streitberger, H.J.; Goldschmidt, A. BASF Handbook Basics of Coating Technology, 1st ed.; BASF Coatings GmbH: Münster, Germany, 2018; pp. 38–80, 182–195, 584–586. [Google Scholar]
Figure 1. The artwork framed in diffused visible light (left) and unframed in raking light (right) before the conservation treatment.
Heritage 06 00005 g001
Figure 2. Graphical representation of the layered structure of the artwork Pace.
Heritage 06 00005 g002
Figure 3. Nino Migliori interviewed at Nino Migliori Foundation (left) and other artworks from the Walls series (right).
Heritage 06 00005 g003
Figure 4. Detail of the artwork in raking light before the conservation treatment.
Heritage 06 00005 g004
Figure 5. UV fluorescence photographic documentation of the artwork framed (left) and unframed (right) before the conservation treatment.
Heritage 06 00005 g005
Figure 6. Digital microscopy documentation with Dinolite AM4113T at 50× (left) and 200× (right) magnification. From top to bottom: details of the superficial layer and execution technique (top), cracks (middle) and losses (bottom) of the superficial layer showing the underlying photographic emulsion.
Heritage 06 00005 g006
Figure 7. Contact angle measurement indicating the hydrophilic nature of the superficial layer. Micrograph taken with Dinolite AM4113T at 50× magnification.
Heritage 06 00005 g007
Figure 8. Optical microscope image of the first sample in cross-section. The letters refer to the identified layers as shown in the graphical representation (Figure 2).
Heritage 06 00005 g008
Figure 9. Optical microscope image of the second sample in cross-section. The letters refer to the identified layers as shown in the graphical representation (Figure 2).
Heritage 06 00005 g009
Figure 10. SEM micrograph (left) and graphical representation (right) of the stratigraphic sequencing of the chromogenic print and surface layer. Layer a cannot be detected in the SEM image since the superficial layer was missing in the analyzed sample.
Heritage 06 00005 g010
Figure 11. Analyzed sample micrograph and layer C EDS spectra.
Heritage 06 00005 g011aHeritage 06 00005 g011b
Figure 12. Layer a (left) and layer b (right) FTIR spectra.
Heritage 06 00005 g012
Figure 13. Layer c (left) and layer b (right) FTIR spectra.
Heritage 06 00005 g013
Figure 14. Layer e FTIR spectrum.
Heritage 06 00005 g014
Figure 15. Sample 1 and Sample 2 FTIR spectra.
Heritage 06 00005 g015
Figure 16. Sample 3 FTIR spectrum.
Heritage 06 00005 g016
Figure 17. Graphical representation of the stratigraphic succession and the composition of each layer of the artwork Pace.
Heritage 06 00005 g017
Figure 18. Dry-cleaning of the artwork surface using a PU sponge (left) and PU sponges before and after cleaning operations (right).
Heritage 06 00005 g018
Figure 19. Cleaning of the artwork surface using a PVA and borax viscoelastic hydrogel at 8% (left) and the same hydrogel after cleaning operations (right).
Heritage 06 00005 g019
Figure 20. Solvent application with brush (left) and with injection (right) during the reactivation of the original adhesive.
Heritage 06 00005 g020
Figure 21. Empirical test for the solvent diffusion evaluation.
Heritage 06 00005 g021
Figure 22. Drying of the adhesive underweight. The artwork surface was protected with a Melinex sheet.
Heritage 06 00005 g022
Figure 23. Detail in raking light of the surface of the artwork Pace before (left) and after (right) the conservation treatment.
Heritage 06 00005 g023
Figure 24. Digital microscopy documentation with Dinolite AM4113T at 50× before (left) and after (right) the conservation treatment. No significant changes in surface appearance were detected.
Heritage 06 00005 g024
Figure 25. The artwork framed (diffused visible light) and unframed (raking light) after the conservation treatment.
Heritage 06 00005 g025
Table 1. Results of the pH analysis of Agarose gel samples placed in 7 sampling points with multiple contact times, before and after cleaning operations.
Before CleaningAfter Cleaning
Sampling PointContact Time:
10 min
Contact Time:
20 min
Contact Time:
10 min
Contact Time:
20 min
16.95 pH6.97 pH7.81 pH7.90 pH
26.32 pH6.38 pH7.42 pH7.45 pH
36.04 pH6.86 pH7.77 pH7.82 pH
46.97 pH6.82 pH7.63 pH7.71 pH
56.68 pH6.70 pH7.57 pH7.63 pH
66.80 pH6.90 pH7.91 pH7.96 pH
76.41 pH6.45 pH7.84 pH7.91 pH
Table 2. Results of the ionic conductivity analysis of Agarose gel samples placed in 7 sampling points with multiple contact times, before and after cleaning operations.
Before CleaningAfter Cleaning
Sampling PointContact Time:
10 min
Contact Time:
20 min
Contact Time:
10 min
Contact Time:
20 min
1192 µS/cm225 µS/cm153 µS/cm127 µS/cm
2102 µS/cm135 µS/cm126 µS/cm123 µS/cm
386 µS/cm168 µS/cm124 µS/cm132 µS/cm
4114 µS/cm190 µS/cm110 µS/cm190 µS/cm
5184 µS/cm250 µS/cm154 µS/cm278 µS/cm
6133 µS/cm208 µS/cm225 µS/cm286 µS/cm
795 µS/cm112 µS/cm137 µS/cm101 µS/cm
Disclaimer/Publisher’s Note: The statements, opinions and data contained in all publications are solely those of the individual author(s) and contributor(s) and not of MDPI and/or the editor(s). MDPI and/or the editor(s) disclaim responsibility for any injury to people or property resulting from any ideas, methods, instructions or products referred to in the content.

