Article

Reconstruction and Visualization of the Mosaic Floor of the Temple of Pitiunt Hillfort

1
Federal Research Centre the Subtropical Scientific Centre of the Russian Academy of Sciences, 354000 Sochi, Russia
2
Institute of Archaeology of the Russian Academy of Sciences, 117292 Moscow, Russia
3
N.N. Semenov Federal Research Center of Chemical Physics Russian Academy of Sciences, 119334 Moscow, Russia
*
Author to whom correspondence should be addressed.
Appl. Sci. 2023, 13(10), 6210; https://doi.org/10.3390/app13106210
Submission received: 17 April 2023 / Revised: 30 April 2023 / Accepted: 17 May 2023 / Published: 18 May 2023

Abstract

:
The 3D reconstruction of the Great Pitiunt Fortress has been our long-term goal. The results of archaeological excavations have revealed traces of a mosaic floor in one of the temples. It was impossible to carry out a full reconstruction of the temple without first restoring the mosaic floor. The area of the preserved mosaic found during the excavations was only 33 square meters. This is 10.5% of the total interior area of the temple of 317 square meters. However, based on a number of reasons, i.e., the direction of the dividing borders between the elements of the mosaic, the requirement of symmetry of individual sections, the adjustment of motifs and the analysis of similar contemporaneous sites, it was possible to make a version of the general view of the reconstructed mosaic floor for further processing in the 3D reconstruction of the temples of the complex. This article provides the methods described, an analysis and justification of the reconstructed design of the mosaic in fragments and a holistic final model. The stylistic features of the mosaic have been identified, and the reasons for the dating of the mosaic have been given.

1. Introduction

The Pitiunt Fortress, located in the modern town of Pitsunda (Abkhazia), is one of the most significant classical monuments of Roman expansion on the eastern Black Sea coast, along with Apsar, Phasis and Sebastopolis. The presence of Roman legionnaires here is confirmed by the discovery of bricks and tiles bearing their markings: LEG and [LE]G XV, interpreted by all researchers as Legio XV Apollinaris, whose markings have additionally been found in the city of Petra (Georgia) [1] and the discovery of a metal (bronze) part of a ballista-type torsion throwing machine [1,2]. Bronze statues of the Roman god Bacchus [3] and numerous 2nd–6th century coins were also found at the site [3].
The temple complex on the territory of the fortress is the oldest known site of Christian architecture in the entire area of the eastern Black Sea.
From 1952 to 1974, the territory of the Pitiunt Fortress was extensively explored in a Bichvint archaeological expedition led by A.M. Apakidze, Doctor of History, of the Academy of Sciences of the Georgian Soviet Socialist Republic (GSSR). The expedition uncovered the contours of the fortress and 27 fortress towers and excavated the central part of the western castellum with administrative and residential buildings, garrison baths and a multi-layered temple complex in the eastern part of the fortress. The three-volume monograph, “The Great Pitiunt” [3] was published as a result of this work. In 2018–2019, a version of the 3D reconstruction of the exterior of the fortress was prepared on the basis of the materials from these studies [4]. Within the framework of this work, the exterior of the Temples No. 1 and 3 was reconstructed (Figures 13 and 14 of Ref. [4]) without significant details, since studying the characteristics of the early Christian architecture of the 4th–6th centuries significantly exceeded the scope of this study. It was therefore decided to carry out detailed external and internal reconstructions of Temples 1–4 separately. An important and integral part of this work is to reconstruct the floor mosaic of Temple 2.
On the territory of the Eastern Black Sea region, floor mosaics have been found only at a few sites located along the coast: the temple of the “Southern Cultures” (Sochi, the Adler district), Temple No. 2 of Pitiunt (Pitsunda, Republic of Abkhazia), the Temple of 2001 on the territory of the fortress of Sebastopolis (Sukhum, Republic of Abkhazia) and a bathhouse of a Roman villa in the village of Bobokvati, not far from Ancient Petra (a modern village of Tsikhizdziri, Georgia). Moreover, the Sebastopolis and Bobokvati mosaics were made using the Opus Sectile technique, i.e., with large shaped terracotta and marble elements [5], whereas the mosaic technique in the Southern Cultures temple remained unknown due to its destruction in the 1950s of the 20th century [6], and only in Pitiunt was Opus Tesselatum mosaic documented. This, together with the fact that Temple No. 2 is one of the oldest on the eastern Black Sea coast, makes it very unique and significant.
Under the direction of the chief architect of the Bichvint archaeological expedition, I.N. Tsitsishvili [7], the members of the expedition, L.A. Matsulevich [8,9], L.A. Shervashidze [10] and T.S. Kaukhchishvili [11] studied the mosaic of Temple No. 2 during the excavations. Later, on the basis of the expedition materials, the mosaic was the subject of studies by V.A. Lekvinadze [12] and L.G. Khrushkova [13]. Although accurate, it is important to note that they were all completed in the “pre-Internet” era and lack full reconstruction and visualization. In this respect, within the framework of this work, the aim is to supplement these studies with new materials obtained in recent years by various specialists on mosaics of late antique and early Christian sites of the Roman Empire and to create a reconstruction with visualization, which today is an indispensable element in the promotion of cultural heritage.

2. Materials and Methods

The reconstruction of an antique mosaic is of great importance. The question of why some lost parts were reconstructed in this way has been the subject of many works dealing with different aspects. However, in the main, these works are either related to narrative reconstructions or to physical reconstructions [14,15,16,17]. Our reconstruction will help to create a virtual 3D model of the temple and the whole complex.
The temple complex of Pitiunt consists of the ruins of four temples that were built one after the other on a single site in the period of the 4th to the 6th century AD. The first three temples were built on top of each other, and the fourth one was moved to the west. The temple complex is now in ruins, and the outlines of the foundations are visible (Figure 1).
According to most researchers, the earliest building of the complex—the single-nave Temple No. 1 with a semicircular apse—was built between the Edict of Milan in 313 and the First Ecumenical Council of Nicaea in 325. It was the residence of Bishop Stratophil of Pitiunt. Temple No. 2, a three-nave, single-aisle Temple with a wide narthex, was built on the site after the temple was destroyed by fire in the middle of the 4th century. It was the richest of all the buildings in the complex. Its naves were separated from each other by marble columns, and the floors were decorated with mosaics.
The temple did not last very long and was also destroyed by a fire, most probably in the 5th century AD. At a later date, Temple No. 3 was built on its foundations. The new design of the stylobates, the apses and the barriers between the nave and the narthex partially destroyed the mosaic. However, the remaining part decorates the floor of Temple No. 3. In a number of places on the naos, the lost mosaic has been replaced by ceramic tiles [7].
Our reconstruction of the mosaic floor of Temple No. 2 was based on the layout of the Bichvint mosaic floor shown in Figure 7A in Volume 3 of the monograph [3], the layout from the article by V.A. Lekvinadze [12] based on the drawing by I.N. Tsitsishvili kept in the State Museum of Georgia and the layout of the remains of the mosaic floor from the Archaeological Museum of the Pitsunda State Historic and Architectural Reserve “Great Pitiunt” (hereinafter “Pitsunda Archaeological Museum”).
The reconstruction of the mosaic floor of Temple No. 2 from the Pitiunt Fortress required a thorough analysis of the available layouts. This work revealed a number of errors and inconsistencies in the sources. The scaling of different variants of the layout gave different geometric dimensions, incompatible with one another and with the existing description. Therefore, it was decided to clarify the geometry of the complex using aerial photography from a UAV, building a photogrammetric model, orthophotomap and DTM according to an established algorithm for such sites [18]. This work made it possible to identify a number of features of the geometry of structures and verify the dimensions.
Aerial photographs of the temple complex were taken using a Mavic Air 2S quadrocopter equipped with an 18-megapixel camera. The flight altitude was 10 m, the camera installation angle was 90 degrees to the horizon, the recording interval was 2 s and the flight speed was set on the basis of a 60–80% overlap of adjacent images. Several serpentine runs were made from west to east and back, with the trajectory being shifted northwards by 2–3 m per cycle. Agisoft Metashape Professional was used to process the UAV survey results. A photogrammetric model, an orthophotomap and a DTM of the preserved foundations of the Temples Nos. 2 and 3 were obtained. The results showed that, on average, the temples had a remarkable parallelogram shape of 4 degrees (Figure 2), which was not reflected in any of the primary plans obtained by the Bichvint survey, where they were all inscribed in a rectangular outline formed by the north, west and south walls. Linking the reconstructed mosaic to the actual layout of the buildings was therefore much more difficult. The geometry and mosaic elements of the basic layout had to be adapted.
It should be noted that parallelograms were not uncommon in Byzantine architecture. Many authors describe these features in the temples of Chersoneses, Greece and Asia Minor [19,20]. A deviation from clear geometric forms is a characteristic of the Byzantine period, unlike the preceding Roman period, known as “comfortable disorder” [21]: the builders did not keep accurate measurements and did not correct any deviations, especially if they were not visible. The disregard for right angles was due to various reasons.
Regarding the temples at Pitiunt, it should be noted that Temple No. 1 was the first with a parallelogram shape. Along the outlines of the southern and western walls, the foundations of Temples Nos. 1, 2 and 3 coincide. Temple No. 4 was shifted westwards; its eastern wall was attached to the western wall of Temples Nos. 1–3, however does not coincide, and all corners of the temple are almost right-angled.
According to I.N. Tsitsishvili [7], the area of the preserved mosaic found during the excavations was 50 square meters. However, a detailed calculation showed that it was only 33 square meters, which is 10.5% of the total interior space of the temple of 317 square meters. However, it was possible to make a version of the general view of the reconstructed mosaic floor for further processing in the 3D reconstruction of the temples of the complex on the basis of a number of reasons, i.e., the direction of the dividing borders between the elements of the mosaic, the requirement of symmetry of individual sections, the adjustment of motifs and the analysis of similar contemporaneous sites (Figure 3).
It is necessary to take a closer look at the process of the reconstruction. As a basis for the model, scaled overlapping layouts of Temples Nos. 2 and 3, obtained from the photogrammetry of the complex, the layout of the mosaics of the Bichvinta expedition, taken from the monograph, and a photograph of mosaic fragments [3] were used. Photos of individual elements were added to the temple layout to create a high-resolution collage, which was then drawn using a combined technique in AutoDesk AutoCAD (vector) and Adobe Photoshop (raster).
It was possible to cover a significant area of the preserved mosaic with elements of the photo collage using a large number of photographs of fragments collected by the Bichvint expedition, together with full-scale copies of individual art panels from the Great Pitiunt Museum Reserve. The remaining area of the mosaic, which was not included in the photo album, was drawn according to the pictures of the layout given in the work of V.A. Lekvinadze [12], since the quality and resolution of his pictures were higher than those illustrated in the monograph [3].
Almost all the original mosaics were dismantled and taken to Georgia. They are now kept in the Museum of Georgian Art in Tbilisi; however, unfortunately, due to the political situation in the world, we are not allowed to see them. Therefore, based on replicas of the most fascinating art panels and the mosaic layout of the temple presented in the Pitsunda Museum and a fragment of a real mosaic stored in the form of a “wickerwork”—a twisted bundle of red and grey shades—the color scheme of the mosaics can only be guessed. L.A. Matsulevich [8,9] and L.A. Shervashidze [10] gave a detailed description of the colors in their works. However, all the photographs in the monograph [3] are in black and white.
L.A. Matsulevich notes the Pitiunt mosaic’s limited palette. Most of the flooring is in just 8 basic colors and tones: red, brownish red, violet, pink, ochre, white, blue-grey and dark blue. For the art panels of the narthex and the apse, some other colors of the palette were added [9]. Shervashidze names the following colors: white, red-brown, pink, dark grey, greenish-grey, black and yellow [10]. The colors of the mosaic in the model were taken from full-color replicas in the Pitsunda Museum, since the name of a color is a subjective category and varies from person to person.

3. Results and Discussions

Despite the large amount of finds from the 1952–1974 excavations, much of it remains unpublished [12,13]. As a result, analysis of the data for in-depth research and reconstruction is difficult. After the excavations, many elements of the temple, i.e., the baptistery or the platform in the apse, were lost, and their description in the three-volume monograph, “Great Pitiunt” [3] is missing or poorly covered; as a result, their reconstruction allows for some alternatives. Given the complexity and variety of the mosaic motifs, we will analyze and justify the reconstruction of the appearance of the mosaic of Temple No. 2 in parts.

3.1. Mosaic of Narthex

Temple No. 2 had a narthex which was 5.0 m long and 12.6 m wide along the axis of the temple. Presumably, the temple had a central entrance in the western wall which has not survived because the apse of the later Temple No. 4 was built on this site. The southern wall had another entrance, which was later covered [7]. Since the barrier between the naos and the narthex was completely destroyed during the construction of Temple No. 3, the number of passages from the narthex to the naos remains unknown. V.A. Lekvinadze was of the opinion that there had been three passages, each of them leading to a separate nave [12], which is the case in our model (Figure 4).
The mosaic floor of the narthex divided it into 2 unequal parts: the southern part of 5.0 × 7.8 m2 and the northern, almost square part of 5.0 × 4.9 m2.
The southern part of the narthex was inscribed with a decorative border, 62 cm wide, with alternating meandering and geometric patterns. The motif was divided into three parts: the central part was the baptistery, the southern part was decorated with patterns of cross-woven rhombuses with medallions, and the northern part was probably a passage to the central nave.

3.1.1. Perspective Meander

A meander is the basis of the border that encloses the entire composition of the southern part of the narthex. Tightly braided bands of red and grey, separated by a thin white stripe, form the meander. A swastika pattern is outlined in this band. Throughout the Roman Empire, a similar motif was widely known. It was actively used in the mosaics of Roman villas throughout the Mediterranean from the turn of the century, for example, in the 1st century AD in Herculaneum and Pompeii, in a Roman villa in Rabat (Malta), in later times, namely in a mosaic of a festive scene in the Tunis Museum (4th century) [22]. A similar, two-colored meander border was used in early Christian churches and synagogues in the Middle East from the 4th to the 6th century. This is the case in the Maoz-Khaim Synagogue mosaic of the 5th century, the Sussia Synagogue mosaic (6th century) and the Horvat Brachot Church mosaic (6th century) [23]. From the time of the Arab Caliphate, the meander was further developed in Arab mosaics. A striking example is the decoration of Caliph Isham’s palace in Jericho (first half of the 8th century) [24].
Thus, despite its development over 8 centuries, the meandering principle remains intact. It is a pattern of two bands of warm and cold tones (usually red and blue or grey) that cross and twist in the shape of a swastika that is placed on the edge. A thin, white line marks the edge of the band facing the viewer. The curves of the band, which form dark triangles and parallelograms, give a sense of volume and perspective. This is why it is called a “perspective meander”.
In the mosaic of Pitsunda Temple No. 2, swastikas are additionally made with a meander. However, dark triangles are inserted randomly into the bands, which completely destroys the sense of volume. It would seem that the mosaicist was familiar with the meander motif and was trying to depict it, however was completely confused by the geometry. The figures look flat and chaotic. The elements of the meander do not look similar and hardly form the general motif of the pattern. The core pattern of the swastika is lost, due to the different thicknesses of the red and grey lines (Figure 5). This flat image of the Pitsunda meanders was also noted by L.A. Matsulevich [9] and L.A. Shervashidze [10].
The harmony of the border is disturbed. As we see in the reconstruction (Figure 4), the meandering squares alternate. The squares are inscribed with various geometric ornaments or images of animals (fish; deer; bird). While the harmony is preserved in the eastern part of the border, violations can be observed elsewhere. Sometimes, the mosaicist replaces the squares of the ornament with rectangles for the sake of harmony. The most serious violation is in the southern part; between two ornamental borders, the mosaicist could not place a meander. This is an eloquent illustration of the artistic skills of the Pitiunt mosaicists and shows that the mosaic was made on the spot, without prior calculations and drawings.

3.1.2. Rhombus Panel

An ornamental covering forms the southern part of the decorative border. Its pattern consists of intersecting diagonal rhombuses interlaced with alternating two-tone braids—“wickerwork”—and shaded rollers. Octagonal and round pendants depicting geometric designs and birds are placed at the tops and intersections of the rhombuses. During the construction of the barrier in the narthex of the later Temple No. 3, the eastern part of this cover was damaged. A trench was dug into the mosaic floor, and the foundation for the stone wall was made. The mosaic in this area was destroyed. As it was in the naos of the new temple, the eastern part of the real decorative border was preserved. However, it was possible to reconstruct the original appearance of this mosaic covering (Figure 6), thanks to the uniformity of the pattern.
This panel shows a pattern that was very common in Late Antiquity and the early Middle Ages. This pattern, similar to the meander, was used in different Roman villas, baths, synagogues and early Christian churches. Examples include the Roman Villa, Desenzano del Garda, the baths in the Roman Villa, La Olmeda in Room No. 1, Pedrosa de la Vega (Palencia, Castile and Leon), the House of Eirene in Philippopolis (modern day Plovdiv) [25], the early Christian cruciform temple of Kaoussie near Antioch [9], the early Christian temple of Shavei Zion in northern Israel [23], the Temple of Marmara Ereglisi Perinthos (late 5th century) in Heraclea Thracia [26], the early Christian Temple of Madonna del Mare in Trieste, the synagogue of Naiaran [23] and the Horvat Brachot [23]. In the later sites of the Arab Caliphate, we find the transformation of this pattern, for example, in the palace of Caliph Isham in Jericho (first half of the 8th century) [24]. It is clear that the list of analogous sites from the 4th to the 6th centuries, which could continue much further, is rather long. Thus, throughout the Roman Empire, the pattern found in the Temple of Pitiunt No. 2 was widespread. Therefore, L. Matsulevich’s opinion about the existence of a certain local mosaic school of Bichvint-1 and Bichvint-2 with its unique features [9], due to the absence of similar sites both in the vicinity of Pitiunt and in the rest of northwestern Colchis, seems unproven.
The analysis of the motif of this part of the Pitiunt mosaic and the decorative border of the narthex, comparing it with the analogies mentioned above, leads us to believe V.A. Lekvinadze [12] and L.G. Khrushkova [13] that the Pitiunt mosaic of Temple No. 2 is from the 5th century and not from the second half of the 4th century, as L.A. Matsulevich had suggested [9].
A number of errors relating to the pattern of the Pitiunt mosaic made by the mosaicist should be pointed out. They become more visible on a reconstructed panel (Figure 6b). It seems that the mosaicist started the mosaic without having planned the available space. He therefore began to distort and deform the pattern in order to fit it into the limited space. This shows the lack of a predesigned, calculated or detailed drawing.

3.1.3. Baptistery Decorations

Very little is known about the baptistery, as the monograph [3] does not provide a sufficient amount of information on it. A detailed report on the excavations carried out in the area of the baptistery, its construction, depth, surface decoration and the presence of mosaics on it, the height of the steps and so on, had not been included.
The area under consideration includes the T-shaped baptistery itself, a fragment of a framing decoration and two artistic panels in varying states of preservation, according to the basic layout of the mosaic [3]. The northern part of the area was destroyed by the later apse of Temple No. 4 cut into the narthex and the eastern part by the narthex barrier of Temple No. 3 (Figure 3). The shape of the baptistery as recorded by the Bichvint expedition corresponds to the time when Temple No. 3 existed. However, the positioning of the art panels on the western side is an indication that the baptistery had an east–west orientation. It is therefore probable that the baptistery had a continuation to the east. Its original shape was traditionally cruciform, and this was retained when rebuilt (see Figure 4). In the description of the mosaic in the baptistery, L.A. Matsulevich [9] writes that a white and red ornament of intersecting circles bordered a white area in front of the footpath. On the basis of this description and taking into account our assumption about the cruciform shape of the baptistery, we continued this decorative border around the perimeter of the basin, thus obtaining the image of a cross. The width of the frame from the south and from the north is not the same, as is evident from the photo of this section [9], being one and one and a half circuits of the pattern, respectively.
Four elongated rectangles appeared at the ends. Archaeological evidence has been found for two of the western ones. At the junction with the meander pattern behind the barrier of the narthex of Temple No. 3, a trace of the border of the northeastern rectangle has been preserved (Figure 3). Therefore, the reconstruction shows four rectangles: the eastern ones according to the preserved trace and the others according to general rules.
The rectangles that have been preserved on the western side contain two artistic panels. The “Fountain of Living Water” composition is on the south-western side. It has been thoroughly described and studied by various authors [7,8,9,10,12,13] therefore, there is no need to go into further details. Its mosaic has been lost in some places. However, the composition of the panel has a central symmetry which makes it possible to reconstruct the missing parts and integrate them into a motif (Figure 7).
The north-western panel depicted a large vessel with “spoons” on the body. It had a colored rim and graceful twisted handles (Figure 4). This panel was diagonally destroyed in half by the apse of Temple No. 4. Unfortunately, there is no photograph of these mosaics. Only a sketch is available. For this reason, the image has been adjusted to correspond with the description given by L.A. Matsulevich [9]. The central symmetry of this jar made it possible to complete its pattern on the other side, and the significant remaining area above the rim of the jar was completed with vines with fruit, matching the composition of this motif.
During the construction of the narthex wall of Temple No. 3, two eastern panels were irretrievably lost. Thus, we can only speculate about what might have been portrayed. Given that the purpose of the baptistery is associated with water and baptism and that the south-west panel depicts a fountain of living water, the image of two fish would seem to be close to the motif, especially since a similar motif occurs twice in this narthex in a mosaic pattern with rhombuses and once in a border with meanders. From the north-east, a panel with a kantharos and birds sitting on it was added. This corresponds to the fountain of living water and a jug and two birds found on a fragment of mosaic in the northern part of the apse.

3.1.4. Central Passage

A fragment of a border resting on the south-eastern shoulder of the apse of Temple No. 4 can be seen in the general arrangement of the mosaics to the north of the baptistery (Figure 3). On the other side, the westward turn of the border, slightly missing the apse axis of Temple No. 4, can be seen if we look at the eastern side of the meandering border. A rectangle inscribed in the northern part of the meander ornamental border is bound by these two lines. It can be seen that this rectangle is located almost in the center of the narthex; however, it is slightly offset to the north.
This is an indication that the central passage between the western entrance to the temple and the passage to the central nave were paved. It also suggests that the main entrance to the temple was not exactly in the center of the western wall, however was shifted 0.4 m to the north.
The mosaic was not preserved within this rectangle. Only a small fragment was found on the apse of Temple No. 4. At the same time [12], it has been suggested that this area may have belonged to the mosaic of the atrium which faced the entrance to the temple. On this basis, this pattern was used in the aisle, on the assumption that the mosaic in the atrium and the central aisle may have been the same.

3.1.5. Northern Part of the Narthex

The mosaic has not survived in the northern part of the narthex measuring 4.9 × 5.0 m. The construction of the apse of Temple No. 4 destroyed it. Therefore, the fact that the meandering border divided the area of the narthex into a northern and southern part was taken as a basis for the reconstruction of this section. The southern part was occupied by the baptistery and the adjacent areas, which were used for the liturgy of baptism. The northern part had a different, simpler purpose. It could be filled with a simple geometric ornament. The intersecting circles in the northern nave of the Great Hall were our choice of ornament. The decorative border in the form of ivy leaves and pelts (see below) was taken from the same place (Figure 3).

3.2. Naos

The main hall of Temple No. 2—the naos—consists of three naves separated by five pairs of columns. I.N. Tsitsishvili suggested that Temple No. 2 had a marble colonnade with an architrave of the southern order [7], on the basis of fragments of marble columns found in the walls of the later Temple No. 3. Excavations revealed the square bases of southern order columns and traces of northern order bases in the northern stylobate of Temple No. 3.
Our calculations showed that only approximately 4 square meters of preserved mosaics were found in the 170 square meters of the total area of the naos. A further 30 square meters had been tiled [7]. This flooring belonged to Temple No. 3. It was a repair of the floor after the destruction of Temple No. 2.
Unfortunately, we do not know what the floor of the naos looked like. A small mosaic fragment in the northern nave suggests that the floor was patterned with intersecting red circles. The lanceolate intersections were filled with white. Inside each circle, there was a white square. The area of this pattern was bounded in the north-east by a border of small columns with spherical tops, the space between which was filled with an ivy leaf shape topped with a pelt. V.A. Lekvinadze [12] noted that there were no direct analogues of such a combination of the pelt and the ivy forms in the ornaments of similar sites. In mosaic art, however, these two motifs were often used as independent elements. The shape of the ivy leaf (or of the suit of cards) is most often used in mosaics in combination with a twisting stem, for example, in the mosaics of the Marmara Ereglisi Perinthos Temple (late 5th century) [26]. Less common is the combination of pelts with heart-shaped leaves. A mosaic in the Temple of S. Stefano on the island of Kos (5th century) [27,28] and the Great Temple of Kefalos (5th–6th century) [23] can be added to the examples already published [12]. A further analogy of the border of the Pitiunt can be found in the Roman residence of Augustus Trajan at Stara Zagora (4th century AD). The mosaic border that surrounds the central composition of Room 1 comprises columns, similar to those in Pitiunt. However, it does not have the spherical tops. There are no heart-shaped leaves in this ornament. However, the space between the columns is additionally covered with pelts [29]. In the mosaic of the Church of the Holy Martyrs in Tayyibat al-Imam (5th century) and additionally in the relief of a sarcophagus in the Louvre Museum, 3rd century, the image of a column with a round object attached to its top resembles the form of the Pitiunt ornament [30]. This feature is not merely a decorative element, as we can see. In Late Antiquity, it was a very common motif. According to M. Olshevsky, it is a large gnomon or a sundial similar to the Jerusalem Column, which was very popular in Roman times. Interestingly, we find direct analogies of the Pitiunt border motif only in the early Christian churches of Thrace of the 4th and 5th centuries; these are the Episcopal Temple of Parthikopolis and the Temple No. 1 at Garmen [31]. Columns with bases, capitals and spherical tops, pelts and heart-shaped ivy leaves are all present.
An analysis of the composition of the remains of the mosaic in the northern nave, shown in Figures 174, 175 and 184 of Volume 3 of the monograph [3], shows that it had a simple pattern that could fill a large area bounded on the side of the northern wall and along the border of the naos and apse by the border of columns, pelts and heart-shaped leaves described above. L.A. Shervashidze wrote about the area: “The mosaic may have had a central panel with a composition or an ornamental motif, as in the case of the mosaic flooring of Chersonesos, which is now in the Hermitage in the Hall of Athena”. Agreeing with this opinion, we transferred this pattern to the entire area of the naos, dividing it only along the lines of the column abutments and placing it in a single border as described above. At the corners of the border, no decorative element has been added, as in the case of Chersonesos, since a photograph of this area that is available does not have such an element. The borders of the long sides of the naves formed 10 identical fields with the column bases, which were filled with geometric patterns analogous to synchronous Christian sites: Solomon’s knots, intertwined circles, inscribed rhombuses and a flat swastika meander. It is important to note that all these patterns have analogues in the surviving sections of the Pitiunt mosaics. Thus, we have not introduced a single unfamiliar element. In the central part of the main nave, a panel with a similar decoration was made, analogous to the Chersoneso chrismons; however, the central filling was simplified by replacing the polychrome grid with a Solomon’s knot of circular segments, which were also often used for similar sites. In the corners of the square, the kantharas were replaced by pelts. A simplified version of the central panel was chosen because there is no evidence of complex geometric patterns in the surviving sections of the mosaic. To conclude the description of the naos mosaic, it should be noted that the proposed version is obviously not sufficiently justified; however, at the same time, it does not fundamentally contradict the overall composition and fits organically into it (Figure 3).

3.3. Apse

The three-nave Temple No. 2 had a large apse, five-sided both internally and externally, which covered all three naves, while its walls continued smoothly, without shoulders, into the contour of the longitudinal walls. One of the most striking features of this apse, for which there are no known analogues, is its asymmetry. The axis of the apse is clearly displaced southwards (Figure 2).
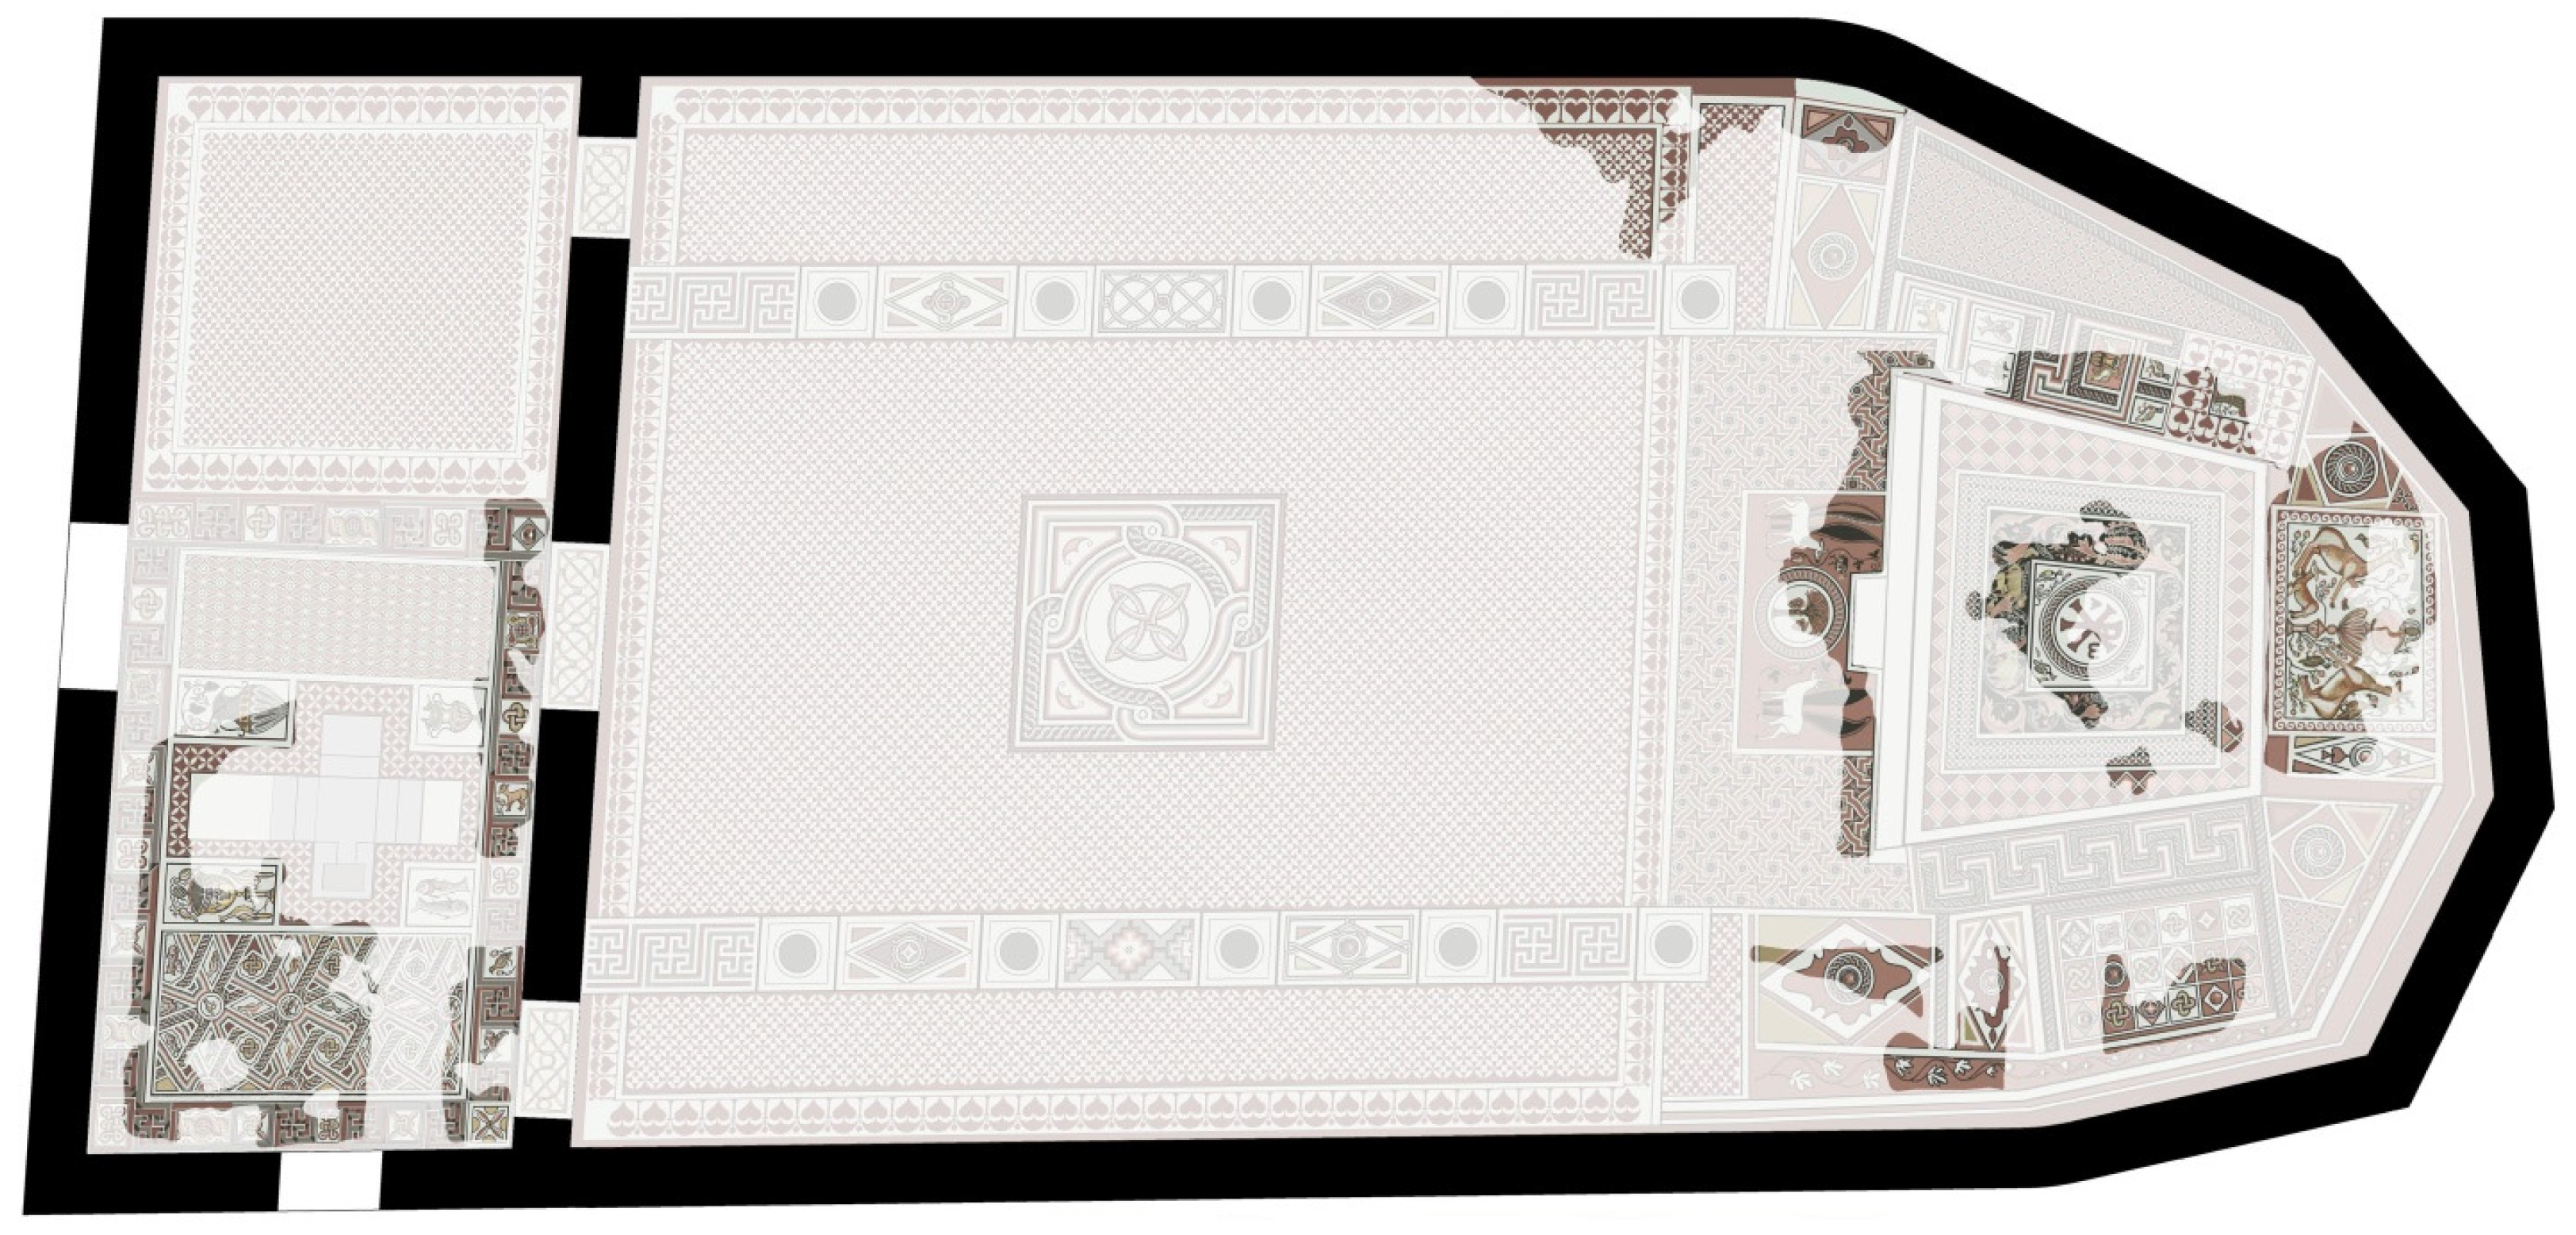
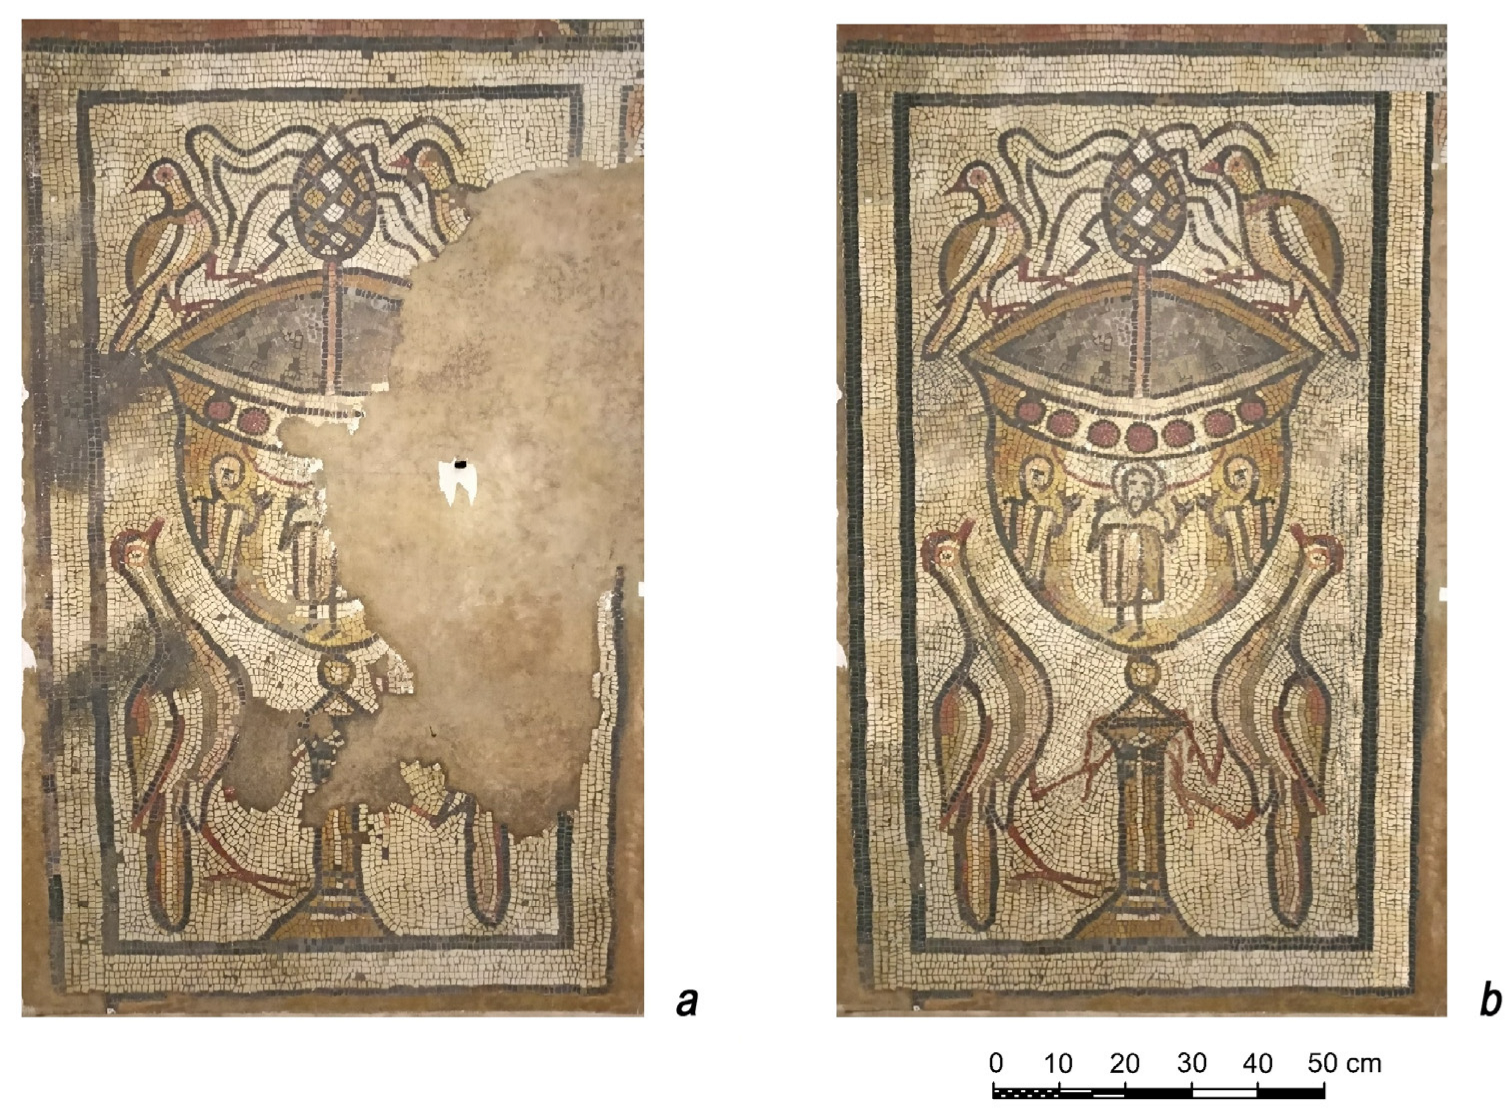
The plan of the mosaic floor of the apse indicates a dedication to a holy martyr. This is symbolically evidenced by successive mosaic panels representing heroic martyrdom for faith (palm tree panel) and the subsequent acquisition of a paradise life by Jesus Christ (monogrammed chrismon) (deer panel and fountain of living water).
Much attention has been paid to analyzing the artistic features of the mosaic of these fragments [7,8,9,10,11,12,13]; therefore, we will concentrate here only on the nuances of reconstructing its former appearance.

3.3.1. Deer Panel and Fountain of Living Water

This panel was hidden under the construction of the floor and the syntron of the central apse of Temple No. 3, which partially damaged it (Figure 8). The loss of the mosaic is approximately 30% of the total area. However, its appearance has been restored since the guiding lines of the contours of deer, kanthara with a pinecone, pomegranate branches and birds have been preserved. There are many possibilities for the depiction of birds throughout the temple mosaic; therefore, it was not difficult to create similar drawings. The heads of the deer have been restored, according to the partially preserved outline of the head of the deer on the right. As an illustration of the mosaicist’s skill, images of deer heads from the same panel, deer from a panel with a date palm and images of a lamb from the border of the narthex were used.
It should be added that the peculiarity of the Pitiunt mosaic lies in the symbolism of the family and maternity, which is not typical of similar motifs of thirsty animals in other synchronous sites, where two identical stags, doe, peacocks or doves are usually depicted symmetrically. In our case, a doe with a fawn on one side and a stag on the other are depicted on one of the main panels of the temple, symbolizing the Garden of Eden.
We will return to other examples in the description of the corresponding fragments.

3.3.2. Platform

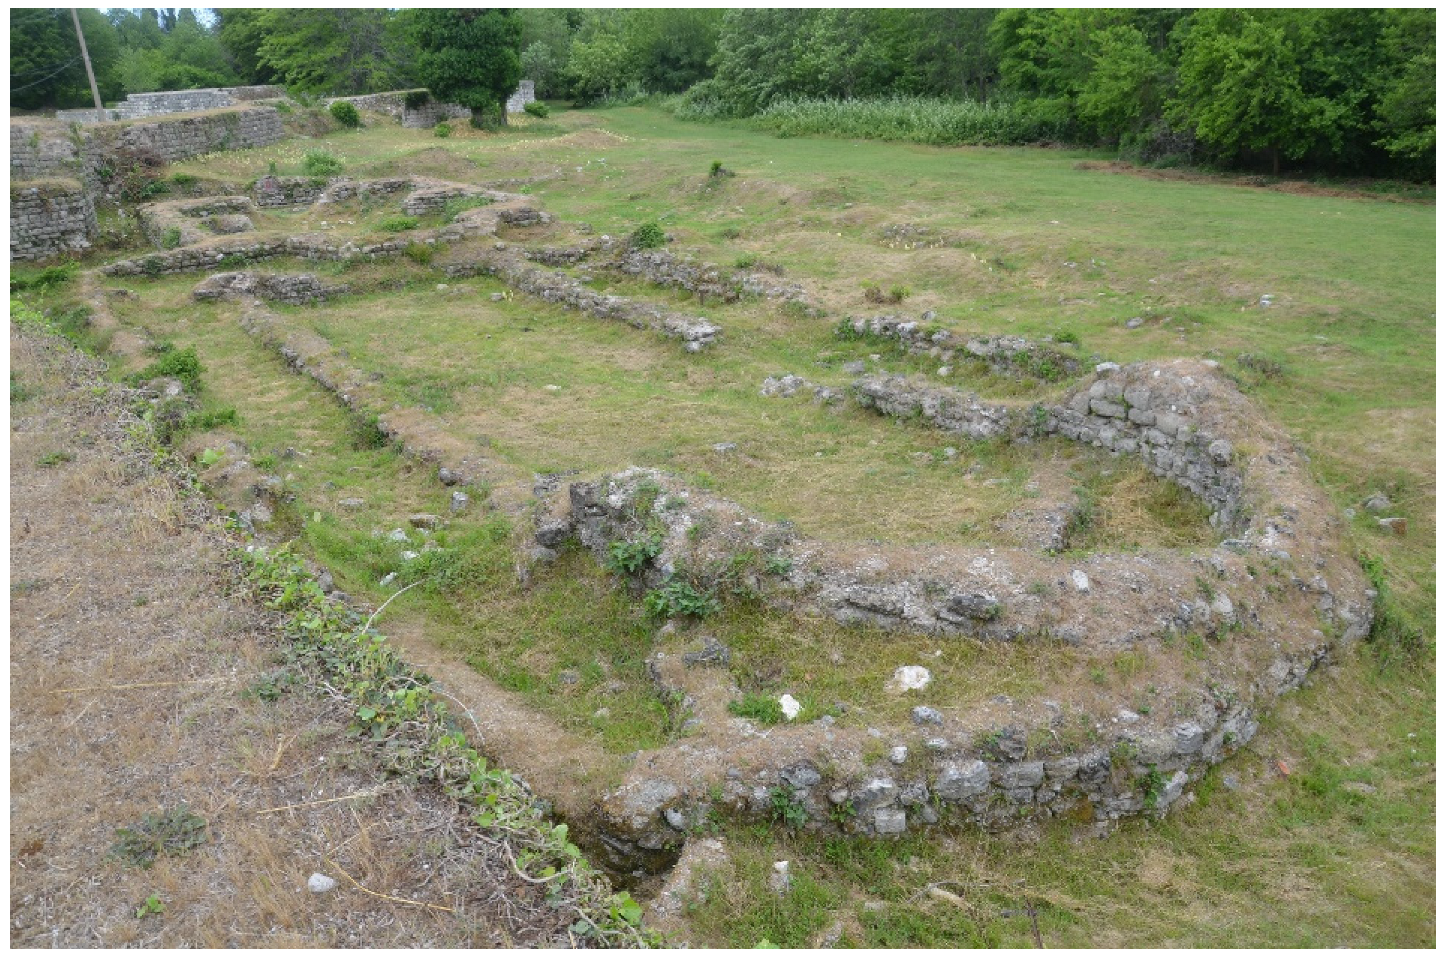
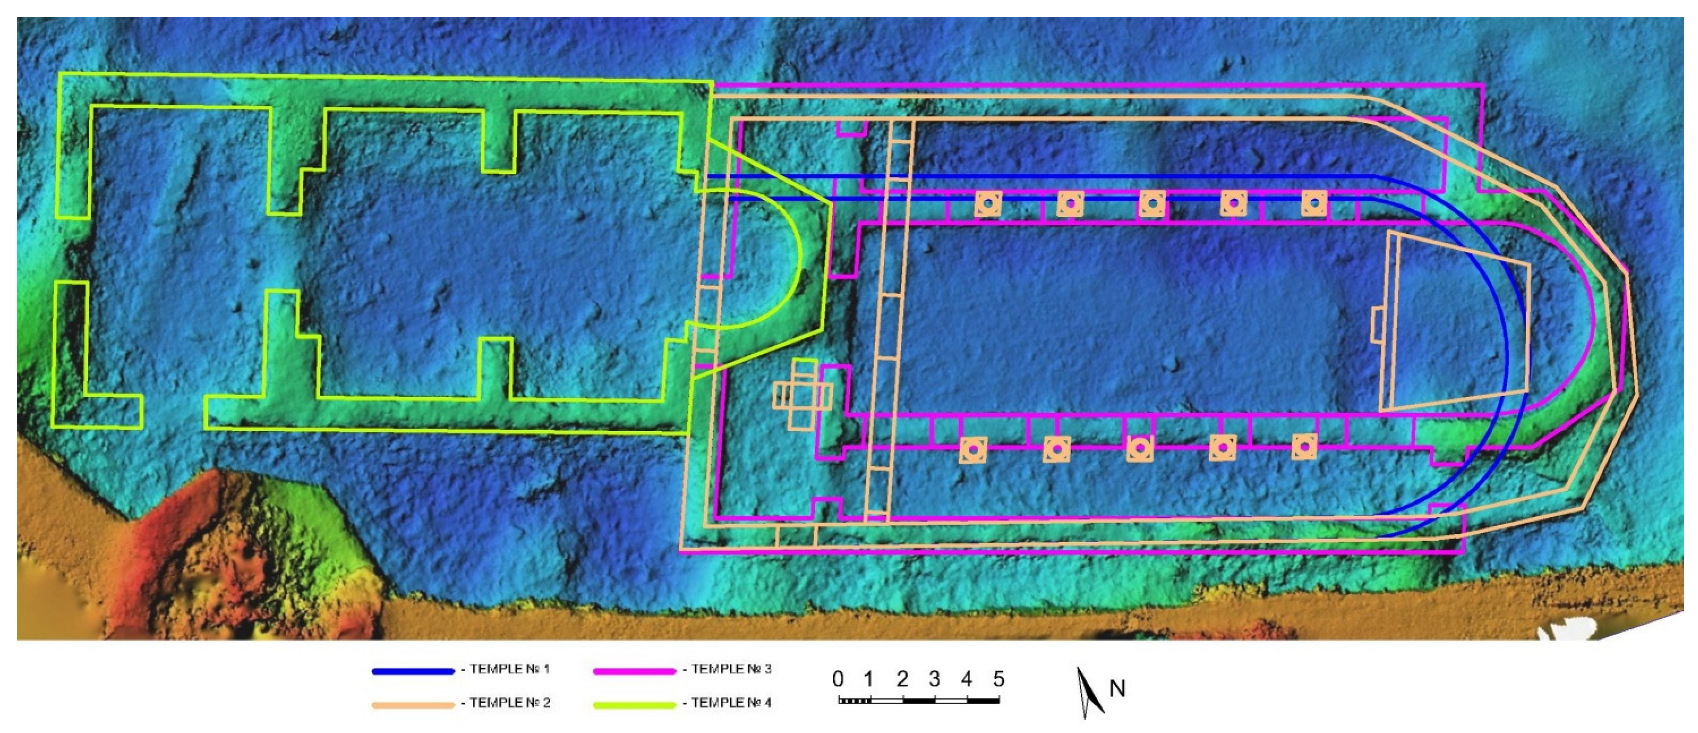
Moving from east to west along the temple’s axis, we find ourselves on a trapezoidal platform, the semantic center of the apse.
The platform has been subject to changes since it was in use in both Temple No. 2 and Temple No. 3. At the time of Temple No. 2, it was a central elevation, covered with mosaics and plastered on the sides, around which it is likely that liturgical detours were made [12]. Both the shape of the apse and its purpose changed after the construction of Temple No. 3. In the new church, the role of the “house of common prayer” increased, and the importance of the memorial function decreased [12]. When the apse of Temple No. 3 was rebuilt, the lines of the columns of the southern nave moved northwards, causing the axis of the central nave to shift. The platform turned out to be inscribed only in the apse of the central nave. As a result, it rested on the southern side, against the stylobate of the southern colonnade. The possibility of moving around it in a circle was lost. The space behind and to the side of the platform was filled in with masonry and raised to the same level as the platform. This formed a platform for the solea and the altar in the central apse. A syntron was built along the perimeter of the curvature of the apse. The central seat was raised. The small central step in front of the platform, which partially covered the mosaic in front of it, was joined by a large, full-width step.
Of the 24 m2 of the platform, only 3.6 m2 of mosaics have survived. This is approximately 15%. Nevertheless, the dividing lines can be seen on the floor plan and in the photographs. By tracing their direction, it is possible to determine the boundaries of the borders that comprise the entire layout of the platform. Furthermore, the fragments of the pattern that have survived show that they were filled in according to the photographs in the monograph [3].
The mosaic of the platform is the monogram of Christ, inscribed in a round border of twisted cord in two colors. It is surrounded by the letters α and ω. This emblem is placed within an irregular trapezoid, with a black and white border. In the corners of the trapezoid, there are four birds perched on the branches of a pomegranate. The trapezoid is surrounded by a wide acanthus frieze on a dark background. The frieze is decorated with images of pomegranates, birds, a cow with a calf and a bull. Below the chrismon, in the center of the acanthus frieze, there is a dedicatory inscription explaining who this temple was built to honor. The acanthus frieze is bordered by an ornament of intersecting circles with black diagonal crosses and red and black lancets (Figure 9). This pattern is similar in color to the mosaic of the large bath in Antioch (3rd century) [32]; however, the filling of the circles is more simple, and the arrangement of the lancets is different: black towards the platform; red towards the outside.
The platform is bordered on the outside by a grid of two-colored rhombuses, separated by a white border with a thin, black rim. A similar ornament is found in the mosaics of the Domus Eirene (4th–5th century) in Philippopolis [33].
The acanthus frieze is the most difficult of all the examples listed. The complexity of its reconstruction depends on the skill of the mosaicist. It was mentioned above that the peculiarity of the Pitiunt mosaic is that the mosaicist worked without a plan, preliminary drawing or calculation. In complex mosaics, the rhythm of the pattern is always missing. It is obvious that the mosaicist was familiar with such elements, that he had made it several times under someone else’s supervision, however that he had not studied in depth the fundamentals of its geometry, which implies a clear periodic rhythm of intertwined stems and leaves of acanthus, with animals, birds, fruits and so on in the spaces between them.
If we look at the variants of the acanthus frieze on other Late Antique and early Christian sites, we can see how skillfully the stems and leaves of the acanthus are intertwined on both sides of the border, forming several repetitions of the pattern. Examples of this are found in the mosaics of Madaba (6th century) 6 [34], in Apamea the mosaics of Meleager and Atalanta (in the last quarter of the 5th century) 8 [34], the tomb mosaic of Kelibia (Tunisia, 5th century) 7 × 7 [12], the Jordanian chapel in Swafia (Amman region, 6th century) 10 × 6 [35], the church of Deacon Thomas in Wadi Ayun Musa (6th century) [35] 11 × 6, the tomb mosaic of Orpheus from Jerusalem (6th century) [36] 5 × 6, etc. As we can see from the examples above, regardless of whether the repetitions were even or uneven along each side of the border, the number of repetitions of the acanthus pattern was determined solely by the proportions of the panel it surrounded.
In the Pitiunt frieze, five periods of the acanthi pattern can be seen on each side. At the same time, the repetition is constantly lost and transformed into a chaotic heap of details (leaves and buds). There are short parts with a proper pattern, only to have the pattern collapse again. Reconstructing the frieze, while respecting the rhythm of the design and the master’s skill, therefore required painstaking work to join together the disparate fragments of the acanthus.
To complete the description of the reasons for the reconstruction of the platform mosaic, it is necessary to consider the western side of the acanthus frieze. A partially damaged dedicatory inscription in classical Greek survives in the central part. In Kauchkhishvili’s version of the reconstruction [11], it appears to be ύπέρ εύχής Ωρέλ ϰαι παντός τού ο’ίϰου: “Orentius and his whole house”. The wording of the inscription is of a standard character and was used on sites of the same type. It is impossible to say to whom the inscription was dedicated based on the information we possess. Similar formulas were used in both funeral monuments and those dedicated to clergymen.
For instance, in the version given in the work of Lekvinadze, [12] such an inscription is found on the mosaic of the Martyrs in Kheliba (Tunisia, 5th century), and in the South Temple of the San Stefano complex on the island of Kos (5th century), [27] the inscription in the presbytery is dedicated to the church patron.
The examples given are not acanthus, as in Pitiunt; however, the execution could be different. An example of an inscription in the center of the western side of the frieze following the Pitiunt pattern is a variant in the Bet Loya church (6th century) [23].
Returning to Pitiunt’s dedicatory inscription, we must note that three different ways of reading the name exist. The first option reads ‘eagle’. All the members of the Bichvint expedition agree with this interpretation. Orentius is the second, as suggested by V.A. Lekvinadze [10]. Orentius was a holy martyr. He and six of his brothers were exiled for their faith to Pitiunt at the time of the emperors Diocletian and Maximian. They all died during their journey; however, St. Orentius relics were, perhaps, later sent to Pitiunt. Such an interpretation is in line with the meaning of the inscription, “In prayer for Ore … and his whole house”, where the house is the family, i.e., the brothers. Lekvinadze also suggested that, as Orentius was of Syrian descent, his name could have been Orelian, which in Greek “The Life of Saint Orentius” was changed to Orentius. A. Plontke-Luning is in favor of the same version and is of the opinion that the Temple of Pitiunt No. 2 could be dedicated to the martyr Orentius or his brother Longinus [37].
Aurelios, the Greek version of the name Aurelius, is another reading suggested by Khrushkova [5]. However, we know nothing of either Aurelios or Aurelius, and the version that the temple was dedicated to the holy martyr Orentius fits well with the funerary and commemorative nature of the mosaic on the altar.
When reconstructing, we did not change the text suggested by T.S. Kauchhishvili, however filled in the missing letters using the epigram.
With regard to the mosaic of this acanthus frieze, it is worth mentioning the surviving image of a cow with a calf on the north side of the inscription in the acanthus scroll. V.A. Lekvinadze believed that “… a cow with a calf on the right side of the circle with an inscription should have been compositionally balanced by the image of the “father”, i.e., the bull…”; “It is the “family” of Christians in the abstract sense of the word, i.e., the entire Christian world, which should obviously be the personification of the contemplated images of the Pitiunt mosaic” [12]. On this basis, we added the figure of a bull on the opposite side of the inscription, stylized in accordance with the master’s handwriting.
In this way, this composition shares a motif with a panel of deer and a fountain of living water in the eastern part of the apse.

3.3.3. Date Palm Panel

In the central part of the apse, in front of the platform, there is a panel with a date palm. It forms the semantic core of the temple mosaic, together with the chrismon of the platform and the composition with deer. The date palm, known for its endurance, fertility and strength, has been used since Hellenistic times to symbolize victory, life and fertility. The palm branch, appearing among simple, early Christian symbols, represented triumph over death and symbolized vitality and the promise of eternal life [38]. As a symbol of the transition from martyrdom to eternal heavenly life, the date palm often becomes an important attribute in the decoration of sarcophagi and martyrias. An example is the Sarcophagus of Theodore from the 5th century, Sant’Apollinare in Classe, Ravenna with a plot similar to that of Pitiunt: the monogram “Chi-Rho”, palms and symmetrically arranged artiodactyl animals (lambs) and a mosaic from the tomb Tall Bi’a, Syria (early 5th century) [38].
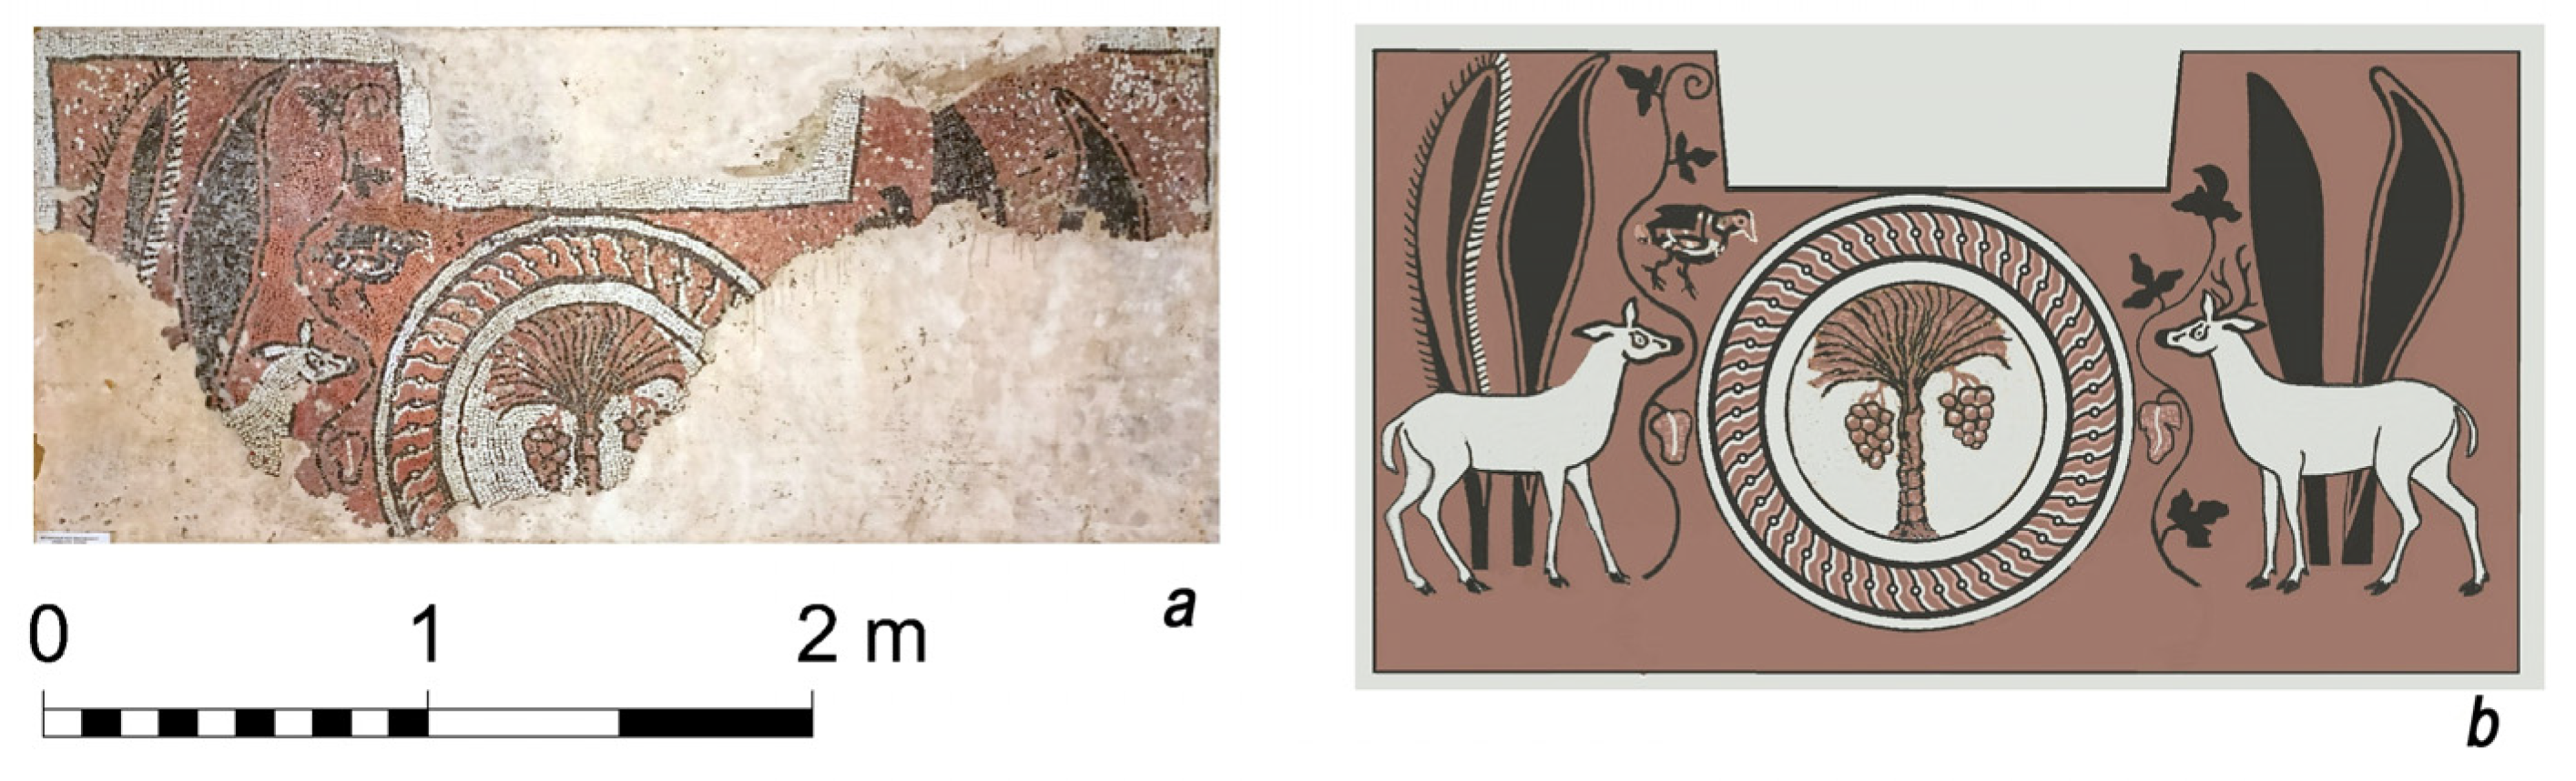
Approximately 40% of the upper and central part of the Pitiunt panel with the date palm has survived. The Pitiunt palm is stylistically close to the palm from the church of the Diaconate of Jabaliyah, Palestine (5th century) [23]. However, it is much simpler. The palette is poor and is represented mainly by three shades: red, black and white. Inclusions of other color tones are caused by a heterogeneous color set. The panel has a white border with a black contour, which surrounds a red, rectangular field. In the center, bordered by a twisted rope, there is a medallion depicting a red date on a white background. The head of a white fallow deer reaching for a palm, a black vine with leaves and a bird are depicted on the north side of the medallion. The upper parts of some trunks or cypresses can be seen on either side of the medallion. The trunks are painted in black and red with the addition of white lines (Figure 10a).
The design of this panel is simple and not overloaded with details; therefore, we can easily restore it. L.A. Matsulevich notes that “a significant piece of the left half of the mosaic discovered during excavations and separate fragments of the right half allow us to assert that its composition was symmetrical and that a date palm with hanging fruits served as its centre. The semantic centre was a deer or a lamb facing it. On the right-hand side, in the lost half of the mosaic, it would have corresponded to the second deer or lamb” [8]. Taking this opinion into account, we have depicted two fallow deer symmetrically from the medallion, while, by an analogy with the “Panel with Deer and Fountain of Living Water” and the animals in an acanthus frieze, we have shown a female fallow deer to the left of the medallion and a male to the right. In early Christian iconography, images of various artiodactyls were used to denote the believers.
To the right of the medallion, the upper part of a certain black detail has been preserved, which we tend to regard as a fragment of a vine leaf, on the basis of which we have placed a vine here, symmetrically to the left.
There were some difficulties with the reconstruction of the lower part of the stems or leaves, which are located on both sides of the panel. L.A. Matsulevich defined them as cypresses [8]. I.N. Tsitsishvili writes about them as leaves, apparently of a tropical plant [7].
Obviously, there are similar variants of images of different plants in Late Antique and early Christian mosaics; however, almost all of them accompany plots with images of animals. Here we can include a panel with lions and cypresses, placed along the edges from the mosaic of the synagogue of Hammat Gader (6th c.) [23], the mosaic in the consistory next to the baptistery, Salona [39], the mosaic in the apse of the martyrdom of Hagia Sophia, Serdika [39], four cruciform trees in the Megalopsychia hunting scene, Yakto Complex, Antioch (5th century) [23] and the El Makerkesh mosaic (level II; building A) [23]. In all cases, we see similar plants. The most similar version to that of Pitiunt, is the mosaic in front of the apse of the Church of the Martyrs at Tayibat-al-Imam (5th century) [30], and this mosaic was used as a basis for the reconstruction that allowed the restoration of the lower part of the complex (Figure 10b).

3.3.4. Bordered Panel with Date Palm Connecting the Central Part of the Apse Mosaic to the Naos

According to the plan of the mosaic floor made by I.N. Tsitsishvili, the panel with the date palm was laid along the western edge of the podium. It was bordered by a pattern of geometric ornaments from the north and south. This pattern continued along the solea staircase and under the stylobates of the columns of Temple No. 3, which was built later. On the northern side, behind the stylos, the mosaic is missing up to the point where the apse joins the naos, and on the opposite side, in the southern aisle, another pattern can be seen. It is therefore logical to assume that this pattern was limited from the north and south to the lines of the colonnades of Temple No. 2. On the western side, it rests on the barrier between the apse and the naos, which can only be seen in the northern nave.
The mosaics in the central nave and in the southern nave have not been preserved.
Photographs 180 and 181 in the photo album of the expedition, published in Volume III of the monograph [3], portray what this pattern looked like. According to Lekvinadze [12]: “The composition with a palm tree was surrounded on three sides by a large area of mosaic with a design whose exact analogy we do not yet know. The wide interlacing stripes of this pattern form a grid in whose cells are placed circles and squares arranged in a chessboard pattern”. I.N. Tsitsishvili [7] and L.A. Matsulevich [8] describe the pattern as a red weave with white and black bands. Based on the above assumptions regarding the boundaries of the ornament and using its descriptions and photographs, this area was reconstructed (Figure 11). It is clear that this pattern, together with a border of hides and heart-shaped leaves, formed a distinct border between the apse and the naos, along which the altar barrier must have been.
As stated earlier, V.A. Lekvinadze in 1970 was unable to find close analogues of this design. In 2000, the early 6th century temple of Kucuk Tavshan near Bodrum was excavated, whose rich floor mosaics were brought to light. A pattern very similar to the border of the panel at Pitiunt [40] was found in the southern aisle of the church. It shows the same circles interlaced with squares of similar thickness in a chequered pattern, additionally in red, white and black. Unlike the Pitiunt decoration, the local artisan has been able to make a knot where the squares and circles meet, whereas in Pitiunt the bands only intersect. The second difference is the use of small bird figures in a square, whereas in Pitiunt the squares and circles have small circles with a cross in the middle. Although Pitiunt’s ornament is simpler, they are related by a certain common pattern used by both masters. Framing the panel with a palm tree completes the description of reconstructing the central part of the apse. We will now look at the southern and northern sections of the central platform.

3.3.5. Southern and Northern Lateral Bypass of the Platform

During the construction of Temple No. 3, a significant part of the mosaic in the apse of Temple No. 2 was destroyed. The walls of the new central apse, the stylobates of the columns and the eastern walls of the side aisles destroyed the mosaic decoration of the old temple. Of the total area of the apse of 99 square meters, only 22% of the mosaics were preserved at the time of the excavations, whereas in the northern part of the lateral bypass of the platform, the mosaic covering survived by 47% and in the southern part by only 15%. Researchers note the lack of symmetry between northern and southern mosaics [10]. Rather, its entire composition is based on the principle of the balancing of the motif. Therefore, we will compare the sections of north and south of the central platform.
Another feature of the mosaic of the side bypasses is that it is not parallel to the central axis of the temple. The mosaic is divided into separate elements by the use of borders. It is a type of patterned carpet, laid around the platform, following the contours of the apse. This geometry is not typical of early Byzantine mosaics. The vast majority of apse mosaics, set against a wide decorative border that repeats the outline of the apse, maintain their orientation along the longitudinal axis of the temple. This may have been due to the ritual of walking around the central podium during the liturgy.
In the northern part of the apse, on the border with the border of the naos, a field of intersecting circles has been preserved. The pattern is similar to the ornament of the filling of the naos; however, the size of the circles is slightly larger, and the colors are reversed: the lancets of the intersecting circles and the inner square are red, and the inner filling is white. The same decoration was used in the northern part of the narthex.
On the layout of the mosaics and on the photographs of the expedition, white borders have been preserved, which limit the field of this mosaic on three sides. The fourth border, which closes the field from the south, was determined by the geometry of the adjacent sections of the mosaic; it ran along the line of the northern colonnade and rests against the border of the panel with a date palm. The reconstruction shows that the northern border of this area is on the northern edge of the apse and unfolds the following mosaic panels after the wall turn.
On the southern side of the apse, the mosaic has not survived; however, using the principle of balancing, we have placed a similar element here, finishing the area of the southern nave where it meets the apse.
The remains of a rhombus inscribed in a quadrangle have also been preserved behind this section, adjacent to the northern wall. In the corners formed, there are triangles. Inside the rhombus, there is a round rosette in a wavy border, adjoined by an oval on the north side. Only the north side of the rhombus has survived. It was therefore completed symmetrically on the south side. Further east, in the space between the outline of the apse and the northern stylobate of the columns of Temple No. 3, no mosaic has survived.
Symmetrical to this area, on the south side, are the remains of a large, round medallion with a twisted rope border, surrounded by a wavy border, also inscribed with a rhombus, completed to a quadrangle with triangles at the corners (Figure 11). To the east, there are the remains of a rectangle with a rhombus inscribed with triangles. In the center of the rectangle, there is a round rosette in a wavy border. This plot element has something in common with the symmetrical section of the northern bypass described above, the difference being that the rhombus is oriented along the W–E line from the north and along the N–S line from the south. To balance this composition, we have placed in the northern part a rhombus with a medallion rotated by 90 degrees. On the painting of the tomb along Demosthenes Street, dated to the second half of the 4th century AD, we have an analogy of such a rhombus with a wavy border with the central medallion in Thessalonica [41].
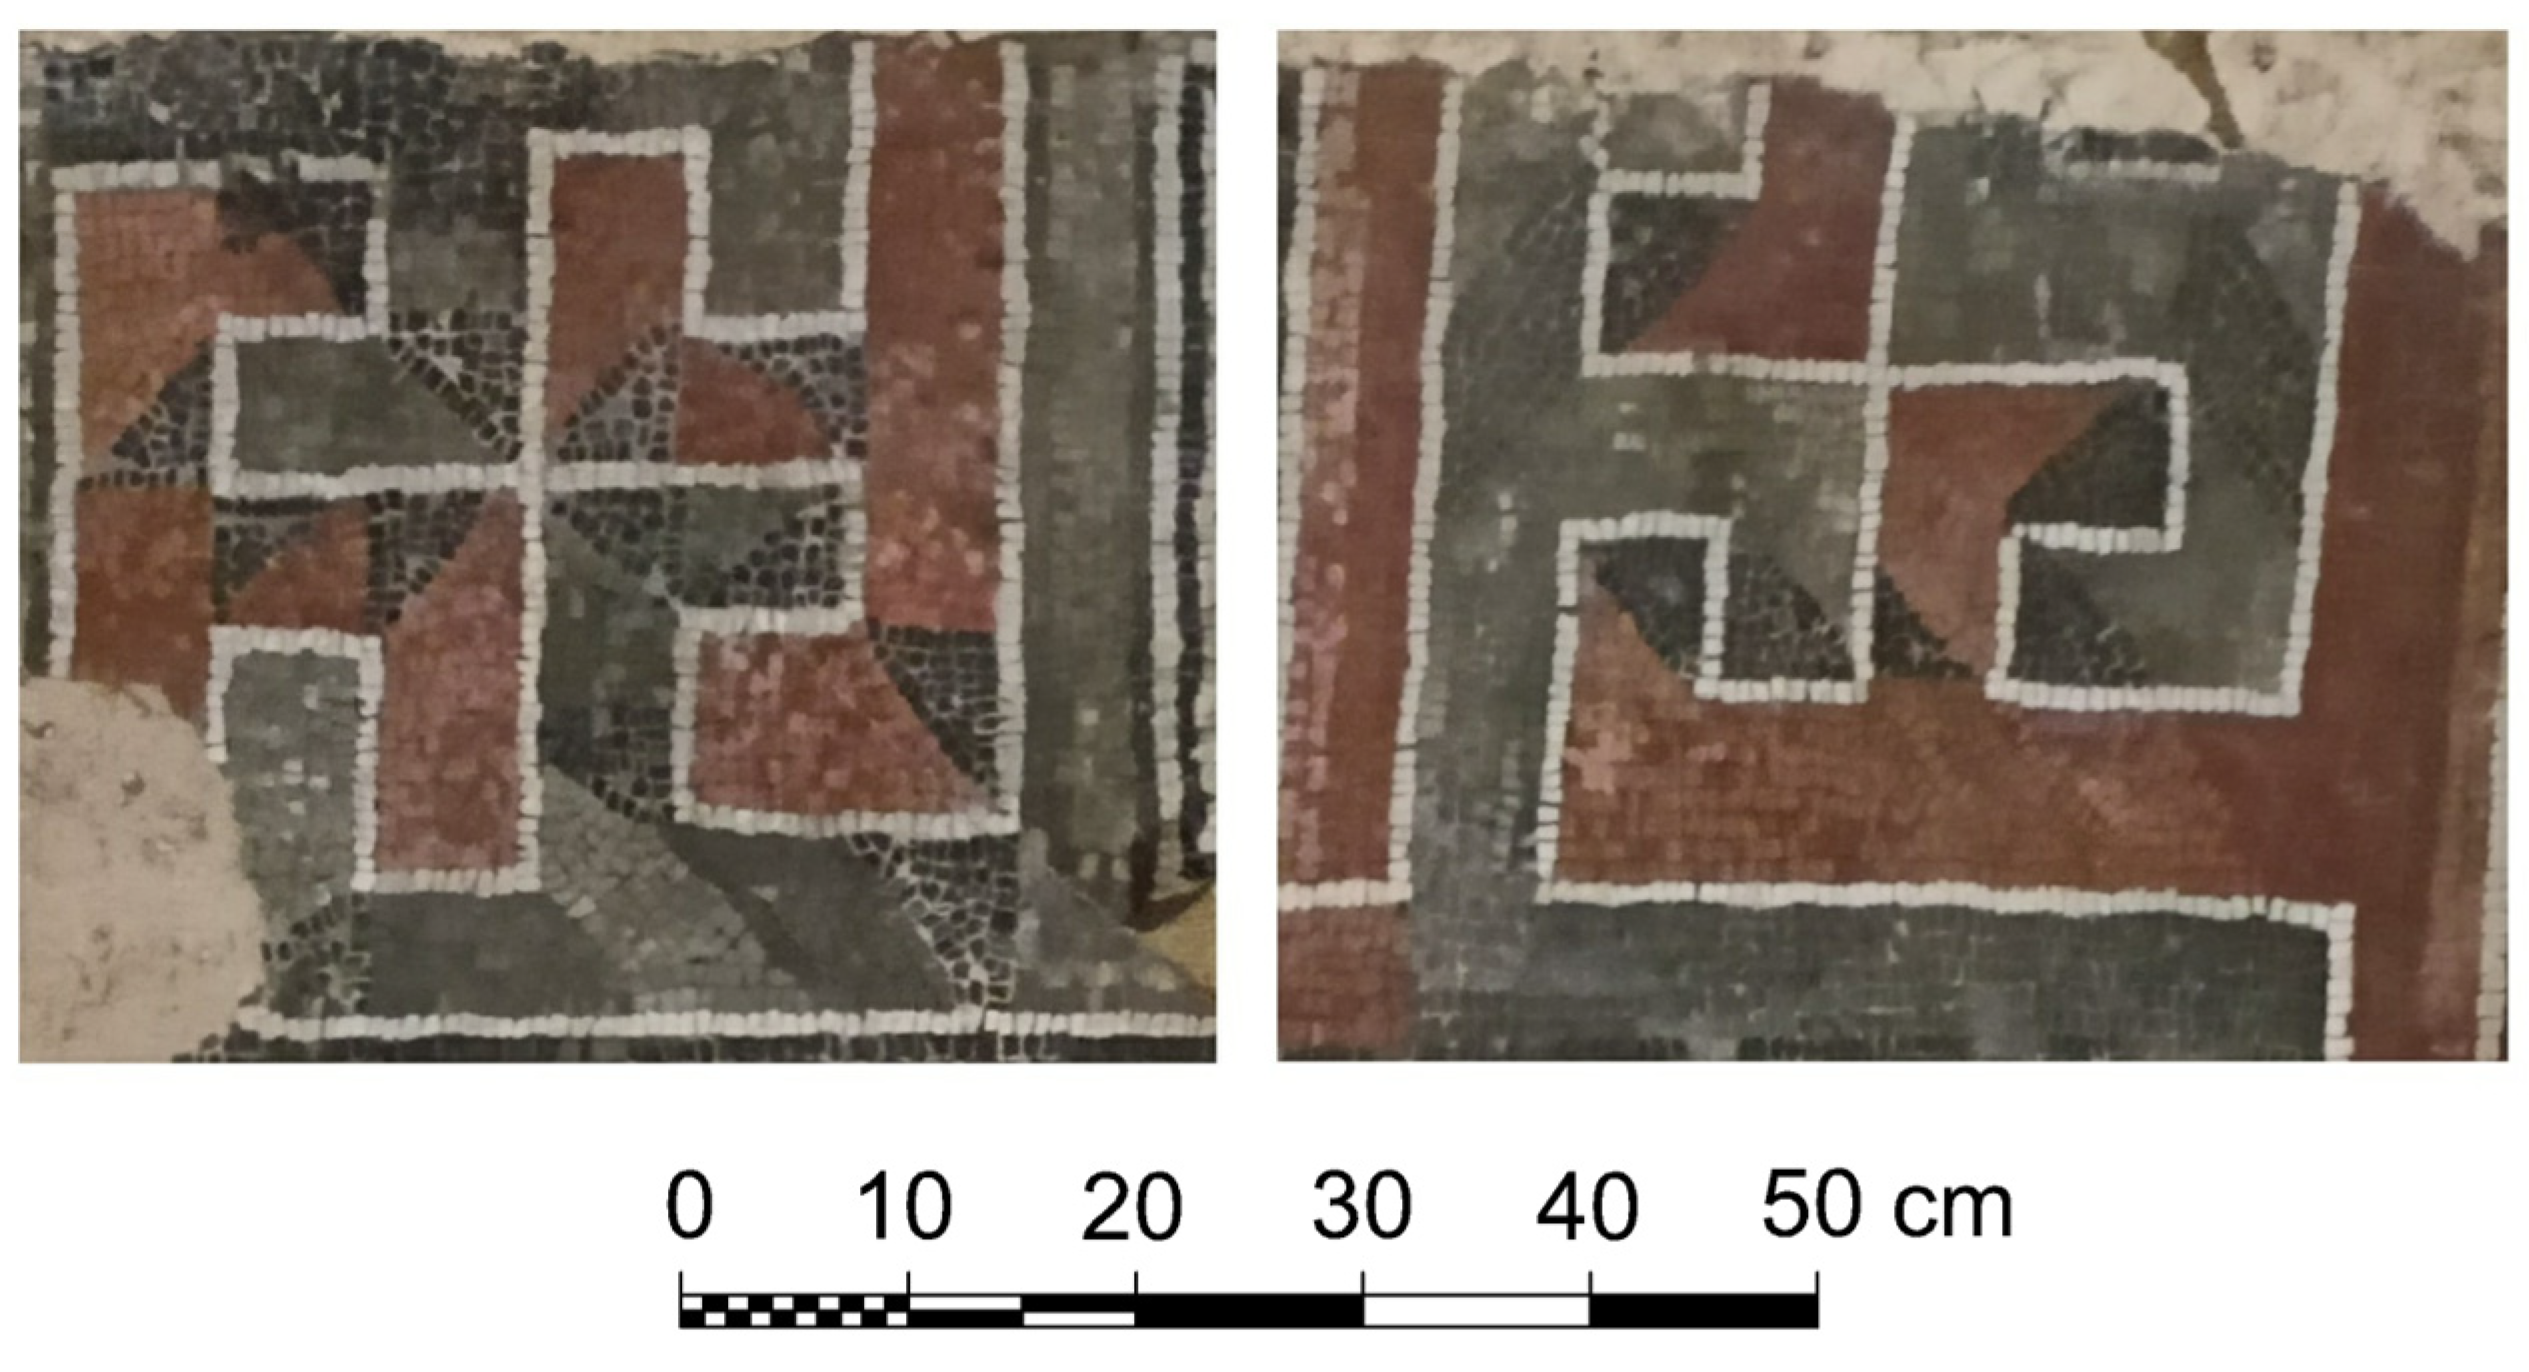
Following the layout of the mosaics, a rectangular pattern area was made along the north side of the platform. L.A. Maculewicz describes this area as “an intersecting meander which forms a quadrangle in the centre”. One band of the meander is covered with a braid of blue, white and red colors. The second band represents a shaded cylinder [9]. To be precise, the term “meander” is applied to this element with restrictions, since this definition implies a certain repetition of the pattern. In this case, we have a complex, chaotic intersection of a lash, a shaded cylinder and a white border with a black edge, forming rectangular borders in which the elements are located. On the layout of the mosaic, the images within the borders are barely distinguishable. There are only descriptions: “In two of these panels, close to the upper ones, there are two images of birds close together, while the third, at the bottom, contains a vase with a bird sitting on the side.... It must be assumed that the second bird of the same type sat symmetrically on the other side of this vase” [10]. The color scheme of the panel with a jug and two birds is given by L.A. Matsulevich [9]. On the basis of this material and the existing photograph of this fragment [1], this area has been reconstructed (Figure 11).
The images in the remaining three borders on the layout of the mosaic are not distinguishable; there are no photos; however, according to the description of V.A. Lekvinadze, referring to the entire composition, “a lamb, vases, birds, plants” were placed here [12]. Since the word “vases” is used here in the plural, this suggests that at least two of the three borders should contain images of a lamb and a vessel. Therefore, in the first panel, we have placed a lamb taken from the meander panel of the baptistery, and in the second panel, we have placed a kantharos similar to the one depicted in the panel of the baptistery. The third field shows crossed fishes taken from the same meander border of the narthex. Our intention was not to introduce new elements, however to support the overall composition of the temple mosaic.
A beautiful border with the same ornamentation of columns, pelts and heart-shaped leaves as in the border of the nave completes this rectangular band of the northern bypass of the platform. This panel is described as follows by L.A. Matsulevich [9]: “There was a square with a white background, outlined by a blue line, and highlighted in the centre. It showed a high wicker basket with concave sides. On the right-hand side, a branch or tree of a pomegranate with two buds was rising from the base of the basket. The image of a fruit basket, symbolising prosperity and abundance, is often found in the mosaics of Roman villas, early Christian churches and synagogues of the 4th–6th centuries in the Middle East [23]”.
The described composition was destroyed more or less diagonally during the rebuilding of the temple; however, its symmetry, the above description and the analogies considered made it possible to reconstruct its original appearance.
On the opposite side of the platform, symmetrically to the northern bypass, a small section of the mosaic has been preserved. Unfortunately, it is only shown on the layout. There are no photographs of it; however, a description has survived that it is “represented as two wide bands divided into separate squares inscribed with geometric figures (circles, rhombuses) or crosses composed of weave [7]”. L.A. Shervashidze is of the opinion that, at the beginning, there could have been more rows of this kind and that there was no particular order to the arrangement of the geometric figures [10]. The description of the color scheme of the composition is given by Matsulevich [9]. He states that the main colors of these elements were red shades, and the dividing border between them was white with a black line.
On the basis of the geometry of the elements to the west of this composition, we agree with Shervashidze’s viewpoint and have added another row of squares to the reconstruction. Only in this case can a normal connection be made between this section and the adjacent rectangle with a rhombus. Filling the squares in the reconstruction is completed according to the mosaic layout and descriptions. The third row was made by analogy.
Approximately at the level of the southern rhombus with a round medallion, the expedition discovered a fragment of an ornament in the form of a winding vine with white leaves with a black border on a red background, which extends along the southern wall of the apse. The eastern wall of Temple No. 3 destroyed the eastern part of this border. In the reconstruction, we have continued this ornament up to the top of the apse. This is because it has something in common with similar borders on synchronous sites, although the overwhelming majority of them use ivy-like leaves.
Thus, after the reconstruction of the described sections, a rectangular field was formed from the south of the platform along the entire length of the south side of the podium. It was logical to place a meander-like ornament on the north side of the platform, according to the principle of balance. The pattern is a very common one in the 4th–6th centuries. An ornament of interlacing and crossing bands in the form of a swastika, consisting of white borders with a black border, two-colored braids and a shaded roll, was found throughout the Mediterranean, Thrace, the Middle East and Asia Minor, in the Church of the Nativity in Bethlehem (4th century AD), in the House of Eirene in Philippopolis (today Plovdiv) (4th–5th century AD) [19], in the Roman residence of Augusta-Trajan in Staraya Zagora (4th century AD) [29], in the Tall Bi’a Martyrium, Syria (early 6th century AD) [38], etc.
It is obvious that the use of this ornament in our version of the reconstruction is only to balance the motif. Information about the real mosaic ornament on this place was not preserved at the time when Temple No. 3 functioned. However, in the general concept of the temple mosaic, the reconstruction of Temple No. 2 with such a filling of this section, at the least, looks harmonious.
Only the north side of the mosaic has survived in the space behind the platform, at the level of the panel with the fountain. The layout of the mosaic shows a triangle to the east of the panel with the basket and fruit, with one side against the panel, the second against the panel with the fountain and the third against the wall of the apse. Inside this triangle, there is a rhombus with a round medallion bordered by a twisted two-color cord. The space between this triangle and the rhombus is divided into several small triangles. Some have a wide border, whereas others have a plain background.
The eastern part of this triangle deserves special attention. It retains the standard ornament of intersecting circles, however with a more elaborate filling. The red lancets of the crossed circles are outlined in black, and the inner space is white. Neither the apse wall nor the fountain slab are parallel to this pattern. None of the researchers had an explanation for the filling of such a small area with this pattern. This allows us to assume that this element is a fragment of the background filling pattern used for other sections of the mosaic. Based on this assumption, we filled the space between the northern apse wall and the northern bypass “meander” pattern with this ornament. Thus, the pattern could be used in other parts of the apse.
On the south side of the panel with the fountain, a section of a rectangular panel with an inscribed rhombus and triangles at the corners has been preserved. The rhombus was inscribed with a three-part medallion. Along the long axis of the medallion were heart-shaped figures in the shape of a card of spades, however red with a black line. This narrow rectangle seems to have corrected the discrepancy between the geometry of the eastern side of the platform and that of the panel with the fountain, complementing it from the south.
Since this part of the mosaic was destroyed during the construction of the temple in the 5th and second half of the 6th century AD, we have no information about the remaining part of the mosaic, which is bounded by the southern border of the rectangle with the rhombus described above, the panel with squares on the southern side of the platform and the wall of the apse from the south-east. Lacking data, we can only reconstruct this section using the principle of compensation, which allows to fill this area with a mosaic stylistically similar to the northern border of the panel with the fountain. The pattern used in the northern part of the apse was also used to fill the southern part of this triangle. 
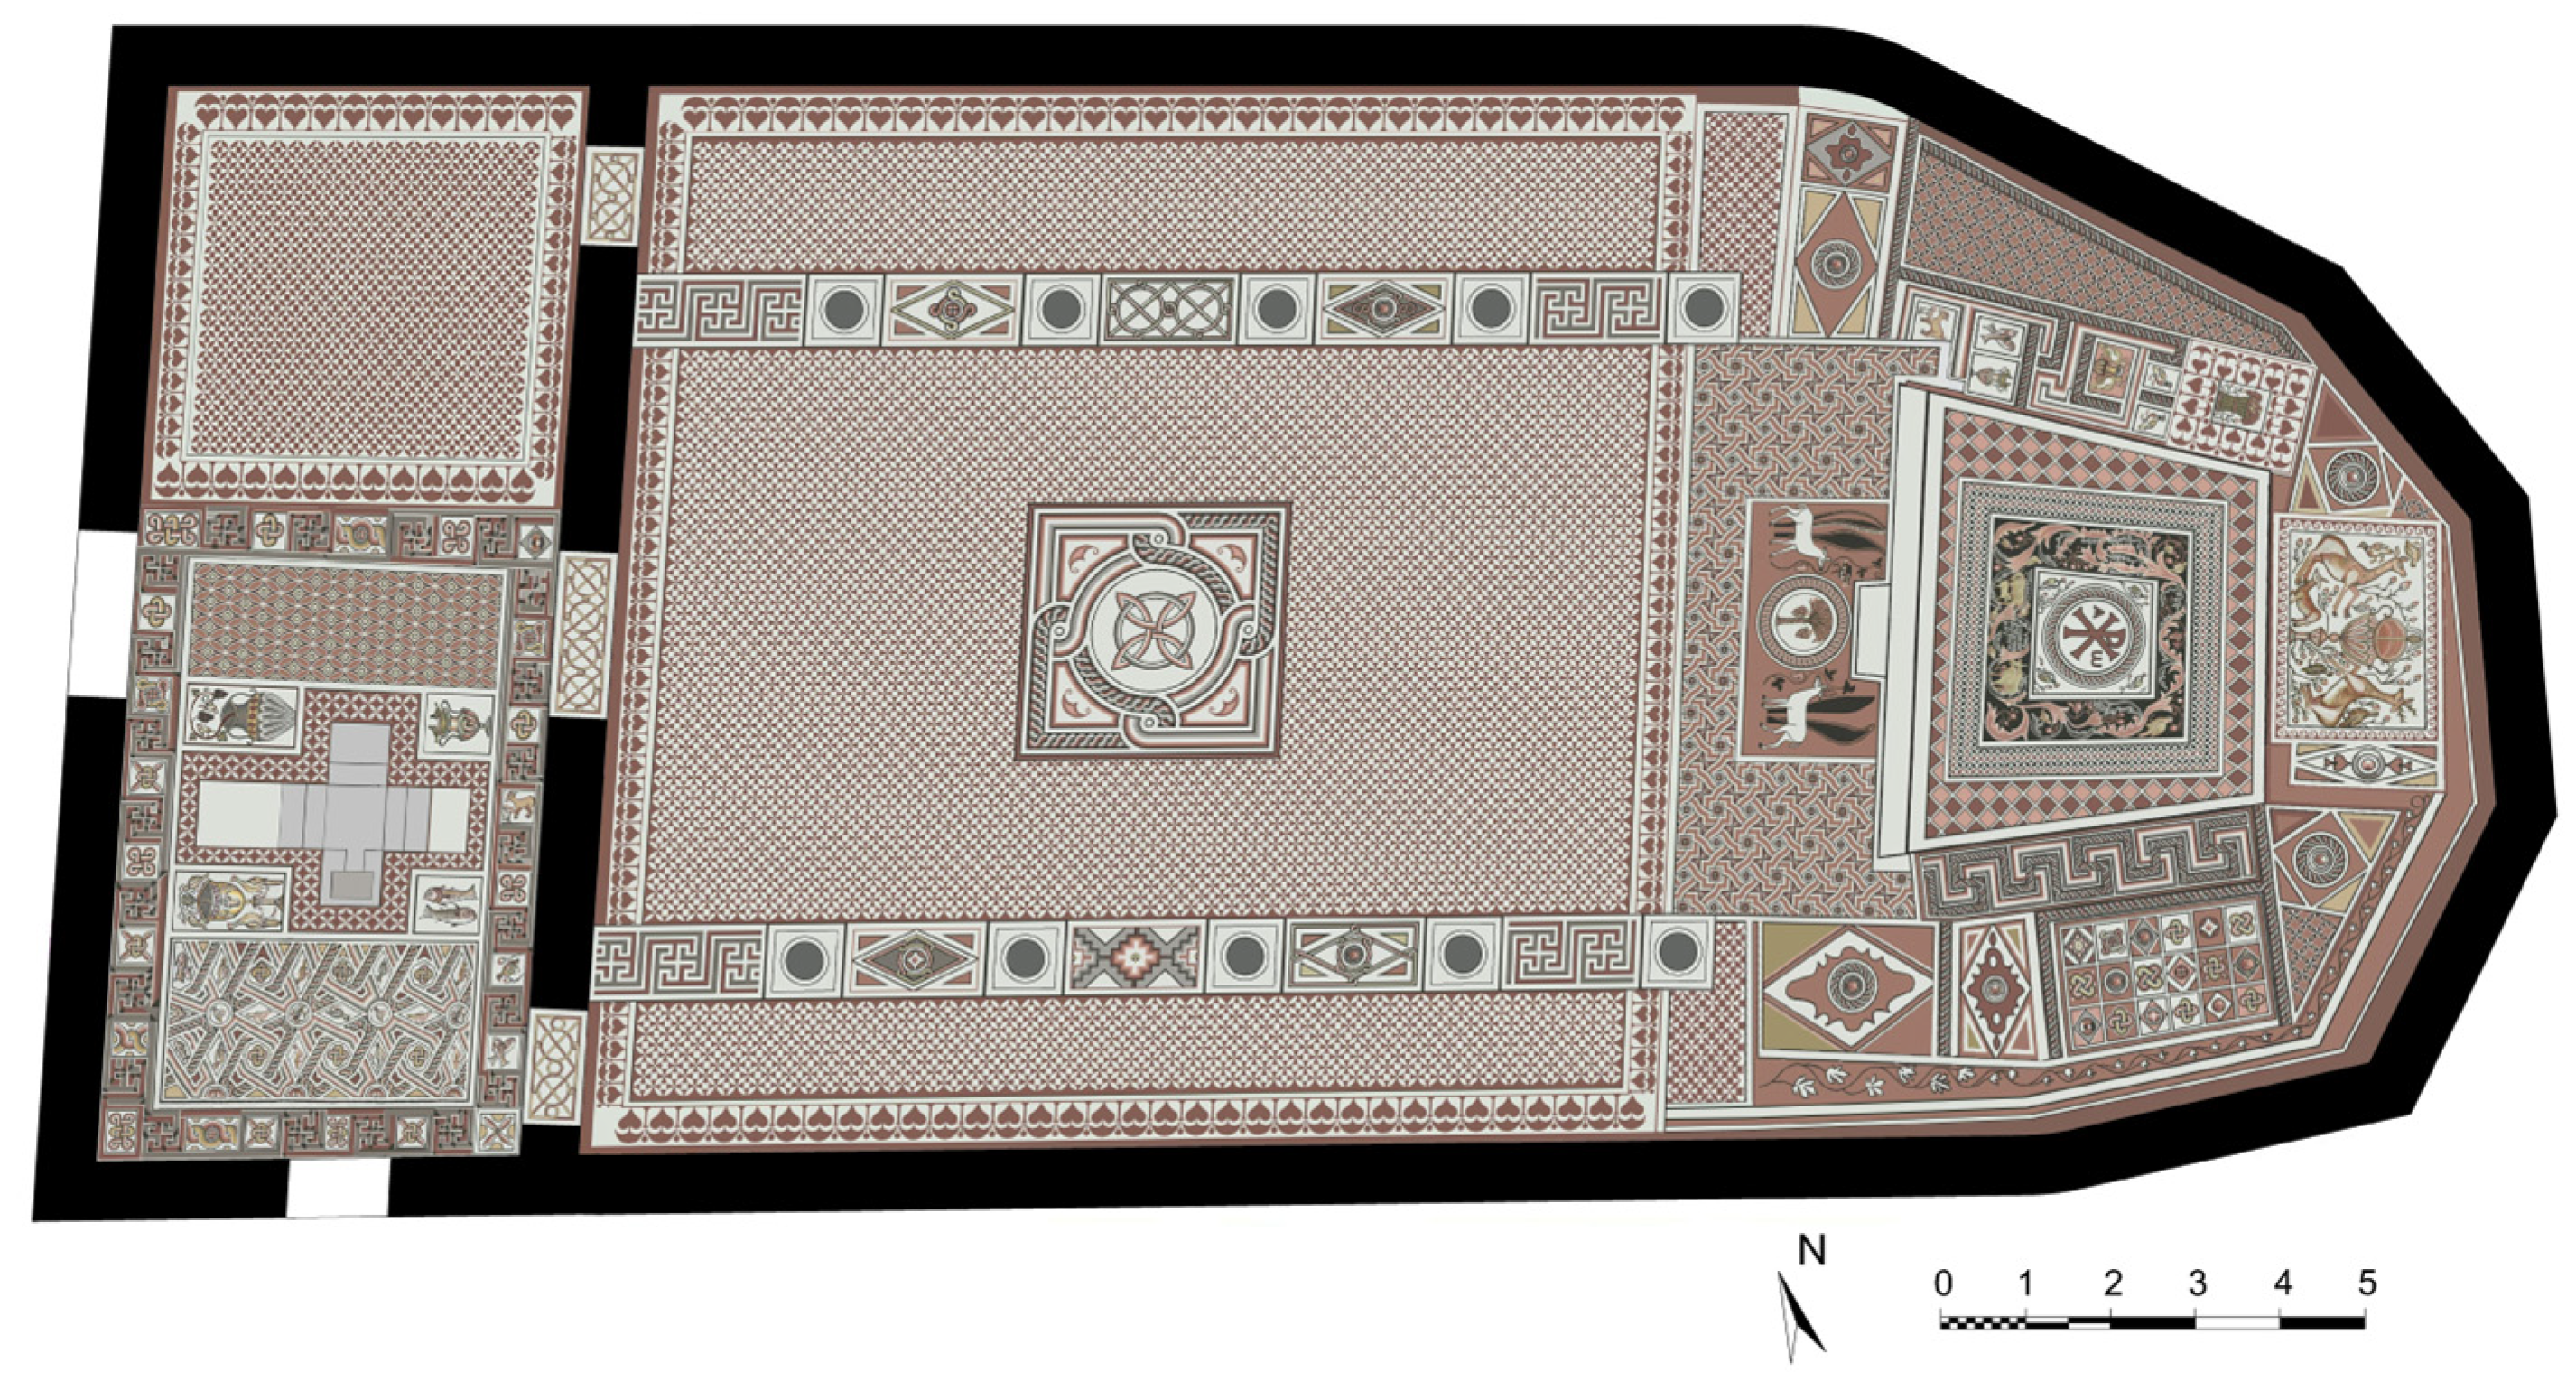
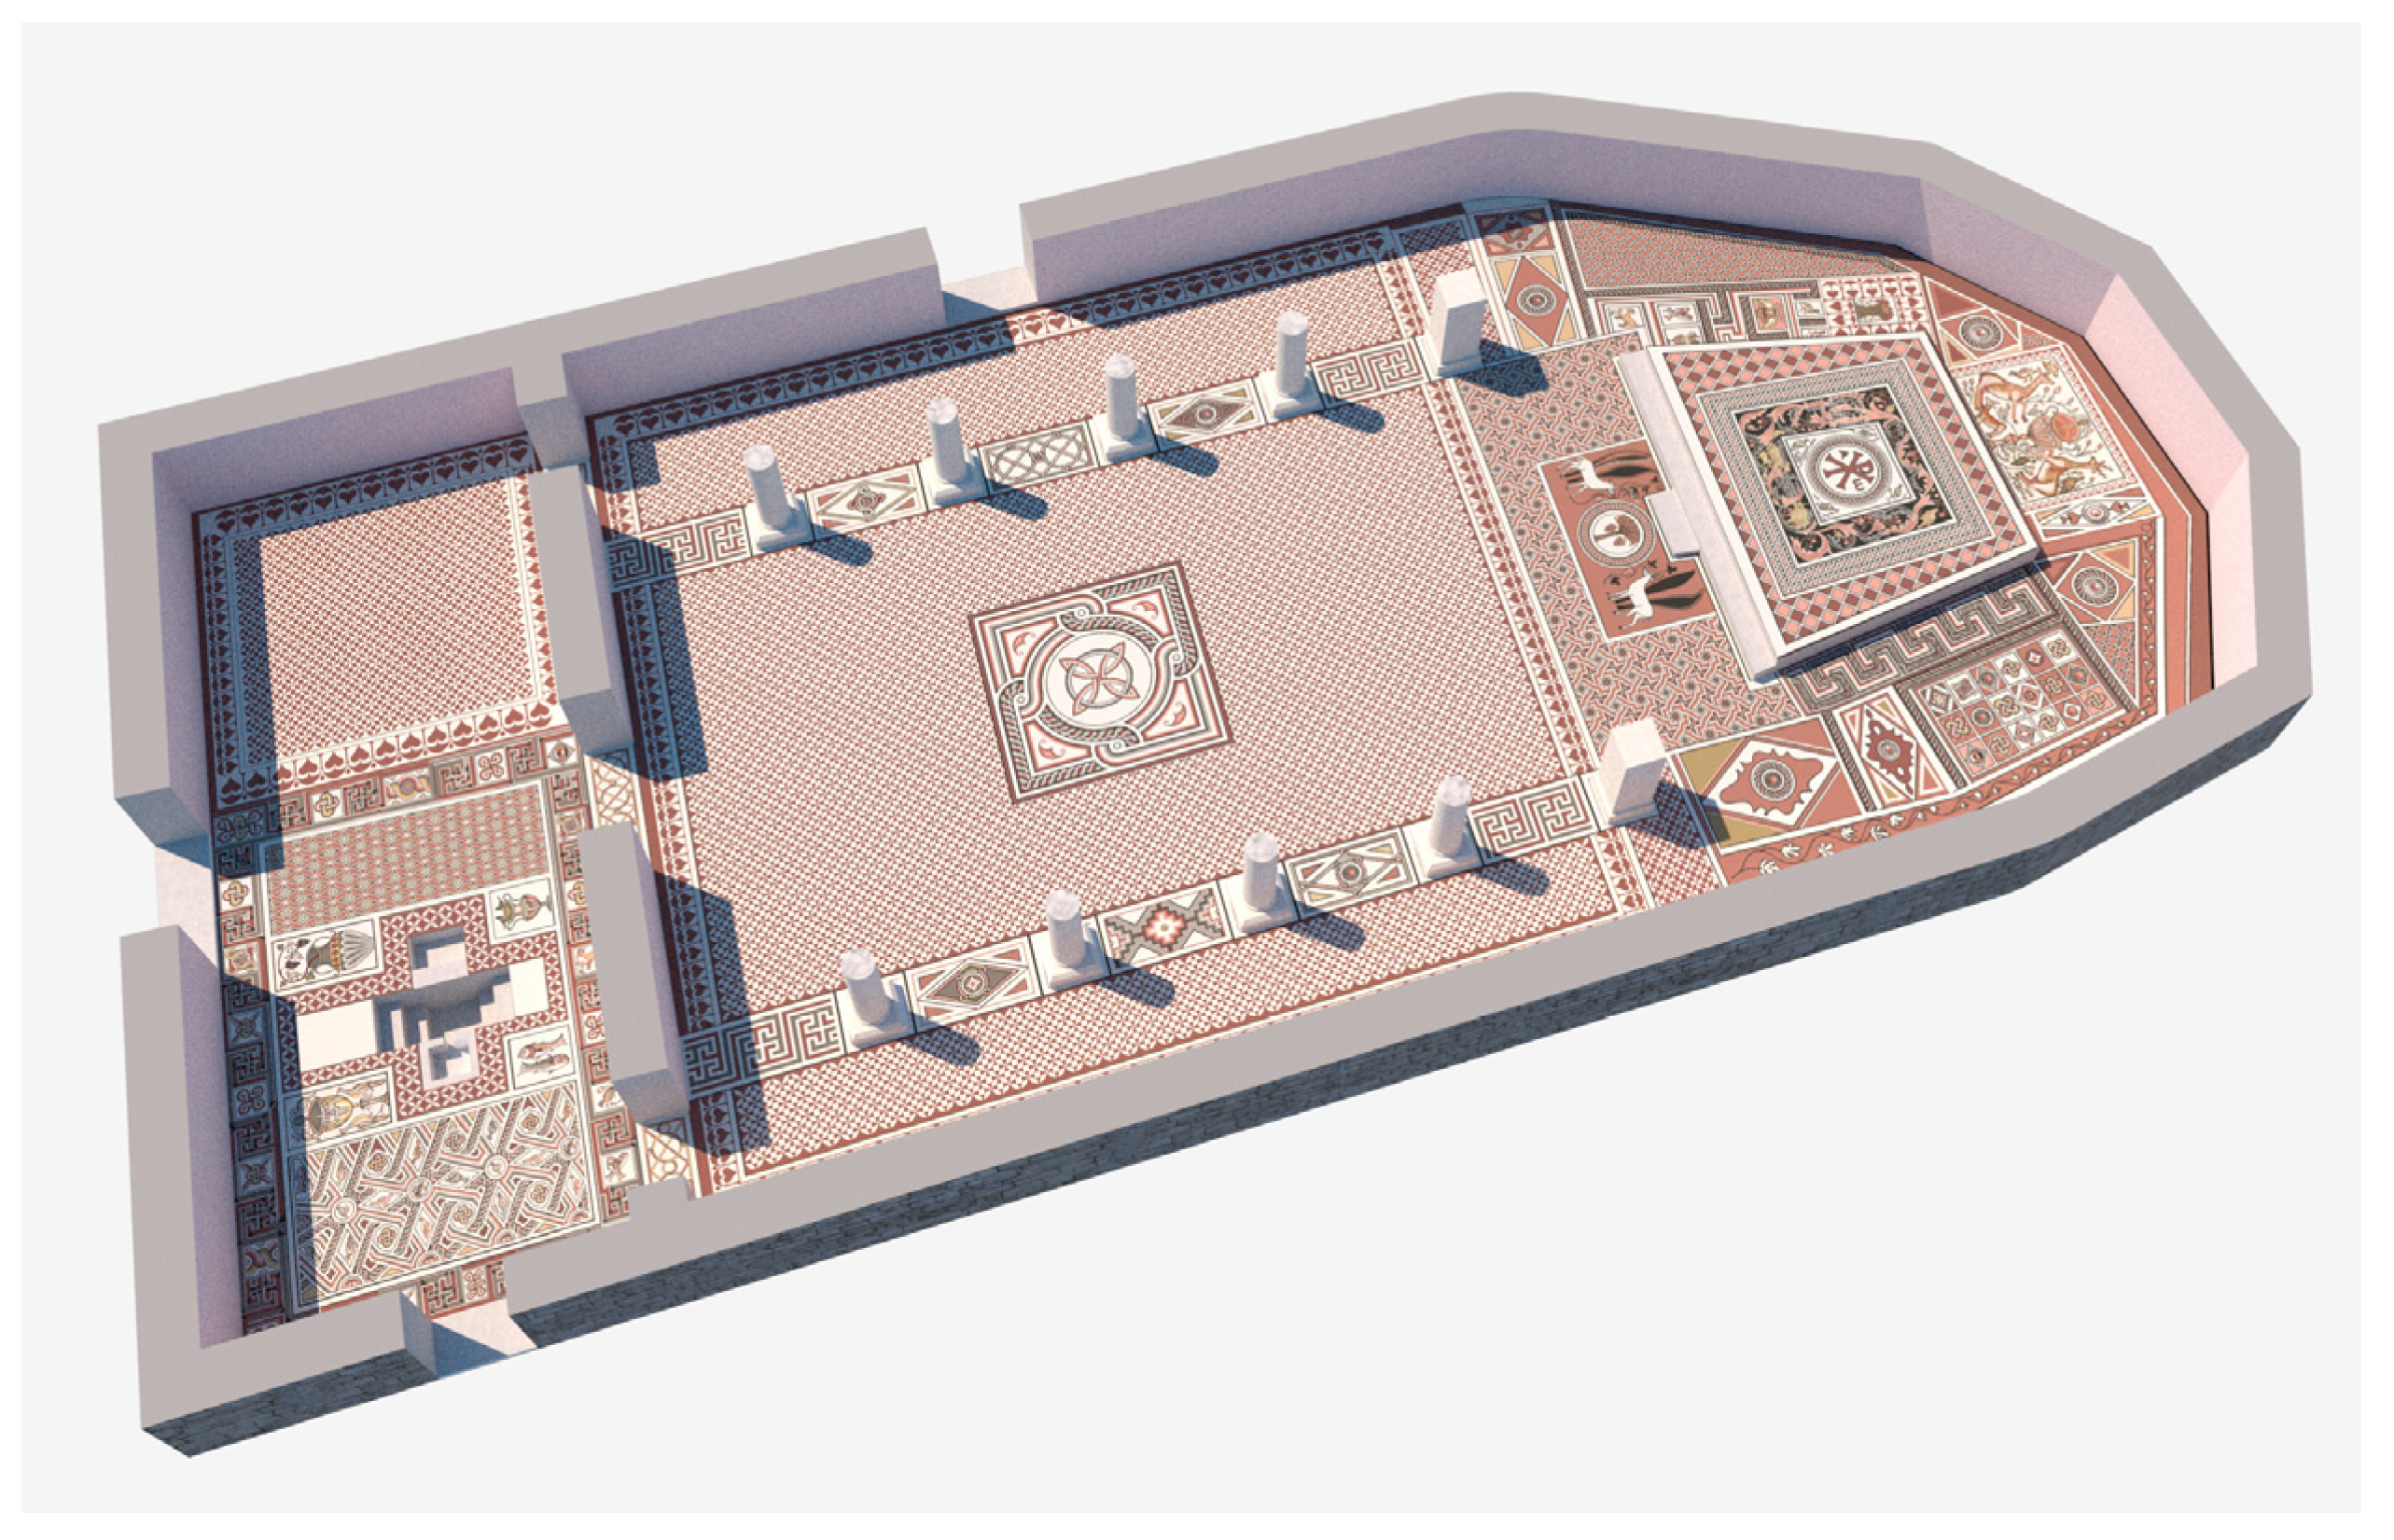
Figure 12 shows the result of such a reconstruction.

4. Conclusions

The reconstruction is based on the results of archaeological data analysis, the plotting of individual elements, symmetry and motif balancing considerations and analogies with synchronous sites in the Mediterranean, Middle East and Black Sea regions. This provides a complete picture of the decoration of ‘Temple No. 2’, allowing us to understand the intention of the mosaicist and to better perceive the overall composition.
Figure 12 shows a variant of the complete reconstruction of the mosaic floor of Temple No. 2, which allows the artistic decoration of the temple to be fully appreciated.
Three large panels in the central part of the apse are the defining motif axis. They reveal the purpose of this temple. The central part, in front of the platform, is decorated with a panel with a date palm, symbolizing the heroic martyrdom for the faith; further to the east, there is an elevation: a platform with the monogram of Christ, bordered by a rich acanthus frieze in dark colors and a dedicatory inscription; at the top of the apse there is a highly artistic polychrome panel with deer and a fountain of living water, symbolizing heavenly life. These three elements are united by a single composition, despite their different techniques. Experts who have analyzed the plot of this triptych agree that it had a dedicatory and commemorative function, addressed to a highly revered person. It has been suggested that the temple may have been a martyr’s tomb; however, the results of the excavation of the central platform have not been published, and therefore the question is still open as to whether there was a tomb, relics or the construction of the temple in memory of the saint.
It is interesting to have a look at the evolution of the purpose of the monuments of the complex. The first temple was the cathedral of Bishop Stratophilus, who attended the First Council of Nicaea, according to the unanimous opinion of researchers. The second is a memorial temple, dedicated to the holy martyr. The third and fourth temples already had the usual function of a city church.
An analysis of the version of the reconstruction of the mosaic of the second temple, amidst all the complexity and variety of the whole, allows us to identify a number of standard elements that are found in contemporaneous and previous buildings on the territory of the Roman Empire and that, together, form a common pattern of mosaic decoration:
An interlaced pattern of intersecting rhombuses with medallions (panel in the narthex);
A perspective meander with a swastika pattern (southern part of narthex);
An acanthus frieze with an inscription of pomegranates (apse platform);
The “wickerwork” of a two-color band;
Shading roll with a color transition from grey to red;
Pelts or “lunulae”, combined with figures in the form of an ivy leaf or a card of spades;
Numerous variations of the rhombus, inscribed in a rectangle;
Round medallions, bordered by “wickerwork”;
Circles and rosettes, divided into four parts by color or intersected by a cross, inscribed in a rhombus;
Interlaced circles and squares arranged in a chequerboard pattern, with round rosettes in the center (the central part of the apse between the naos and the platform);
A grapevine with leaves (a panel with a date and ornament in the southern part of the apse);
Repeated elements of intersecting circles and ovals, forming a continuous pattern (naos; border of the baptistery);
Various types of geometric patterns and variants of Solomon’s knots, inscribed in a square (crossed and interlaced ovals, etc.);
Depictions of birds, fish and animals that eat plants, often in pairs or with cubs;
Vases, kanfaras, bowls and fruit baskets;
A wavy white and red border around a panel, with a deer and a fountain of living water in the apse;
Simple, straight white and red borders with a thin black or red border.
This is the point at which the variety of elements in the Pitiunt mosaic comes to an end. There are no very complex geometric patterns. Perhaps the most complex patterns are a perspective meander, a diamond panel and an acanthus frieze around a chrismon. The other elements are simple; however, when combined with different artistic panels, the result is a very individual look (Figure 13).
Attention must also be paid to the artistic level of the mosaicists. Gross errors in the geometry of the elements, in the repetition and coloring of the various sections and in the master’s misunderstanding of the form of what he was depicting have been identified by many researchers [9,10]. After the analysis and reconstruction of this mosaic, in which each section has been carefully studied, we can confirm and add to these conclusions. Except for the representation of a bowl with birds in the baptistery and a panel with deer and a fountain of living water in the apse, one obtains the feeling that the mosaicist’s skillfulness was rather low.
Modern research [25] shows that in the eastern part of the Roman Empire in the first centuries AD, the Syrian and Middle Eastern school of mosaic art, with its ancient roots, prevailed. In the 4th–5th century, Constantinople became the center of the decoration of the buildings of the capital. Combining oriental motifs and designs with the needs and wishes of local clients, it developed its own school. The artists of Constantinople worked all over the Black Sea region. It is possible that in Pitiunt we are dealing with a specific provincial artel of this school, which was attracted to work on the north-eastern edge of the Roman Empire. The analysis of the Pitiunt mosaic gives the impression that the craftsmen were technically capable of laying the mosaic to a high standard, that they were familiar with the typical patterns, however that they did not fully understand the nuances of some complex elements, that the layout of the drawing was not well thought out and that errors were made in the patterns. The overall composition of the mosaics shows that there was no pre-determined plan, however that the mosaics were created on the spot, filling in gaps and trying to balance the north and south sides of the central axis. At the same time, this does not detract from the artistic value of the mosaics of the Temple of Pitiunt; nevertheless, it gives them their individuality and their originality, and they fit organically into the overall picture of the development and spread of mosaic art in the territory of the Roman Empire.
The analysis of the similarity of the elements of the mosaic suggests that the mosaic site dates from the beginning of the fifth century at the earliest, which agrees with the opinion of Lekinadze, Shervashidze and Khrushkova.
The research and reconstruction carried out is only part of a larger work to reconstruct and visualize the appearance of all the temples in the complex, taking into account their direct causal and spatio–temporal relationships.

Author Contributions

Conceptualization, G.T. and K.G.; methodology, K.G. and I.A.; investigation, G.T., K.G. and A.K.; analysis archival materials, K.G. and A.K.; writing—original draft preparation, G.T., K.G. and V.Y.; writing—review and editing, G.Y.; visualization, K.G., V.Y. and I.A.; supervision, G.T.; project administration, G.Y.; funding acquisition, G.Y. All authors have read and agreed to the published version of the manuscript.

Funding

This research was funded by the Russian Science Foundation, grant number 22-18-00466.

Institutional Review Board Statement

Not applicable.

Informed Consent Statement

Not applicable.

Data Availability Statement

The data presented in this study are available on request from the corresponding author.

Conflicts of Interest

The authors declare no conflict of interest.

References

  1. Kiguradze, N.S.; Lordkipanidze, G.A.; Todua, T.T. Symbols of the XV legion from the Pitsunda settlement. Bull. Anc. Hist. 1987, 2, 88–92. [Google Scholar]
  2. Baatz, D. Eine Katapult-Spannbuchse aus Pityus, Georgien (UDSSR). Saalburg Jahrb. 1988, 44, 59–64. [Google Scholar]
  3. Javakhishvili, I.A. (Ed.) Great Pitiunt. Archaeological Excavations in Pitsunda; Metsniereba: Tbilisi, Georgia (USSR), 1978; Volume 3, pp. 1975–1978. [Google Scholar]
  4. Trebeleva, G.; Glazov, K.; Kizilov, A.; Sakania, S.; Yurkov, V.; Yurkov, G. Roman Fortress Pitiunt: 3D-Reconstruction of the Monument Based on the Materials of Archaeological Research and Geological Paleoreconstructions. Appl. Sci. 2021, 11, 4814. [Google Scholar] [CrossRef]
  5. Khrushkova, L. Opus Sectile Pavements in the Crimea and on the East Coast of the Black Sea. In Proceedings of the 11th International Colloquium on Ancient Mosaics, Bursa, Turkey, 16–20 October 2009; pp. 505–518. [Google Scholar]
  6. Anfimov, N.V. Report of the Black Sea Archaeological Expedition. Part 2: Materials of the Sochi Detachment; Archive of the Academy of Sciences of the USSR: Moscow, USSR, 1956; pp. 29–43. [Google Scholar]
  7. Tsitsishvili, I.N. Complex of church buildings in Pitsunda. In Great Pitiunt. Archaeological Excavations in Pitsunda; Javakhishvili, I.A., Ed.; Metsniereba: Tbilisi, Georgia, USSR, 1977; Volume 2, pp. 101–119. [Google Scholar]
  8. Matsulevich, L.A. Discovery of mosaic floor in Ancient Pitiunt. Bull. Anc. Hist. 1956, 4, 146–153. [Google Scholar]
  9. Matsulevich, L.A. Mosaic of Bichvinta—Great Pitiunt. In Great Pitiunt. Archaeological Excavations in Pitsunda; Javakhishvili, I.A., Ed.; Metsniereba: Tbilisi, Georgia (USSR), 1978; Volume 3, pp. 100–168. [Google Scholar]
  10. Shervashidze, L.A. The Pitsunda Mosaic. In Great Pitiunt. Archaeological Excavations in Pitsunda; Javakhishvili, I.A., Ed.; Metsniereba: Tbilisi, Georgia (USSR), 1978; Volume 3, pp. 169–193. [Google Scholar]
  11. Kaukhchishvili, T.S. Greek inscription of Bichvinta mosaic. In Great Pitiunt. Archaeological Excavations in Pitsunda; Javakhishvili, I.A., Ed.; Metsniereba: Tbilisi, Georgia (USSR), 1978; Volume 3, pp. 218–241. [Google Scholar]
  12. Lekvinadze, V.A. On the ancient Temple of Pitiunt and its mosaics. Bull. Anc. Hist. 1970, 2, 174–193. [Google Scholar]
  13. Khrushkova, L.G. Early Christian Monuments of Eastern Black Sea Region (IV–VII Centuries); Nauka: Moscow, Russia, 2002; pp. 67–91. [Google Scholar]
  14. Boschetti, C.; Dilaria, S.; Mazzoli, C.; Salvadori, M. Making Roman Mosaics in Aquileia (I BC–IV AD): Technology, Materials, Style and Workshop Practices. Two Case Studies from the insula della Casa delle Bestie Ferite. In Archaeology and Economy in the Ancient World, Proceeding of 19th International Congress of Classical Archaeology, Cologne/Bonn, Germany, 22–26 May 2018; Thomas, R., Ed.; Propylaeum: Heidelberg, Germany, 2021; pp. 91–111. [Google Scholar] [CrossRef]
  15. Taddei, A. A Remarks on the decorative Wall-mosaics of Saint Eirene at Constantinople. In Proceedings of the 11th International Colloquium on Ancient Mosaics, Bursa, Turkey, 16–20 October 2009; pp. 883–896. [Google Scholar]
  16. Guimier-Sorbets, A.-M.; Nenna, M.-D. Reflexions sur la couleur dans les mosaiques Hellenistiques: Delos et Alexandrie. Bull. Corresp. Hellénique 1995, 119, 529–563. [Google Scholar] [CrossRef]
  17. Wootton, W. Figuring out the facts: Calculating mosaic labour times in 4th-c. A.D. Britain. J. Rom. Archaeol. 2015, 28, 261–282. [Google Scholar] [CrossRef]
  18. Trebeleva, G.; Glazov, K.; Kizilov, A.; Kizilova, A.; Yurkov, V.; Yurkov, G. Advanced Technologies in Digitizing the Cultural Heritage of Northwestern Colchis: Experience of Markul Expedition. Appl. Sci. 2022, 12, 2052. [Google Scholar] [CrossRef]
  19. Zavadskaya, I.A. Numerical proportions of early Byzantine Temples of Chersonesos. Mater. Archaeol. Hist. Ethnogr. Tauria 2019, XXIV, 135–159. [Google Scholar]
  20. Underwood, P.A. Some Principles of Measure in the Architecture of the Period of Justinian. Cah. Archéologiques 1948, III, 64–74. [Google Scholar]
  21. Tsafrir, Y. On the Pre-Layout ning of Ancient Churches and Synagogues. A Test Case: The Northern Church at Rehovot in the Negev. In Christian Archaeology in the Holy Land. New Discoveries; Bottini, G.C., Di Segni, L., Alliata, E., Eds.; Franciscan Printing Press: Jerusalem, Israel, 1990; pp. 535–541. [Google Scholar]
  22. Pappalardo, U.; Ciardiello, R. Mosaïques Gréco-Romaines; Abbeville: Vérone, Italy, 2012; 320p. [Google Scholar]
  23. Hachlili, R. Ancient Mosaics Pavements, Themes, Issues, and Trends Selected Studies; Brill: Leiden-Boston, The Netherlands, 2008; 438p. [Google Scholar] [CrossRef]
  24. Tāhā, Ḥ.; Whitcomb, D. The Mosaics of Khirbet el-Mafjar Hisham’s Palace; Oriental Institute Miscellaneous Publication: Chicago, IL, USA, 2015; 132p. [Google Scholar]
  25. Topalilov, I. The Syrian influence over the Late Antique mosaics in Philippopolis, Thrace. Hortus Artium Mediaev. 2016, 22, 118–129. [Google Scholar] [CrossRef]
  26. Ousterhout, R. The Temple at Herakleia Perinthos and connections with the Byzantine capital. J. Rom. Archaeol. 2017, 30, 937–938. [Google Scholar] [CrossRef]
  27. Giulia, M. La Temple Sud e gli annessi meridionali. In Archeologia Protobizantina a Kos III Il Complesso di S. Stefano e L’insediamento della Baia di Kephalos; Baldini, I., Cosentino, S., Eds.; Bononia University Press: Bologna, Italy, 2021; pp. 39–64. [Google Scholar] [CrossRef]
  28. De Matteis, L.M. The Mosaics of the early Christian Temples on the Island of Kos. In Proceedings of the 11th International Colloquium on Ancient Mosaics, Bursa, Turkey, 16–20 October 2009; pp. 339–352. [Google Scholar]
  29. Valeva, J. Une riche domus de Stara Zagora (Augusta Trajana-Beroe): Publication préliminaire. In Proceedings of the 11th International Colloquium on Ancient Mosaics, Bursa, Turkey, 16–20 October 2009; pp. 927–940. [Google Scholar]
  30. Olszewski, M.T. Cadrans Solaires Sur Trois Mosaïques Byzantines Au Proche-Orient Et Quelques Autres Identifications Hypothétiques De Gnomons Géants (Pl. IX–XI). Archeologia 2009, 60, 69–79. [Google Scholar]
  31. Popova, V. Liturgy and Mosaics: The Case Study of The Late Antique Monuments From Bulgaria. Niš Byzantium 2018, 16, 135–160. [Google Scholar]
  32. Can, B. Geometric Mosaics from the Courtyard of the Great Bath at Antiochia ad Cragum in Western Rough Cilica. J. Mosaic Res. 2017, 10, 83–100. [Google Scholar] [CrossRef]
  33. Topalilov, I. On the Eirene Mosaic from Philippopolis, Thrace/Trakya, Philippopolis Eirene Mozaiği Üzerine. J. Mosaic Res. 2018, 11, 273–285. [Google Scholar] [CrossRef]
  34. Dunbabin, K.M.D. Mythology and Theatre in the Mosaics of the Graeco-Roman East. In Using Images in Late Antiquity; Stine Birk, S., Kristensen, T.M., Poulsen, B., Eds.; Oxbow Books: Barnsley, UK, 2014; pp. 227–252. [Google Scholar]
  35. Lakhnati, L.-A. La Figuration du Travail Manuel Dans le Diocèse d’Orient (IVe-VIe Siècles). Master’s Thesis, Universities de Strasbourg, Strasbourg, France, August 2018. [Google Scholar]
  36. Olszewski, M.T. The Orpheus Funerary Mosaic from Jerusalem in the Archaeological Museum at Istanbul. In Proceedings of the 11th International Colloquium on Ancient Mosaics, Bursa, Turkey, 16–20 October 2009; pp. 655–664. [Google Scholar]
  37. Plontke-Luning, A. Pitiunt and its mosaics. In Chersonesus Collection; Klyonina, E.Y., Ed.; Maksim: Sevastopol, Ukraine, 2006; Issue 15, pp. 181–190. [Google Scholar]
  38. Kalla, G. Date Palms, Deer/Gazelles and Birds in Ancient Mesopotamia and Early Byzantine Syria. A Christian Iconographic Scheme and its Sources in the Ancient Orient. In Across The Mediterranean—Along the Nile; Bács, T.A., Bollók, Á., Vida, T., Eds.; Archaeolingua Alapítvány: Budapest, Hungary, 2018; Volume 2, pp. 863–900. [Google Scholar]
  39. Popova, V. Fons Vitae in Late Antique monuments in Bulgaria. Stud. Acad. Šumenensia 2016, 3, 154–198. [Google Scholar]
  40. Andaloro, M.; Pogliani, P. The 6th Century Mosaic Floor of the Church of Küçük Tavşan Adası (Bodrum). In Proceedings of the 11th International Colloquium on Ancient Mosaics, Bursa, Turkey, 16–20 October 2009; pp. 769–778. [Google Scholar]
  41. Zavadskaya, I.A. Ornamental and Symbolic System of the Chersonesos Christian Crypts Paintings; Problems of Chronology and Genesis. Mater. Archaeol. Hist. Ethnogr. Tauria 2005, XI, 258–288. [Google Scholar]
Figure 1. External view of the Pitiunt temple complex.
Applsci 13 06210 g001
Figure 2. Pitiunt. DTM remains of the temple complex.
Applsci 13 06210 g002
Figure 3. Revised mosaic floor layout of Temple No. 2 with preserved mosaics. Reconstructed areas are shown with white transparent fill.
Applsci 13 06210 g003
Figure 4. Pitiunt. Temple No. 2. Reconstruction of the mosaic floor of the narthex.
Applsci 13 06210 g004
Figure 5. Pitiunt. Temple No. 2. Fragments of a perspective meander from the Pitsunda Archaeological Museum (photo by the authors, Glazov K.A.).
Applsci 13 06210 g005
Figure 6. A fragment of a full-size reproduction of the narthex mosaic from the Pitsunda Archaeological Museum (photo taken by the authors, Glazov K.A.) (a) and its reconstruction (b).
Applsci 13 06210 g006
Figure 7. Pitiunt, Temple Mosaic No. 2, “Fountain of Living Water”. (a) Full-size reproduction from the exposition of the Pitsunda Archaeological Museum (photo by the authors, Glazov K.A.) and (b) reconstruction.
Applsci 13 06210 g007
Figure 8. Pitiunt. Temple No. 2; the plate with the stag. (a) Full-sized reproduction from the exposition of the Archaeological Museum of Pitsunda (photo by the authors, Glazov K.A.) and (b) reconstruction of the panel.
Applsci 13 06210 g008
Figure 9. Pitiunt. Temple No. 2. Reconstruction of the mosaic of the platform.
Applsci 13 06210 g009
Figure 10. The panel with date palm: (a) photo of the reproduction from the exposition of the Pitsunda Archaeological Museum (photo by the authors, K.A. Glazov) and (b) its reconstruction.
Applsci 13 06210 g010
Figure 11. Pitiunt. Temple No 2. Reconstruction of the mosaic of the apse.
Applsci 13 06210 g011
Figure 12. Pitiunt. Version of the reconstruction of the mosaic floor of Temple No. 2.
Applsci 13 06210 g012
Figure 13. Volumetric visualization of the appearance of the mosaic floor of Temple No. 2 of Pitiunt, combined with the contours of the foundation.
Applsci 13 06210 g013
Disclaimer/Publisher’s Note: The statements, opinions and data contained in all publications are solely those of the individual author(s) and contributor(s) and not of MDPI and/or the editor(s). MDPI and/or the editor(s) disclaim responsibility for any injury to people or property resulting from any ideas, methods, instructions or products referred to in the content.

